Utilize o gerenciamento de servidores MCP ( Databricks ) para gerenciar servidores MCP.
Visualização
Este recurso está em Pré-visualização Pública.
Os servidores MCP gerenciados do Databricks são servidores prontos para uso que conectam seus agentes de AI a dados armazenados no Unity Catalog, índices de Pesquisa de AI do Databricks, Genie Spaces e funções personalizadas.
As permissões Unity Catalog são sempre aplicadas, portanto, agentes e usuários só podem acessar as ferramentas e os dados aos quais têm permissão. Para monitorar o uso do servidor MCP e o acesso ao servidor, juntamente com seus outros recursos AI , use o Unity AI Gateway.
Servidores gerenciáveis disponíveis
A Databricks fornece os seguintes servidores MCP que funcionam imediatamente após a instalação. Ao conectar-se aos servidores MCP de gerenciamento usando autenticação de usuário em nome de terceiros, inclua o escopo OAuth correspondente para cada servidor que seu aplicativo precisa acessar. Consulte Conectar clientes usando autenticação OAuth para obter instruções de configuração.
Servidor MCP | Padrão de URL | Escopo OAuth |
|---|---|---|
Genie One Faça perguntas sobre seus dados empresariais em linguagem natural. Genie One pesquisa em Genie Spaces e nos seus dados do Unity Catalog, e retorna uma resposta fundamentada com um link direto para a conversação na UI do Databricks. Somente leitura. O Genie é executado assincronamente. Chame a ferramenta |
|
|
Espaço Genie Consulte um único Genie Space para analisar dados estruturados usando linguagem natural. Somente leitura. Este servidor invoca o Genie como uma ferramenta, o que significa que a história não é passada para a API do Genie. Para preservar a história, use Genie em um sistema multiagente em vez disso. Ao usar este servidor, deve-se consultar os resultados de queries de longa duração. |
|
|
Pesquisa de IA Consultar Índices de Pesquisa de IA para encontrar documentos relevantes. O índice deve usar incorporações gerenciadas do Databricks. Pesquisa de IA era anteriormente conhecida como Pesquisa vetorial. O prefixo de URL legado |
|
|
Databricks SQL Execução SQL gerado AIpara criação de pipeline de dados com ferramentas de codificação AI , como Claude Code, Cursor e Codex. Ler e escrever. Ao usar este servidor, você precisará consultar periodicamente os resultados de consultas de longa duração. |
|
|
Unity Catalog funções Utilize as funçõesUnity Catalog para executar consultas SQL predefinidas. |
|
|
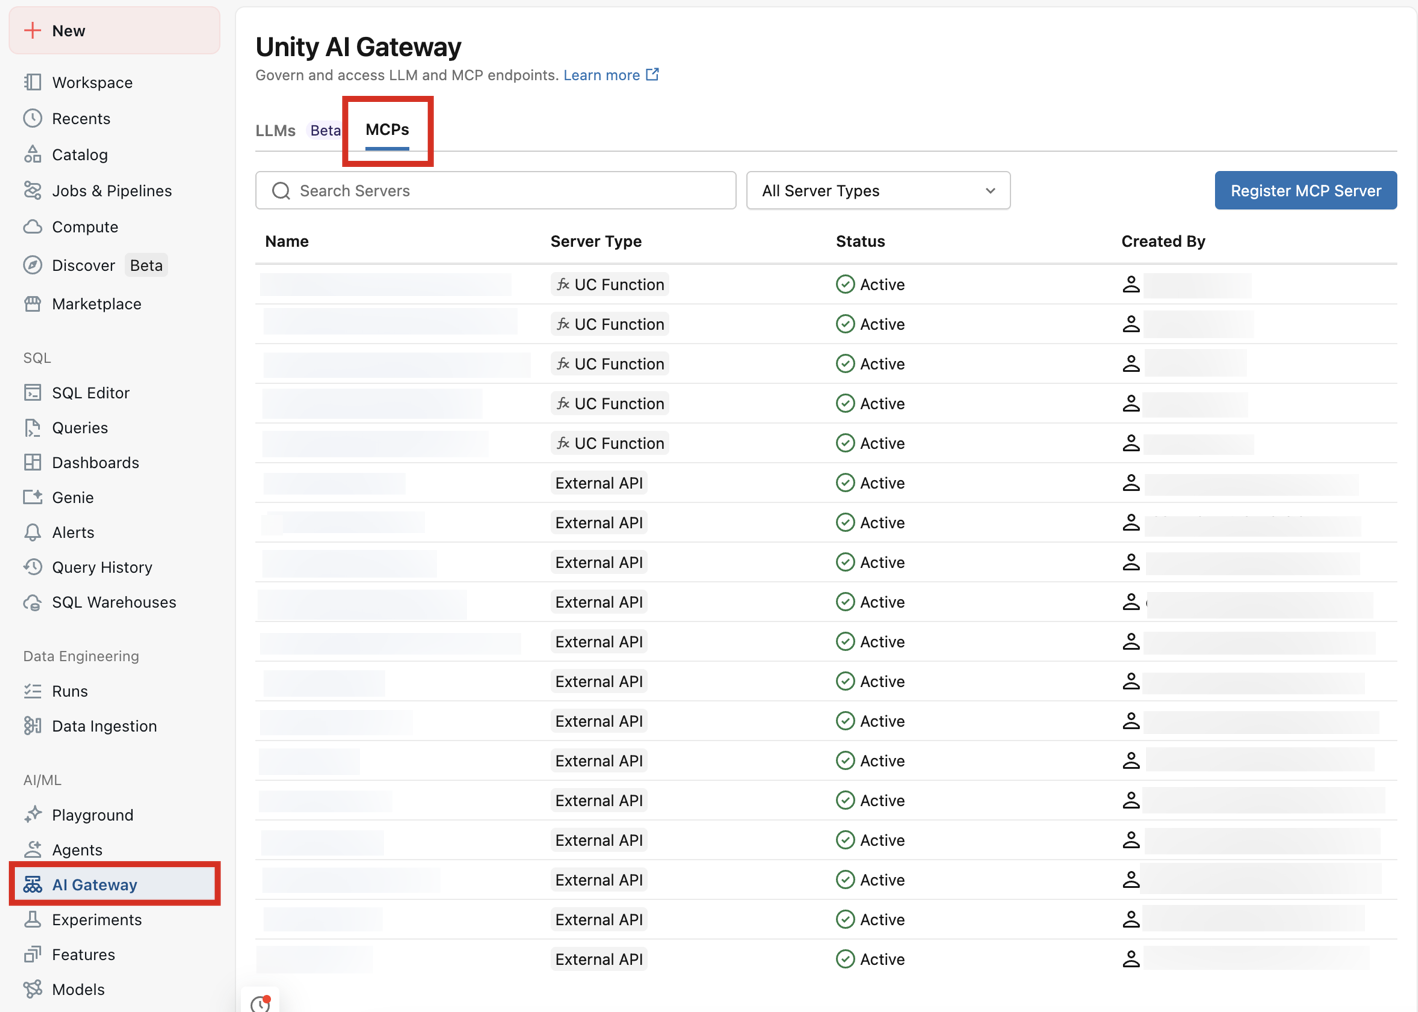
Para view seus servidores MCP e seus URLs endpoint , acesse seu workspace > AI Gateway > MCPs :
Cenário de exemplo
Considere um agente personalizado que auxilie no suporte ao cliente. Você pode conectá-lo a vários servidores MCP gerenciados:
-
Pesquisa de AI:
https://<workspace-hostname>/api/2.0/mcp/ai-search/prod/customer_support- Pesquisar tickets de suporte e documentação
-
Espaço Genie :
https://<workspace-hostname>/api/2.0/mcp/genie/{billing_space_id}- Consultar dados de faturação e informação de clientes
-
Funções de UC :
https://<workspace-hostname>/api/2.0/mcp/functions/prod/billing- executar funções personalizadas para pesquisas e atualizações account
Isso dá ao seu agente acesso a dados não estruturados (tickets de suporte), dados estruturados (tabelas de cobrança) e lógica de negócios personalizada.
Exemplo de Notebook: Crie um agente com servidores MCP Databricks
O Notebook a seguir mostra como criar agentes LangGraph e OpenAI que chamam ferramentas MCP usando servidores MCP Databricks .
Agente de chamada de ferramentas LangGraph MCP
Agente de chamada de ferramentas OpenAI MCP
Agente de chamada de ferramenta MCP do SDK de agentes
Crie um agente a partir de um ambiente local
Conectar-se a um servidor MCP no Databricks é semelhante a conectar-se a qualquer outro servidor MCP remoto. Você pode se conectar ao servidor usando SDKs padrão, como o MCP Python SDK. A principal diferença é que os servidores MCP Databricks são seguros por default e exigem que os clientes especifiquem autenticação.
A biblioteca Python databricks-mcp auxilia na simplificação da autenticação em código de agente personalizado.
A maneira mais simples de desenvolver código de agente é executá-lo localmente e autenticar em seu workspace. Siga estes passos para criar um agente AI que se conecta a um servidor MCP Databricks .
Configure seu ambiente
-
Use OAuth para autenticar seu workspace. execute o seguinte comando em um terminal local:
Bashdatabricks auth login --host https://<your-workspace-hostname> -
Quando solicitado, insira um nome de perfil e anote-o para uso posterior. O nome de perfil default é default.
-
Certifique-se de que possui um ambiente local com o Python 3.12 ou superior e, em seguida, instale as dependências:
Bashpip install -U "mcp>=1.9" "databricks-sdk[openai]" "mlflow>=3.1.0" "databricks-agents>=1.0.0" "databricks-mcp"
Teste sua conexão com o ambiente local
computesem servidor deve estar habilitado em seu workspace para executar este snippet.
Valide sua conexão com o servidor MCP listando suas ferramentas do Unity Catalog e executando a ferramenta de interpretação de código Python integrada.
- execute o seguinte código para validar sua conexão com o servidor MCP:
from databricks_mcp import DatabricksMCPClient
from databricks.sdk import WorkspaceClient

# TODO: Update to the Databricks CLI profile name you specified when
# configuring authentication to the workspace.
databricks_cli_profile = "YOUR_DATABRICKS_CLI_PROFILE"
assert (
    databricks_cli_profile != "YOUR_DATABRICKS_CLI_PROFILE"
), "Set databricks_cli_profile to the Databricks CLI profile name you specified when configuring authentication to the workspace"
workspace_client = WorkspaceClient(profile=databricks_cli_profile)
workspace_hostname = workspace_client.config.host
mcp_server_url = f"{workspace_hostname}/api/2.0/mcp/functions/system/ai"

# This code uses the Unity Catalog functions MCP server to expose built-in
# AI tools under `system.ai`, like the `system.ai.python_exec` code interpreter tool
def test_connect_to_server():
    mcp_client = DatabricksMCPClient(server_url=mcp_server_url, workspace_client=workspace_client)
    tools = mcp_client.list_tools()

    print(
        f"Discovered tools {[t.name for t in tools]} "
        f"from MCP server {mcp_server_url}"
    )

    result = mcp_client.call_tool(
        "system__ai__python_exec", {"code": "print('Hello, world!')"}
    )
    print(
        f"Called system__ai__python_exec tool and got result "
        f"{result.content}"
    )


if __name__ == "__main__":
    test_connect_to_server()
Crie seu agente
-
Desenvolva o código acima para definir um agente básico de turno único que usa ferramentas. Salve o código do agente localmente como um arquivo chamado
mcp_agent.py:Pythonimport json
import uuid
import asyncio
from typing import Any, Callable, List
from pydantic import BaseModel
import mlflow
from mlflow.pyfunc import ResponsesAgent
from mlflow.types.responses import ResponsesAgentRequest, ResponsesAgentResponse
from databricks_mcp import DatabricksMCPClient
from databricks.sdk import WorkspaceClient
from databricks_openai import DatabricksOpenAI
# 1) CONFIGURE YOUR ENDPOINTS/PROFILE
LLM_ENDPOINT_NAME = "databricks-claude-sonnet-4-5"
SYSTEM_PROMPT = "You are a helpful assistant."
DATABRICKS_CLI_PROFILE = "YOUR_DATABRICKS_CLI_PROFILE"
assert (
DATABRICKS_CLI_PROFILE != "YOUR_DATABRICKS_CLI_PROFILE"
), "Set DATABRICKS_CLI_PROFILE to the Databricks CLI profile name you specified when configuring authentication to the workspace"
workspace_client = WorkspaceClient(profile=DATABRICKS_CLI_PROFILE)
host = workspace_client.config.host
# Add more MCP server URLs here if desired, for example:
# f"{host}/api/2.0/mcp/ai-search/prod/billing"
# to include AI Search indexes under the prod.billing schema, or
# f"{host}/api/2.0/mcp/genie/<genie_space_id>"
# to include a Genie Space
MANAGED_MCP_SERVER_URLS = [
f"{host}/api/2.0/mcp/functions/system/ai",
]
# Add Custom MCP Servers hosted on Databricks Apps
CUSTOM_MCP_SERVER_URLS = []
# 2) HELPER: convert between ResponsesAgent “message dict” and ChatCompletions format
def _to_chat_messages(msg: dict[str, Any]) -> List[dict]:
"""
Take a single ResponsesAgent‐style dict and turn it into one or more
ChatCompletions‐compatible dict entries.
"""
msg_type = msg.get("type")
if msg_type == "function_call":
return [
{
"role": "assistant",
"content": None,
"tool_calls": [
{
"id": msg["call_id"],
"type": "function",
"function": {
"name": msg["name"],
"arguments": msg["arguments"],
},
}
],
}
]
elif msg_type == "message" and isinstance(msg["content"], list):
return [
{
"role": "assistant" if msg["role"] == "assistant" else msg["role"],
"content": content["text"],
}
for content in msg["content"]
]
elif msg_type == "function_call_output":
return [
{
"role": "tool",
"content": msg["output"],
"tool_call_id": msg["tool_call_id"],
}
]
else:
# fallback for plain {"role": ..., "content": "..."} or similar
return [
{
k: v
for k, v in msg.items()
if k in ("role", "content", "name", "tool_calls", "tool_call_id")
}
]
# 3) “MCP SESSION” + TOOL‐INVOCATION LOGIC
def _make_exec_fn(
server_url: str, tool_name: str, ws: WorkspaceClient
) -> Callable[..., str]:
def exec_fn(**kwargs):
mcp_client = DatabricksMCPClient(server_url=server_url, workspace_client=ws)
response = mcp_client.call_tool(tool_name, kwargs)
return "".join([c.text for c in response.content])
return exec_fn
class ToolInfo(BaseModel):
name: str
spec: dict
exec_fn: Callable
def _fetch_tool_infos(ws: WorkspaceClient, server_url: str) -> List[ToolInfo]:
print(f"Listing tools from MCP server {server_url}")
infos: List[ToolInfo] = []
mcp_client = DatabricksMCPClient(server_url=server_url, workspace_client=ws)
mcp_tools = mcp_client.list_tools()
for t in mcp_tools:
schema = t.inputSchema.copy()
if "properties" not in schema:
schema["properties"] = {}
spec = {
"type": "function",
"function": {
"name": t.name,
"description": t.description,
"parameters": schema,
},
}
infos.append(
ToolInfo(
name=t.name, spec=spec, exec_fn=_make_exec_fn(server_url, t.name, ws)
)
)
return infos
# 4) "SINGLE‐TURN" AGENT CLASS
class SingleTurnMCPAgent(ResponsesAgent):
def _call_llm(self, history: List[dict], ws: WorkspaceClient, tool_infos):
"""
Send current history → LLM, returning the raw response dict.
"""
client = DatabricksOpenAI()
flat_msgs = []
for msg in history:
flat_msgs.extend(_to_chat_messages(msg))
return client.chat.completions.create(
model=LLM_ENDPOINT_NAME,
messages=flat_msgs,
tools=[ti.spec for ti in tool_infos],
)
def predict(self, request: ResponsesAgentRequest) -> ResponsesAgentResponse:
ws = WorkspaceClient(profile=DATABRICKS_CLI_PROFILE)
# 1) build initial history: system + user
history: List[dict] = [{"role": "system", "content": SYSTEM_PROMPT}]
for inp in request.input:
history.append(inp.model_dump())
# 2) call LLM once
tool_infos = [
tool_info
for mcp_server_url in (MANAGED_MCP_SERVER_URLS + CUSTOM_MCP_SERVER_URLS)
for tool_info in _fetch_tool_infos(ws, mcp_server_url)
]
tools_dict = {tool_info.name: tool_info for tool_info in tool_infos}
llm_resp = self._call_llm(history, ws, tool_infos)
raw_choice = llm_resp.choices[0].message.to_dict()
raw_choice["id"] = uuid.uuid4().hex
history.append(raw_choice)
tool_calls = raw_choice.get("tool_calls") or []
if tool_calls:
# (we only support a single tool in this “single‐turn” example)
fc = tool_calls[0]
name = fc["function"]["name"]
args = json.loads(fc["function"]["arguments"])
try:
tool_info = tools_dict[name]
result = tool_info.exec_fn(**args)
except Exception as e:
result = f"Error invoking {name}: {e}"
# 4) append the “tool” output
history.append(
{
"type": "function_call_output",
"role": "tool",
"id": uuid.uuid4().hex,
"tool_call_id": fc["id"],
"output": result,
}
)
# 5) call LLM a second time and treat that reply as final
followup = (
self._call_llm(history, ws, tool_infos=[]).choices[0].message.to_dict()
)
followup["id"] = uuid.uuid4().hex
assistant_text = followup.get("content", "")
return ResponsesAgentResponse(
output=[
{
"id": uuid.uuid4().hex,
"type": "message",
"role": "assistant",
"content": [{"type": "output_text", "text": assistant_text}],
}
],
custom_outputs=request.custom_inputs,
)
# 6) if no tool_calls at all, return the assistant’s original reply
assistant_text = raw_choice.get("content", "")
return ResponsesAgentResponse(
output=[
{
"id": uuid.uuid4().hex,
"type": "message",
"role": "assistant",
"content": [{"type": "output_text", "text": assistant_text}],
}
],
custom_outputs=request.custom_inputs,
)
mlflow.models.set_model(SingleTurnMCPAgent())
if __name__ == "__main__":
req = ResponsesAgentRequest(
input=[{"role": "user", "content": "What's the 100th Fibonacci number?"}]
)
resp = SingleTurnMCPAgent().predict(req)
for item in resp.output:
print(item)
implantado seu agente
Quando você estiver pronto para implantar um agente que se conecta a servidores gerenciais MCP, consulte implantar um agente para aplicações AI generativa (servindo modelo).
Especifique todos os recursos que seu agente precisa no momento do registro. Veja Autenticação para recurso Databricks
Por exemplo, se seu agente usar os URLs de servidor MCP listados abaixo, você deverá especificar todos os índices do AI Search nos esquemas prod.customer_support e prod.billing. Todas as funções do Unity Catalog também devem ser especificadas em prod.billing:
https://<your-workspace-hostname>/api/2.0/mcp/ai-search/prod/customer_supporthttps://<your-workspace-hostname>/api/2.0/mcp/ai-search/prod/billinghttps://<your-workspace-hostname>/api/2.0/mcp/functions/prod/billing
Se o seu agente se conectar aos servidores MCP no Databricks para descobrir e executar ferramentas, log o recurso necessário para esses servidores MCP com seu agente. A Databricks recomenda instalar o pacote PyPI databricks-mcp para simplificar esse processo.
Em particular, se você usar servidores gerenciar MCP, você pode usar databricks_mcp.DatabricksMCPClient().get_databricks_resources(<server_url>) para recuperar o recurso necessário para o servidor gerenciar MCP. Se o seu agente consultar um servidor MCP personalizado hospedado em um aplicativo Databricks, você poderá configurar a autorização incluindo explicitamente o servidor como um recurso ao registrar seu modelo.
Por exemplo, para implementar o agente definido acima, execute o seguinte código, supondo que você salvou a definição do código do agente em mcp_agent.py:
import os
from databricks.sdk import WorkspaceClient
from databricks import agents
import mlflow
from mlflow.models.resources import DatabricksFunction, DatabricksServingEndpoint, DatabricksVectorSearchIndex
from mcp_agent import LLM_ENDPOINT_NAME
from databricks_mcp import DatabricksMCPClient

# TODO: Update this to your Databricks CLI profile name
databricks_cli_profile = "YOUR_DATABRICKS_CLI_PROFILE"
assert (
    databricks_cli_profile != "YOUR_DATABRICKS_CLI_PROFILE"
), "Set databricks_cli_profile to the Databricks CLI profile name you specified when configuring authentication to the workspace"
workspace_client = WorkspaceClient(profile=databricks_cli_profile)


# Configure MLflow and the Databricks SDK to use your Databricks CLI profile
current_user = workspace_client.current_user.me().user_name
mlflow.set_tracking_uri(f"databricks://{databricks_cli_profile}")
mlflow.set_registry_uri(f"databricks-uc://{databricks_cli_profile}")
mlflow.set_experiment(f"/Users/{current_user}/databricks_docs_example_mcp_agent")
os.environ["DATABRICKS_CONFIG_PROFILE"] = databricks_cli_profile

MANAGED_MCP_SERVER_URLS = [
    f"{host}/api/2.0/mcp/functions/system/ai",
]
# Log the agent defined in mcp_agent.py
here = os.path.dirname(os.path.abspath(__file__))
agent_script = os.path.join(here, "mcp_agent.py")
resources = [
    DatabricksServingEndpoint(endpoint_name=LLM_ENDPOINT_NAME),
    DatabricksFunction("system.ai.python_exec"),
    # --- Uncomment and edit the following lines to include custom mcp servers hosted on Databricks Apps ---
    # DatabricksApp(app_name="app-name")
]

for mcp_server_url in MANAGED_MCP_SERVER_URLS:
    mcp_client = DatabricksMCPClient(server_url=mcp_server_url, workspace_client=workspace_client)
    resources.extend(mcp_client.get_databricks_resources())

with mlflow.start_run():
    logged_model_info = mlflow.pyfunc.log_model(
        artifact_path="mcp_agent",
        python_model=agent_script,
        resources=resources,
    )

# TODO Specify your UC model name here
UC_MODEL_NAME = "main.default.databricks_docs_mcp_agent"
registered_model = mlflow.register_model(logged_model_info.model_uri, UC_MODEL_NAME)

agents.deploy(
    model_name=UC_MODEL_NAME,
    model_version=registered_model.version,
)
Recursos adicionais
- Conecte clientes a plataformas Databricks MCP, como Cursor e Claude Desktop.
- Metaparâmetros para Databricks gerenciar servidores MCP