本番運用で GenAI アプリを監視する
ベータ版
この機能はベータ版です。ワークスペース管理者は、 プレビュー ページからこの機能へのアクセスを制御できます。「Databricks プレビューの管理」を参照してください。
本番運用モニタリングを使用すると、GenAI アプリからのトレースに対してMLflow 3 スコアラーを自動的に実行して、品質を継続的に評価できます。 MLflowエクスペリメントに対してスコアラーをスケジュールすると、モニタリング サービスが受信トレースの構成可能なサンプルを評価します。 結果は、評価対象となった各トレースへのフィードバックとして添付されます。
本番運用モニタリングには次の内容が含まれます。
- 会話全体を評価するためのマルチターン審査員を含む、組み込みまたはカスタムのスコアラーを使用した自動品質評価。
- サンプリング レートを設定できるため、カバレッジと計算コストのトレードオフを制御できます。
- 一貫した評価を確保するために、開発と本番運用で同じスコアラーを使用します。
- バックグラウンドで実行されるモニタリングによる継続的な品質評価。
MLflow 3 本番運用 モニタリングは、 MLflow 2 からログに記録されたトレースと互換性があります。
前提 条件
本番運用モニタリングを設定する前に、次のことを確認してください。
-
MLflowエクスペリメント : トレースが記録されるMLflowエクスペリメント。 エクスペリメントが指定されていない場合は、アクティブなエクスペリメントが使用されます。
-
インストルメント化された本番運用アプリケーション : GenAI アプリは、 MLflow Tracingを使用してトレースを記録する必要があります。 本番運用トレース ガイドを参照してください。
-
定義済みのスコアラー : アプリケーションのトレースの形式で動作するテスト済みのスコアラー。開発中に本番運用アプリを
mlflow.genai.evaluate()のpredict_fnとして使用した場合、スコアラーは既に互換性がある可能性があります。 -
サーバレス予算ポリシー :ワークスペースでデフォルトのサーバレス予算ポリシーが許可されていない場合は、スコアラーを登録する前にMLflowエクスペリメントでポリシーを設定してください。MLflowエクスペリメントのサーバレス予算ポリシーを構成するを参照してください。
-
SQLウェアハウス ID ( Unity Catalogトレース用) : トレースがUnity Catalogに保存されている場合、モニタリングが機能するようにSQLウェアハウス ID を構成する必要があります。 「本番運用モニタリングの有効化」を参照してください。
さあ始めましょう
本番運用モニタリングを設定するには、 MLflowエクスペリメントでスコアラーを登録し、サンプリング構成で開始します。 この2段階のパターン( .register()次に.start() )は、すべてのスコアラータイプに適用されます。
いつでも、最大20個のスコアラーをエクスペリメントに関連付けて、継続的な品質モニタリングを行うことができます。
スコアラーの詳細については、以下を参照してください。
以下のセクションでは、さまざまな種類の裁判官の使い方と、それらを組み合わせる方法について説明します。詳細を表示するには、セクションを展開してください。
UIを使用してLLM審査員を作成およびスケジュール設定する
UI を使用して LLM 審査員を作成し、スケジュールを設定します
MLflow拡張機能のUIを使用すると、 LLM審査員に基づいたスコアラーを作成およびテストできます。
新しいLLM裁判官を作成するには:
-
MLflowエクスペリメント UI の [Judges] タブに移動します。

-
「新しいLLM判事」 をクリックしてください。
-
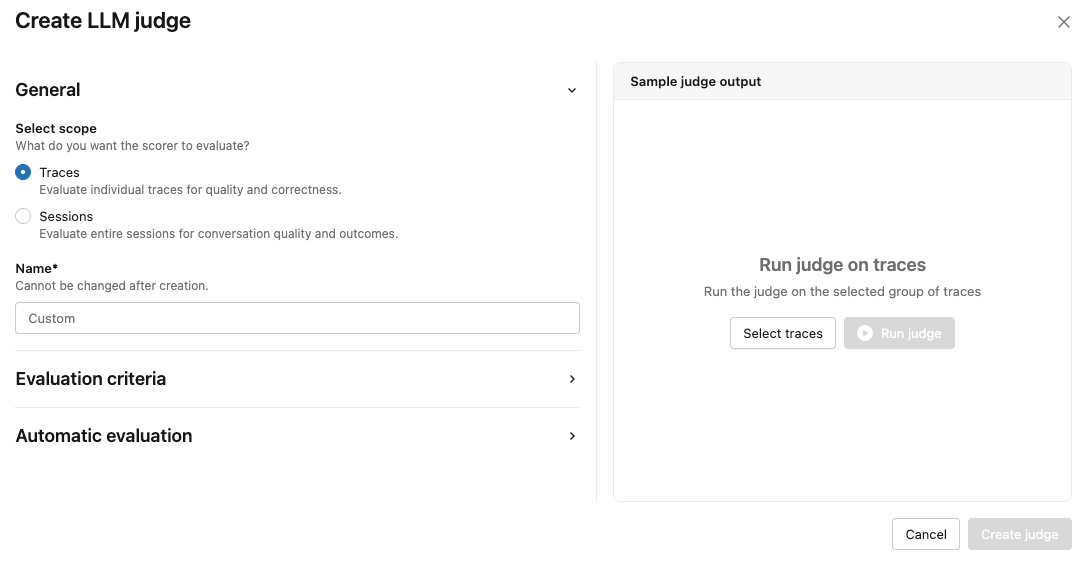
スコアラーが評価する内容を指定するには、 「トレース」 または 「セッション」 を選択してください。
-
裁判官の名前を入力してください。
-
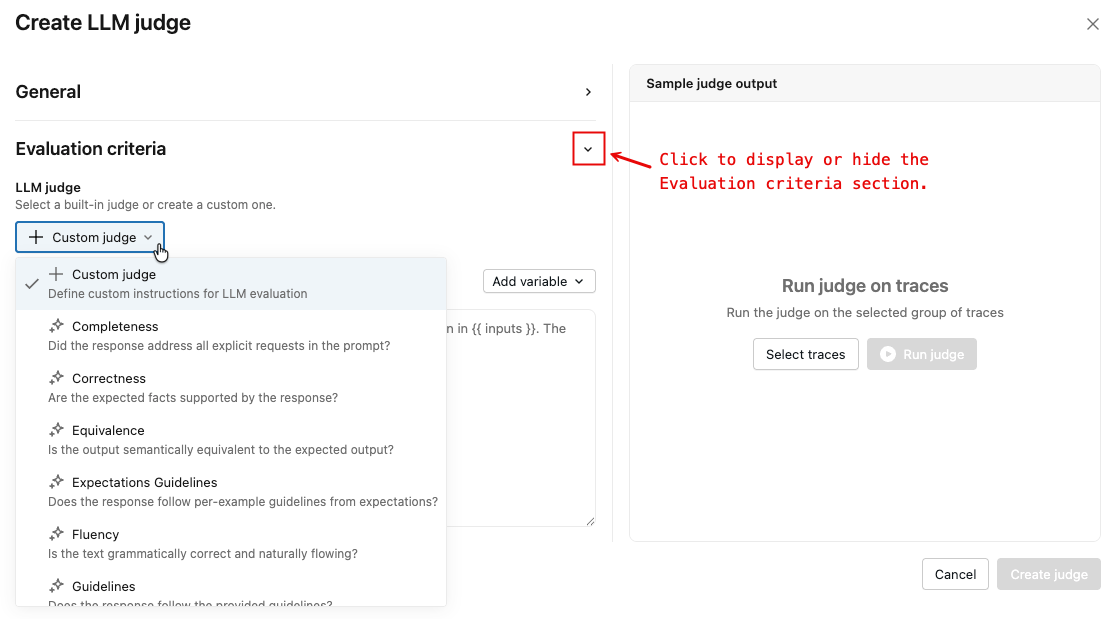
図のように矢印をクリックすると、 評価基準の セクションが表示されます。
-
ドロップダウンメニューから、審査員の種類を選択してください。一部の裁判官タイプでは、変数を含むカスタム指示を入力できます。
-
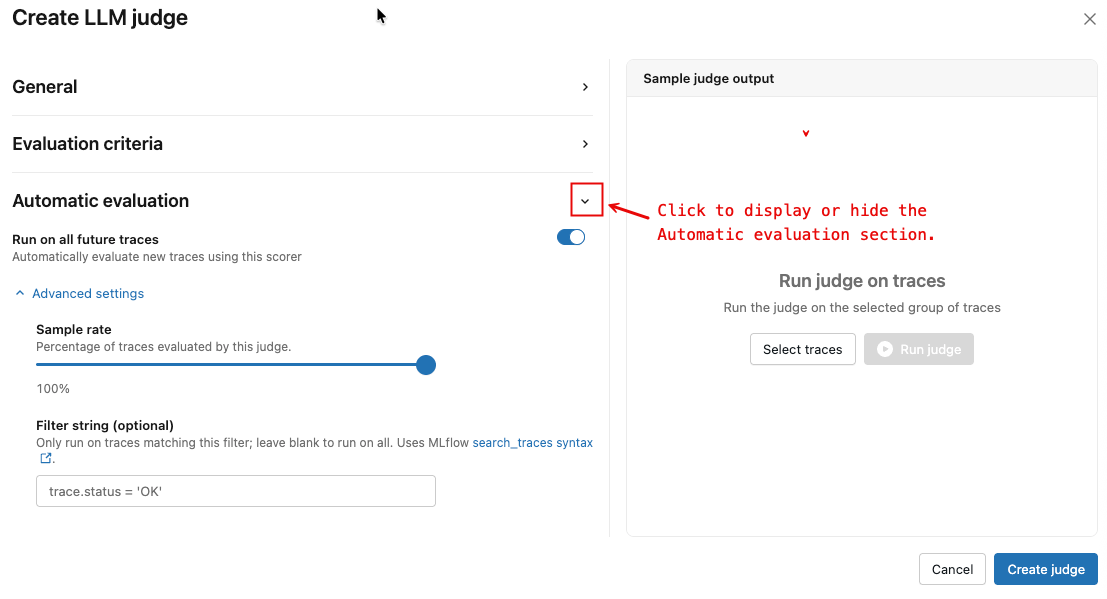
図のように矢印をクリックすると、 自動評価 セクションが表示されます。
-
必要に応じて、 「今後のすべてのトレースで実行」 のトグルを設定してください。
-
(オプション) 詳細設定 で、 サンプルレート と フィルタ文字列 を調整して、評価するトレースを制御します。
-
(オプション)既存のトレースセットで新しいジャッジをテストするには:
- 左側のペインで 「トレースを選択」 をクリックします。ポップアップが表示されます。
- 実行するトレースを選択し、 「選択(n)」 をクリックします。
- 「審査員を実行」 をクリックしてください。トレースが評価され、結果が表示されます。
- 結果を確認してください。選択した各トレースの結果を順に表示するには、 「次へ 」ボタンと 「前へ」 ボタンを使用します。
- 必要に応じて、審査員の描写を編集し、審査員のパフォーマンスに満足できるまで繰り返し調整してください。
-
裁判官を作成するには、 「裁判官を作成」を クリックします。
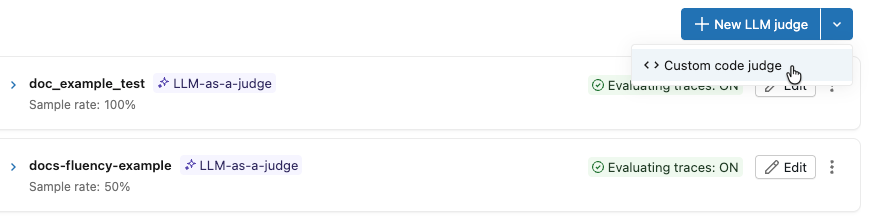
UIを使用してカスタムコードジャッジを作成することはできません。ノートブックにコピーして必要に応じて編集できるテンプレートコードを表示するには、次の手順を実行してください。
-
「新しい LLM ジャッジ」 ボタンの横にあるドロップダウン矢印をクリックし、 「カスタムコードジャッジ」 を選択します。
-
カスタムコードジャッジの定義方法と実行方法を示す手順とテンプレートコードが表示されたポップアップが表示されます。
組み込みのLLMジャッジを使用する
組み込みのLLMジャッジを使用する
MLflowには、すぐに使える組み込みのLLMジャッジがいくつか用意されています。
from mlflow.genai.scorers import Safety, ScorerSamplingConfig

# Register the scorer with a name and start monitoring
safety_judge = Safety().register(name="my_safety_judge")  # name must be unique to experiment
safety_judge = safety_judge.start(sampling_config=ScorerSamplingConfig(sample_rate=0.7))
デフォルトでは、各ジャッジは GenAI 品質評価を実行するために設計された Databricks ホスト LLM を使用します。スコアラー定義でmodel引数を使用すると、代わりにDatabricksモデルサービング エンドポイントを使用するように判定モデルを変更できます。 モデルはdatabricks:/<databricks-serving-endpoint-name>形式で指定する必要があります。
safety_judge = Safety(model="databricks:/databricks-gpt-oss-20b").register(name="my_custom_safety_judge")
使用ガイドライン LLM審査員
使用ガイドライン LLMジャッジ
ガイドライン LLM 審査員は、合格/不合格の自然言語基準を使用して入力と出力を評価します。
from mlflow.genai.scorers import Guidelines

# Create and register the guidelines scorer
english_judge = Guidelines(
  name="english",
  guidelines=["The response must be in English"]
).register(name="is_english")  # name must be unique to experiment

# Start monitoring with the specified sample rate
english_judge = english_judge.start(sampling_config=ScorerSamplingConfig(sample_rate=0.7))
組み込みジャッジと同様に、代わりにDatabricksモデルサービング エンドポイントを使用するようにジャッジ モデルを変更できます。
english_judge = Guidelines(
  name="english",
  guidelines=["The response must be in English"],
  model="databricks:/databricks-gpt-oss-20b",
).register(name="custom_is_english")
カスタムプロンプトを使用してLLMジャッジを使用する
カスタムプロンプトでLLMジャッジを使用する
ガイドライン審査員よりも柔軟性を高めるには、カスタマイズ可能な選択カテゴリを使用して複数レベルの品質評価を可能にするカスタム プロンプトを備えた LLM 審査員を使用します。
from typing import Literal
from mlflow.genai import make_judge
from mlflow.genai.scorers import ScorerSamplingConfig

# Create a custom judge using make_judge
formality_judge = make_judge(
    name="formality",
    instructions="""You will look at the response and determine the formality of the response.

Request: {{ inputs }}
Response: {{ outputs }}

Evaluate whether the response is formal, somewhat formal, or not formal.
A response is somewhat formal if it mentions friendship, etc.""",
    feedback_value_type=Literal["formal", "semi_formal", "not_formal"],
    model="databricks:/databricks-gpt-oss-20b",  # optional
)

# Register the custom judge and start monitoring
registered_judge = formality_judge.register(name="my_formality_judge")  # name must be unique to experiment
registered_judge = registered_judge.start(sampling_config=ScorerSamplingConfig(sample_rate=0.1))
カスタムスコアラー関数を使用する
カスタムスコアラー関数を使用する
柔軟性を最大限に高めるには、カスタム スコアラー関数を定義して使用します。
:::重要 本番運用モニタリングのカスタム スコアラー要件
@scorerデコレータベースのスコアラーのみがサポートされています。 クラスベースのScorerサブクラスは本番運用モニタリングに登録できません。 クラスベースのスコアラーが必要な場合は、代わりに@scorerデコレータを使用するようにリファクタリングしてください。- スコアラーは、Databricks ノートブックから定義および登録する必要があります。 モニタリング サービスは、スコアラー関数のコードをリモート実行用にシリアル化します。このシリアル化にはノートブック環境が必要です。 スタンドアロンのPythonファイルまたはローカル IDE 環境で定義されたスコアラーは、本番運用モニタリング用にシリアル化できません。
- 採点者は自己完結的である必要があります。 スコアラー関数はリモート実行用のコードとしてシリアル化されるため、すべてのインポートは関数本体内でインラインで実行する必要があります。関数は、その外部で定義された変数、オブジェクト、またはモジュールを参照できません。
:::
カスタム スコアラーを定義するときは、関数シグネチャにインポートする必要がある型ヒントを使用しないでください。スコアラー関数本体でインポートが必要なパッケージを使用する場合は、適切なシリアル化を確保するために、これらのパッケージを関数内にインラインでインポートします。
一部のパッケージは、インラインインポートを必要とせずにデフォルトで使用できます。これには、 databricks-agents、 mlflow-skinny、 openai、 およびサーバレス環境バージョン 2 に含まれるすべてのパッケージが含まれます。
from mlflow.genai.scorers import scorer, ScorerSamplingConfig


# Custom metric: Check if response mentions Databricks
@scorer
def mentions_databricks(outputs):
    """Check if the response mentions Databricks"""
    return "databricks" in str(outputs.get("response", "")).lower()

# Register and start monitoring
databricks_scorer = mentions_databricks.register(name="databricks_mentions")
databricks_scorer = databricks_scorer.start(sampling_config=ScorerSamplingConfig(sample_rate=0.5))
カスタムスコアラーのその他の例については、 「コードベースのスコアラー」を参照してください。
複数ターン制の審判員を使用する
マルチターンジャッジを使用する
本番運用モニタリングは、個々のトレースではなく会話全体を評価するマルチターン ジャッジをサポートします。 これらの審査員は、ユーザーの不満度や会話の完了度など、複数のやり取りにおける品質パターンを評価します。複数回審査員の登録および開始方法は、単回審査員と同じです。
モニタリングジョブは、mlflow.trace.session タグに基づいてトレースを会話に自動的にグループ化します。会話が完了したと見なされた後に、マルチターン判定が実行されます。デフォルトでは、そのセッション ID を持つ新しいトレースが 5分間 取り込まれない場合、会話は完了します。このバッファを構成するには、モニタリングジョブで MLFLOW_ONLINE_SCORING_DEFAULT_SESSION_COMPLETION_BUFFER_SECONDS 環境変数を設定します。
利用可能なマルチターン ジャッジの完全なリストについては、 「マルチターン ジャッジ」を参照してください。会話の評価の詳細については、 「会話を評価する」を参照してください。
To use multi-turn judges, your agent must set session IDs on traces. See Track users and sessions for details.
from mlflow.genai.scorers import (
    ConversationCompleteness,
    UserFrustration,
    ScorerSamplingConfig,
)

# Register and start multi-turn judges just like single-turn judges
completeness_scorer = ConversationCompleteness().register(name="conversation_completeness")
completeness_scorer = completeness_scorer.start(
    sampling_config=ScorerSamplingConfig(sample_rate=1.0),
)

frustration_scorer = UserFrustration().register(name="user_frustration")
frustration_scorer = frustration_scorer.start(
    sampling_config=ScorerSamplingConfig(sample_rate=1.0),
)
合同審査員
合同審査員
同じ拡張メントで、シングルターンの審判とマルチターンの審判を組み合わせることができます。 登録して各スコアラーを個別に起動します。
from mlflow.genai.scorers import Safety, Guidelines, UserFrustration, ScorerSamplingConfig

# Single-turn judges
safety_judge = Safety().register(name="safety")
safety_judge = safety_judge.start(sampling_config=ScorerSamplingConfig(sample_rate=1.0))

english_judge = Guidelines(
    name="english",
    guidelines=["The response must be in English"]
).register(name="is_english")
english_judge = english_judge.start(sampling_config=ScorerSamplingConfig(sample_rate=0.5))

# Multi-turn judge
frustration_judge = UserFrustration().register(name="frustration")
frustration_judge = frustration_judge.start(sampling_config=ScorerSamplingConfig(sample_rate=0.3))
結果を見る
スコアラーをスケジュールした後、初期処理に15〜20分かかります。そうしたら:
- MLflowエクスペリメントに移動します。
- トレース タブを開いて、トレースに添付された評価を確認します。
- モニタリングダッシュボードを使用して、品質の傾向を追跡します。
複数ターンの審査員の場合、評価は各セッションの最初のトレースに添付されます。詳細については、 「評価の保存方法」を参照してください。
おすすめの方法
サンプリング戦略
-
安全性やセキュリティのチェックなどの重要なスコアラーには、
sample_rate=1.0使用します。 -
複雑な LLM ジャッジなどの高価なスコアラーの場合は、より低いサンプル レート (0.05 ~ 0.2) を使用します。
-
開発中の反復的な改善には、中程度のレート (0.3 ~ 0.5) を使用します。
-
次の例に示すように、カバレッジとコストのバランスをとってください。
Python# High-priority scorers: higher sampling
safety_judge = Safety().register(name="safety")
safety_judge = safety_judge.start(sampling_config=ScorerSamplingConfig(sample_rate=1.0)) # 100% coverage for critical safety
# Expensive scorers: lower sampling
complex_scorer = ComplexCustomScorer().register(name="complex_analysis")
complex_scorer = complex_scorer.start(sampling_config=ScorerSamplingConfig(sample_rate=0.05)) # 5% for expensive operations
トレースをフィルタリング
ScorerSamplingConfigのfilter_string問題を使用して、スコアラーがどのトレースを評価するかを制御します。 これはmlflow.search_traces()と同じフィルタ構文を使用します。
from mlflow.genai.scorers import Safety, ScorerSamplingConfig

# Only evaluate traces that completed successfully
safety_judge = Safety().register(name="safety")
safety_judge = safety_judge.start(
    sampling_config=ScorerSamplingConfig(
        sample_rate=1.0,
        filter_string="attributes.status = 'OK'"
    ),
)
複数の条件を組み合わせることができます。
import time

# Evaluate successful traces from the last 24 hours
one_day_ago = int((time.time() - 86400) * 1000)
safety_judge = safety_judge.start(
    sampling_config=ScorerSamplingConfig(
        sample_rate=0.5,
        filter_string=f"attributes.status = 'OK' AND attributes.timestamp_ms > {one_day_ago}"
    ),
)
カスタムスコアラーのデザイン
次の例に示すように、カスタムスコアラーを自己完結型のままにします。
@scorer
def well_designed_scorer(inputs, outputs):
    # All imports inside the function
    import re
    import json

    # Handle missing data gracefully
    response = outputs.get("response", "")
    if not response:
        return 0.0

    # Return consistent types
    return float(len(response) > 100)
トラブルシューティング
スコアラーが実行されない
スコアラーが実行されていない場合は、次の点を確認してください。
- エクスペリメントのチェック : トレースが個々の実行ではなくエクスペリメントに記録されていることを確認します。
- サンプリング レート : サンプリング レートが低い場合、結果が表示されるまでに時間がかかることがあります。
- フィルター文字列を確認してください :
filter_stringが実際のトレースと一致していることを確認してください。
シリアル化の問題
本番運用モニタリングのカスタム スコアラーはシリアル化されているため、モニタリング サービスによってリモートで実行できます。 これにはいくつかの制約が課せられます。
- ノートブックの要件 : カスタム
@scorer関数を定義し、 Databricksノートブックから登録する必要があります。 シリアル化メカニズムはノートブック環境に依存します。 - 自己完結型関数 : すべてのインポートは関数本体内にインラインで記述する必要があります。関数外で定義された外部変数、モジュール、またはオブジェクトへの参照は、シリアル化中にキャプチャされません。
- クラスベースのスコアラーはありません 。登録できるのは
@scorerのデコレータベースのスコアラーのみです。クラスベースのScorerサブクラスは、リモート実行用にシリアル化できません。 - インポートを必要とする型ヒントがありません : 関数シグネチャ内にインポート ステートメントを必要とする型ヒント (たとえば、
Listfromtyping) があると、シリアル化が失敗します。
カスタムスコアラーを作成するときは、関数定義にインポートを含めます。
# Avoid external dependencies
import external_library  # Outside function

@scorer
def bad_scorer(outputs):
    return external_library.process(outputs)

# Include imports in the function definition
@scorer
def good_scorer(outputs):
    import json  # Inside function
    return len(json.dumps(outputs))

# Avoid using type hints in scorer function signature that requires imports
from typing import List

@scorer
def scorer_with_bad_types(outputs: List[str]):
    return False

# Class-based scorers are not supported for production monitoring
class MyScorer(Scorer):
    name: str = "my_scorer"
    def __call__(self, outputs):
        return len(outputs) > 10
その他のリソース
- 本番運用スコアラーの管理- 本番運用スコアラーのライフサイクルを管理します。
- 過去のトレースにスコアラーを遡及的に適用する- 過去のトレースにスコアラーを遡及的に適用します。
- トレースをDeltaテーブルにアーカイブする- トレースと評価をDeltaテーブルに保存します。
- コードベースのスコアラー- ニーズに合わせてカスタマイズされたスコアラーを構築します。
- 会話を評価する- マルチターンの会話評価とマルチターンの審査員について学びます。
- MLflow評価データセットの構築- モニタリング結果を活用して品質を向上させる。
リファレンスガイド
- スコアラーライフサイクル管理APIリファレンス- スコアラーライフサイクル管理のためのAPIリファレンス。
- 採点者とLLM審査員- モニタリングを強化するメトリクスを理解します。
- 開発中に生成AI アプリを評価する:オフライン評価と本番運用との関係