Become a Databricks Marketplace provider
This page describes how to sign up as a Databricks Marketplace provider, assign the Marketplace admin role, and create your provider profile. After these steps are completed, you can create listings on Databricks Marketplace.
Before you begin
To list products in the Databricks Marketplace, you must agree to provider policies, and your account and workspaces must meet certain requirements.
Policies
To list data products on the Marketplace exchange, you must agree to the Marketplace provider policies.
Account and workspace requirements
Databricks Marketplace uses OpenSharing to manage secure sharing of data products. OpenSharing, in turn, requires that your Databricks workspace is enabled for Unity Catalog. Your Databricks account and workspaces must therefore meet the following requirements:
- Databricks account on the Premium plan or above.
- A Databricks workspace enabled for Unity Catalog. See Enable a workspace for Unity Catalog. You do not need to enable all of your workspaces for Unity Catalog. You can create one to manage Marketplace listings.
If you have workspaces that meet these criteria, your users will be able to view the Marketplace home page. Additional permissions are required to create and manage listings. These are enumerated in the sections that follow. If you don't want your users to be able to view the Marketplace home page at all, contact your Databricks account team.
Permission requirements
To sign up as a private-exchange-only provider, you must be a Databricks account admin. See Sign up to be a Databricks Marketplace provider.
Sign up to be a Databricks Marketplace provider
The way you sign up to be a Databricks Marketplace provider depends on whether you intend to create listings in the public marketplace or only through private exchanges. In private exchanges, only consumers who are members of the exchange can browse, view, and request access to a listing. See Create and manage private exchanges in Databricks Marketplace.
To be a private-exchange-only provider, you can sign up using the provider console. To create public listings, you apply through the Databricks Data Partner Program.
Apply to be a provider that can create public listings
If your organization is already in the Databricks Partner Program and you're interested in becoming a Marketplace provider, skip the following instructions and contact partnerops@databricks.com instead.
-
On the Databricks Data Partner Program page, click Apply Now.
-
On the next page, click Apply here as a new provider.
-
Enter your email address and click Apply Now.
-
Fill out the application form.
Toward the bottom of the application form, you're asked which Databricks Partner program interests you. Select Databricks Data Provider.
The Databricks Partner team reaches out to you to complete the application process. When you're approved, the Provider console becomes available in your Unity Catalog-enabled Databricks workspaces. To access the Provider console, a user must have the Marketplace admin role.
Sign up as a private exchange provider
To sign up as a private-exchange-only provider, use the Get started as a provider page in the provider console.
To sign up as a private exchange provider:
-
As a Databricks account admin, sign in to your Databricks workspace.
-
In the sidebar, click
 Marketplace.
 -
In the upper-right corner of the Marketplace page, click Provider console.
-
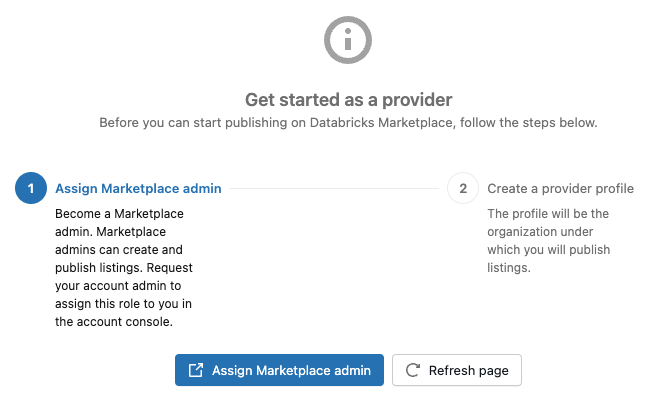
If your account isn't onboarded as a provider, the provider console displays the Get started as a provider page. Follow the steps to enable your account as a private exchange provider.
-
After a few minutes, the Assign Marketplace admin button appears. Click it to open your user page in the account console. On the Roles tab, enable Marketplace admin.
You can assign the Marketplace admin role to other users. Those users can continue the process after you finish signing up as a private exchange provider.
-
Return to the Provider console in the workspace and click Refresh page. Don't use your browser's refresh button.
-
After a few minutes, the Create provider profile button appears. Click it to open the Create Profile page.
noteIt might take a few minutes for the system to finish assigning the Marketplace admin role. If you proceed to create a provider profile and see an error indicating that you don't have the Marketplace admin role, wait a few more minutes, refresh the page, and retry.
-
To create your provider profile, follow the instructions in Create your Marketplace provider profile, starting at step 5.
-
Create your first private exchange. See Create and manage private exchanges in Databricks Marketplace.
Assign the Marketplace admin role
If you signed up as a private exchange provider, you performed this task as part of the sign-up process. You can skip the instructions in this section unless you want to enable other users in your Databricks account as Marketplace admins.
After you've been approved as a Marketplace provider, you must grant at least one user the Marketplace admin role. This role is required for accessing the Marketplace Provider console and for creating and managing your Marketplace provider profile and listings. A Databricks account admin can grant the role.
- As an account admin, log in to the account console.
- Click
 User management.
 - Find and click the username.
- On the Roles tab, turn on Marketplace admin.
Create your Marketplace provider profile
Your provider profile gives you the opportunity to tell prospective consumers who you are and to group your data products under a single brand or identity. Typically, a data provider has one profile but can list multiple data products. If you want more than one profile, reach out to your Databricks account team.
If you are a public provider, you can create your profile after your provider application has been approved. If you are a private-exchange-only provider, you create your profile as the final step of the signup process, starting at step 5 in the procedure provided here.
Permission required: Marketplace admin role
To create a profile:
- Log in to the Databricks workspace you will use for creating shares and listings.
- In the sidebar, click Marketplace.
- In the upper-right corner of the Marketplace page, click Provider console.
- On the Provider console page Profiles tab, click Create profile.
- Enter the following information. All fields are required:
- Provider name: Use a name that consumers will recognize. Consumers can filter listings by provider name.
- Logo: Drag and drop or browse to an image file for the logo you want to use in your listing. You can upload different logos for light and dark mode.
- Description: Describe your organization clearly and accurately. Include details such as industries you typically serve or represent and the types of data assets that you typically list. Consumers can see this description when they view your profile and on all of your listings.
- Organization website: Link to your organization's website. Consumers can follow this link to learn more about your organization. This link appears on all of your listings.
- Business email: Enter an email address that Databricks can use to send you notifications. Consumers do not see this information.
- Support email: Enter an email address that consumers can use to request support. This address appears on all of your listings.
- Terms of service link: This link appears on all of your listings. You can override this link by entering a different one at the listing level.
- Privacy policy: This link appears on all of your listings. You can override this link by entering a different one at the listing level.
- Click Submit profile.
If any of this information changes while you are a Marketplace provider, update your profile. Your profile must be accurate and kept up to date.