

%md
# MLflow 3.0 with Mosaic AI Agent Framework: Author and deploy a tool-calling LangGraph agent

This notebook demonstrates how to author a LangGraph agent that's compatible with Mosaic AI Agent Framework features, highlighting the latest MLflow 3.0 features. In this notebook you learn to:
- Author a tool-calling LangGraph agent wrapped with `ChatAgent`
- Manually test the agent's output
- Evaluate the agent using Mosaic AI Agent Evaluation
- Log and deploy the agent

To learn more about authoring an agent using Mosaic AI Agent Framework, see Databricks documentation ([AWS](https://docs.databricks.com/aws/generative-ai/agent-framework/author-agent) | [Azure](https://learn.microsoft.com/azure/databricks/generative-ai/agent-framework/create-chat-model)).
MLflow 3.0 with Mosaic AI Agent Framework: Author and deploy a tool-calling LangGraph agent
This notebook demonstrates how to author a LangGraph agent that's compatible with Mosaic AI Agent Framework features, highlighting the latest MLflow 3.0 features. In this notebook you learn to:
- Author a tool-calling LangGraph agent wrapped with
ChatAgent - Manually test the agent's output
- Evaluate the agent using Mosaic AI Agent Evaluation
- Log and deploy the agent
To learn more about authoring an agent using Mosaic AI Agent Framework, see Databricks documentation (AWS | Azure).
%pip install databricks-langchain databricks-agents uv langgraph==0.3.4
%pip install mlflow>=3.0.0.rc0  --upgrade --pre
dbutils.library.restartPython()
%md

## Define the agent in code
Define the agent code in a single cell below. This lets you easily write the agent code to a local Python file, using the `%%writefile` magic command, for subsequent logging and deployment.

#### Agent tools
This agent code adds the built-in Unity Catalog function `system.ai.python_exec` to the agent. The agent code also includes commented-out sample code for adding a vector search index to perform unstructured data retrieval.

For more examples of tools to add to your agent, see Databricks documentation ([AWS](https://docs.databricks.com/aws/generative-ai/agent-framework/agent-tool) | [Azure](https://learn.microsoft.com/en-us/azure/databricks/generative-ai/agent-framework/agent-tool))

#### Wrap the LangGraph agent using the `ChatAgent` interface

For compatibility with Databricks AI features, the `LangGraphChatAgent` class implements the `ChatAgent` interface to wrap the LangGraph agent. This example uses the provided convenience APIs [`ChatAgentState`](https://mlflow.org/docs/latest/python_api/mlflow.langchain.html#mlflow.langchain.chat_agent_langgraph.ChatAgentState) and [`ChatAgentToolNode`](https://mlflow.org/docs/latest/python_api/mlflow.langchain.html#mlflow.langchain.chat_agent_langgraph.ChatAgentToolNode) for ease of use.

Databricks recommends using `ChatAgent` as it simplifies authoring multi-turn conversational agents using an open source standard. See MLflow's [ChatAgent documentation](https://mlflow.org/docs/latest/python_api/mlflow.pyfunc.html#mlflow.pyfunc.ChatAgent).
Define the agent in code
Define the agent code in a single cell below. This lets you easily write the agent code to a local Python file, using the %%writefile magic command, for subsequent logging and deployment.
Agent tools
This agent code adds the built-in Unity Catalog function system.ai.python_exec to the agent. The agent code also includes commented-out sample code for adding a vector search index to perform unstructured data retrieval.
For more examples of tools to add to your agent, see Databricks documentation (AWS | Azure)
Wrap the LangGraph agent using the ChatAgent interface
For compatibility with Databricks AI features, the LangGraphChatAgent class implements the ChatAgent interface to wrap the LangGraph agent. This example uses the provided convenience APIs ChatAgentState and ChatAgentToolNode for ease of use.
Databricks recommends using ChatAgent as it simplifies authoring multi-turn conversational agents using an open source standard. See MLflow's ChatAgent documentation.
%%writefile agent.py
from typing import Any, Generator, Optional, Sequence, Union

import mlflow
from databricks_langchain import (
    ChatDatabricks,
    UCFunctionToolkit,
    VectorSearchRetrieverTool,
)
from langchain_core.language_models import LanguageModelLike
from langchain_core.runnables import RunnableConfig, RunnableLambda
from langchain_core.tools import BaseTool
from langgraph.graph import END, StateGraph
from langgraph.graph.graph import CompiledGraph
from langgraph.graph.state import CompiledStateGraph
from langgraph.prebuilt.tool_node import ToolNode
from mlflow.langchain.chat_agent_langgraph import ChatAgentState, ChatAgentToolNode
from mlflow.pyfunc import ChatAgent
from mlflow.types.agent import (
    ChatAgentChunk,
    ChatAgentMessage,
    ChatAgentResponse,
    ChatContext,
)
############################################
# Define your LLM endpoint and system prompt
############################################
# Optional: Replace with your model serving endpoint
LLM_ENDPOINT_NAME = "databricks-meta-llama-3-3-70b-instruct"
llm = ChatDatabricks(endpoint=LLM_ENDPOINT_NAME, temperature=0.1, max_tokens=2000)

# Optional: Update with your system prompt
system_prompt = "You are a chatbot that can answer questions about Databricks."

###############################################################################
## Define tools for your agent, enabling it to retrieve data or take actions
## beyond text generation
## To create and see usage examples of more tools, see
## https://docs.databricks.com/en/generative-ai/agent-framework/agent-tool.html
###############################################################################
tools = []

# You can use UDFs in Unity Catalog as agent tools
# Below, we add the `system.ai.python_exec` UDF, which provides
# a python code interpreter tool to our agent
# You can also add local LangChain python tools. See https://python.langchain.com/docs/concepts/tools

# Optional: Add additional tools
uc_tool_names = ["system.ai.python_exec"]
uc_toolkit = UCFunctionToolkit(function_names=uc_tool_names)
tools.extend(uc_toolkit.tools)

# Use Databricks vector search indexes as tools
# See https://docs.databricks.com/en/generative-ai/agent-framework/unstructured-retrieval-tools.html
# for details

# Optional: Add vector search indexes
# vector_search_tools = [
#         VectorSearchRetrieverTool(
#         index_name="",
#         # filters="..."
#     )
# ]
# tools.extend(vector_search_tools)

#####################
## Define agent logic
#####################


def create_tool_calling_agent(
    model: LanguageModelLike,
    tools: Union[ToolNode, Sequence[BaseTool]],
    system_prompt: Optional[str] = None,
) -> CompiledGraph:
    model = model.bind_tools(tools)

    # Define the function that determines which node to go to
    def should_continue(state: ChatAgentState):
        messages = state["messages"]
        last_message = messages[-1]
        # If there are function calls, continue. else, end
        if last_message.get("tool_calls"):
            return "continue"
        else:
            return "end"

    if system_prompt:
        preprocessor = RunnableLambda(
            lambda state: [{"role": "system", "content": system_prompt}]
            + state["messages"]
        )
    else:
        preprocessor = RunnableLambda(lambda state: state["messages"])
    model_runnable = preprocessor | model

    def call_model(
        state: ChatAgentState,
        config: RunnableConfig,
    ):
        response = model_runnable.invoke(state, config)

        return {"messages": [response]}

    workflow = StateGraph(ChatAgentState)

    workflow.add_node("agent", RunnableLambda(call_model))
    workflow.add_node("tools", ChatAgentToolNode(tools))

    workflow.set_entry_point("agent")
    workflow.add_conditional_edges(
        "agent",
        should_continue,
        {
            "continue": "tools",
            "end": END,
        },
    )
    workflow.add_edge("tools", "agent")

    return workflow.compile()


class LangGraphChatAgent(ChatAgent):
    def __init__(self, agent: CompiledStateGraph):
        self.agent = agent

    def predict(
        self,
        messages: list[ChatAgentMessage],
        context: Optional[ChatContext] = None,
        custom_inputs: Optional[dict[str, Any]] = None,
    ) -> ChatAgentResponse:
        request = {"messages": self._convert_messages_to_dict(messages)}

        messages = []
        for event in self.agent.stream(request, stream_mode="updates"):
            for node_data in event.values():
                messages.extend(
                    ChatAgentMessage(**msg) for msg in node_data.get("messages", [])
                )
        return ChatAgentResponse(messages=messages)


# Create the agent object, and specify it as the agent object to use when
# loading the agent back for inference via mlflow.models.set_model()
mlflow.langchain.autolog()
agent = create_tool_calling_agent(llm, tools, system_prompt)
AGENT = LangGraphChatAgent(agent)
mlflow.models.set_model(AGENT)
%md ## Test the agent Interact with the agent to test its output and tool-calling abilities. Since this notebook called `mlflow.langchain.autolog()`, you can view the trace for each step the agent takes. Replace this placeholder input with an appropriate domain-specific example for your agent.
Test the agent
Interact with the agent to test its output and tool-calling abilities. Since this notebook called mlflow.langchain.autolog(), you can view the trace for each step the agent takes.
Replace this placeholder input with an appropriate domain-specific example for your agent.
dbutils.library.restartPython()
from agent import AGENT
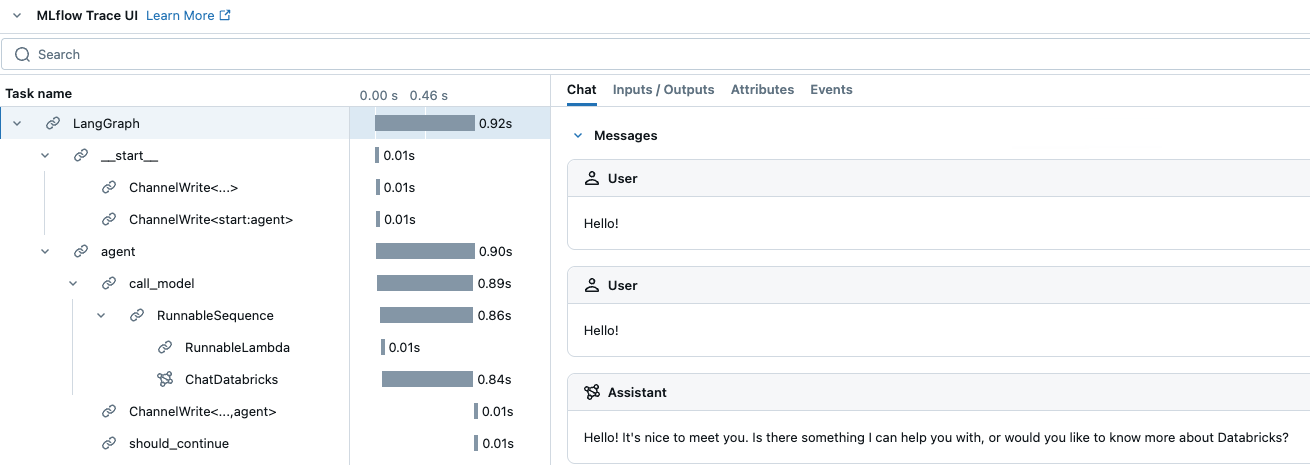
AGENT.predict({"messages": [{"role": "user", "content": "Hello!"}]})%md Here is an example of the output of the previous cell, showing a trace of the agent's execution. <img src="http://docs.databricks.com/images/mlflow/mlflow3-trace-1.png"/>
Here is an example of the output of the previous cell, showing a trace of the agent's execution.
%md
## Log the agent as an MLflow model

Log the agent as code from the `agent.py` file. See [MLflow - Models from Code](https://mlflow.org/docs/latest/models.html#models-from-code).

### Enable automatic authentication for Databricks resources
For the most common Databricks resource types, Databricks supports and recommends declaring resource dependencies for the agent upfront during logging. This enables automatic authentication passthrough when you deploy the agent. With automatic authentication passthrough, Databricks automatically provisions, rotates, and manages short-lived credentials to securely access these resource dependencies from within the agent endpoint.

To enable automatic authentication, specify the dependent Databricks resources when calling `mlflow.pyfunc.log_model().`

  - **Note**: If your Unity Catalog tool queries a vector search index or leverages external functions, you need to include the dependent vector search index and Unity Catalog connection objects, respectively, as resources. See the documentation ([AWS](https://docs.databricks.com/generative-ai/agent-framework/log-agent.html#resources) | [Azure](https://learn.microsoft.com/azure/databricks/generative-ai/agent-framework/log-agent#resources)).
Log the agent as an MLflow model
Log the agent as code from the agent.py file. See MLflow - Models from Code.
Enable automatic authentication for Databricks resources
For the most common Databricks resource types, Databricks supports and recommends declaring resource dependencies for the agent upfront during logging. This enables automatic authentication passthrough when you deploy the agent. With automatic authentication passthrough, Databricks automatically provisions, rotates, and manages short-lived credentials to securely access these resource dependencies from within the agent endpoint.
To enable automatic authentication, specify the dependent Databricks resources when calling mlflow.pyfunc.log_model().
import mlflow
from agent import tools, LLM_ENDPOINT_NAME
from databricks_langchain import VectorSearchRetrieverTool
from mlflow.models.resources import DatabricksFunction, DatabricksServingEndpoint
from unitycatalog.ai.langchain.toolkit import UnityCatalogTool

# Optional: Manually include underlying resources if needed. See the Note in the markdown above for more information.
resources = [DatabricksServingEndpoint(endpoint_name=LLM_ENDPOINT_NAME)]
for tool in tools:
    if isinstance(tool, VectorSearchRetrieverTool):
        resources.extend(tool.resources)
    elif isinstance(tool, UnityCatalogTool):
        resources.append(DatabricksFunction(function_name=tool.uc_function_name))


with mlflow.start_run():
    logged_agent_info = mlflow.pyfunc.log_model(
        artifact_path="agent",
        python_model="agent.py",
        pip_requirements=[
            "mlflow",
            "langgraph==0.3.4",
            "databricks-langchain",
        ],
        params={
            "temperature": 0.1,
            "max_tokens": 2000
        },
        resources=resources,
        model_type="agent",
        input_example={"messages": [{"role": "user", "content": "What is MLflow?"}]},
    )
# Inspect the LoggedModel and its properties logged_model = mlflow.get_logged_model(logged_agent_info.model_id) print(logged_model.model_id, logged_model.params)
%md
## Evaluate the agent with Agent Evaluation

Use Mosaic AI Agent Evaluation to evalaute the agent's responses based on expected responses and other evaluation criteria. Use the evaluation criteria you specify to guide iterations, using MLflow to track the computed quality metrics.
See Databricks documentation ([AWS]((https://docs.databricks.com/aws/generative-ai/agent-evaluation) | [Azure](https://learn.microsoft.com/azure/databricks/generative-ai/agent-evaluation/)).


To evaluate your tool calls, add custom metrics. See Databricks documentation ([AWS](https://docs.databricks.com/en/generative-ai/agent-evaluation/custom-metrics.html#evaluating-tool-calls) | [Azure](https://learn.microsoft.com/en-us/azure/databricks/generative-ai/agent-evaluation/custom-metrics#evaluating-tool-calls)).
Evaluate the agent with Agent Evaluation
Use Mosaic AI Agent Evaluation to evalaute the agent's responses based on expected responses and other evaluation criteria. Use the evaluation criteria you specify to guide iterations, using MLflow to track the computed quality metrics. See Databricks documentation (AWS | Azure).
To evaluate your tool calls, add custom metrics. See Databricks documentation (AWS | Azure).
import pandas as pd

import pandas as pd
eval_df = pd.DataFrame(
  {
    "request": [
      "What is MLflow Tracking and how does it work?",
      "What is Unity Catalog?",
      "What are user-defined functions (UDFs)?"
    ],
    "expected_response": [
      """MLflow Tracking is a key component of the MLflow platform designed to record and manage machine learning experiments. It enables data scientists and engineers to log parameters, code versions, metrics, and artifacts in a systematic way, facilitating experiment tracking and reproducibility.\n\nHow It Works:\n\nAt the heart of MLflow Tracking is the concept of a run, which is an execution of a machine learning code. Each run can log the following:\n\nParameters: Input variables or hyperparameters used in the model (e.g., learning rate, number of trees). Metrics: Quantitative measures to evaluate the model's performance (e.g., accuracy, loss). Artifacts: Output files like models, datasets, or images generated during the run. Source Code: The version of the code or Git commit hash used. These logs are stored in a tracking server, which can be set up locally or on a remote server. The tracking server uses a backend storage (like a database or file system) to keep a record of all runs and their associated data.\n\n Users interact with MLflow Tracking through its APIs available in multiple languages (Python, R, Java, etc.). By invoking these APIs in the code, you can start and end runs, and log data as the experiment progresses. Additionally, MLflow offers autologging capabilities for popular machine learning libraries, automatically capturing relevant parameters and metrics without manual code changes.\n\nThe logged data can be visualized using the MLflow UI, a web-based interface that displays all experiments and runs. This UI allows you to compare runs side-by-side, filter results, and analyze performance metrics over time. It aids in identifying the best models and understanding the impact of different parameters.\n\nBy providing a structured way to record experiments, MLflow Tracking enhances collaboration among team members, ensures transparency, and makes it easier to reproduce results. It integrates seamlessly with other MLflow components like Projects and Model Registry, offering a comprehensive solution for managing the machine learning lifecycle.""",
      """Unity Catalog is a feature in Databricks that allows you to create a centralized inventory of your data assets, such as tables, views, and functions, and share them across different teams and projects. It enables easy discovery, collaboration, and reuse of data assets within your organization.\n\nWith Unity Catalog, you can:\n\n1. Create a single source of truth for your data assets: Unity Catalog acts as a central repository of all your data assets, making it easier to find and access the data you need.\n2. Improve collaboration: By providing a shared inventory of data assets, Unity Catalog enables data scientists, engineers, and other stakeholders to collaborate more effectively.\n3. Foster reuse of data assets: Unity Catalog encourages the reuse of existing data assets, reducing the need to create new assets from scratch and improving overall efficiency.\n4. Enhance data governance: Unity Catalog provides a clear view of data assets, enabling better data governance and compliance.\n\nUnity Catalog is particularly useful in large organizations where data is scattered across different teams, projects, and environments. It helps create a unified view of data assets, making it easier to work with data across different teams and projects.""",
      """User-defined functions (UDFs) in the context of Databricks and Apache Spark are custom functions that you can create to perform specific tasks on your data. These functions are written in a programming language such as Python, Java, Scala, or SQL, and can be used to extend the built-in functionality of Spark.\n\nUDFs can be used to perform complex data transformations, data cleaning, or to apply custom business logic to your data. Once defined, UDFs can be invoked in SQL queries or in DataFrame transformations, allowing you to reuse your custom logic across multiple queries and applications.\n\nTo use UDFs in Databricks, you first need to define them in a supported programming language, and then register them with the SparkSession. Once registered, UDFs can be used in SQL queries or DataFrame transformations like any other built-in function.\n\nHere\'s an example of how to define and register a UDF in Python:\n\n```python\nfrom pyspark.sql.functions import udf\nfrom pyspark.sql.types import IntegerType\n\n# Define the UDF function\ndef multiply_by_two(value):\n    return value * 2\n\n# Register the UDF with the SparkSession\nmultiply_udf = udf(multiply_by_two, IntegerType())\n\n# Use the UDF in a DataFrame transformation\ndata = spark.range(10)\nresult = data.withColumn("multiplied", multiply_udf(data.id))\nresult.show()\n```\n\nIn this example, we define a UDF called `multiply_by_two` that multiplies a given value by two. We then register this UDF with the SparkSession using the `udf` function, and use it in a DataFrame transformation to multiply the `id` column of a DataFrame by two."""
    ],
  }
)
display(eval_df)
with mlflow.start_run() as evaluation_run:
    eval_dataset: mlflow.entities.Dataset = mlflow.data.from_pandas(
        df=eval_df,
        name="eval_dataset",
    )
    # Run the agent evaluation
    eval_results = mlflow.evaluate(
        model=f"models:/{logged_model.model_id}",
        data=eval_dataset,
        model_type="databricks-agent"
    )
    # Log evaluation metrics and associate with agent
    mlflow.log_metrics(
        metrics=eval_results.metrics,
        dataset=eval_dataset,
        # Specify the ID of the agent logged above
        model_id=logged_model.model_id
    )

# Review the evaluation results in the MLFLow UI (see console output), or access them in place:
display(eval_results.tables['eval_results'])
%md ## Register the model to Unity Catalog Before you deploy the agent, you must register the agent to Unity Catalog.
Register the model to Unity Catalog
Before you deploy the agent, you must register the agent to Unity Catalog.
# TODO: Specify the catalog, schema, and model name for your model
catalog = "main"
schema = "default"
model_name = "agent"
UC_MODEL_NAME = f"{catalog}.{schema}.{model_name}"
mlflow.set_registry_uri("databricks-uc")
# register the model to Unity Catalog
uc_registered_model_info = mlflow.register_model(
model_uri=logged_model.model_uri, name=UC_MODEL_NAME
)%md Now you can view the model version and all centralized performance data on the model version page in Unity Catalog. You can also get the same information using the API as shown in the following cell.
Now you can view the model version and all centralized performance data on the model version page in Unity Catalog. You can also get the same information using the API as shown in the following cell.
# Get the model version
from mlflow import MlflowClient
client = MlflowClient()
model_version = client.get_model_version(name=UC_MODEL_NAME, version=uc_registered_model_info.version)
print(model_version)
%md
## Next steps

After your agent is registered to Unity Catalog, set up a deployment job ([AWS](https://docs.databricks.com/en/mlflow/deployment-job.html) | [Azure](https://learn.microsoft.com/en-us/azure/databricks/mlflow/deployment-job)) to create a secure CI/CD pipeline to deploy your agent.

The deployment task in the job can be very simple, for example:

`from databricks import agents`
`agents.deploy(UC_MODEL_NAME, uc_registered_model_info.version, tags = {"endpointSource": "docs"})`

For a more detailed example of a deployment task notebook, see the documentation ([AWS](https://docs.databricks.com/en/mlflow/deployment-job.html#deployment-notebook) | [Azure](https://learn.microsoft.com/en-us/azure/databricks/mlflow/deployment-job#deployment-notebook)).

After the agent is deployed, you can chat with it in AI playground to perform additional checks, share it with SMEs in your organization for feedback, or embed it in a production application. For details, see the documentation ([AWS](https://docs.databricks.com/en/generative-ai/deploy-agent.html) | [Azure](https://learn.microsoft.com/en-us/azure/databricks/generative-ai/deploy-agent)).
Next steps
After your agent is registered to Unity Catalog, set up a deployment job (AWS | Azure) to create a secure CI/CD pipeline to deploy your agent.
The deployment task in the job can be very simple, for example:
from databricks import agentsagents.deploy(UC_MODEL_NAME, uc_registered_model_info.version, tags = {"endpointSource": "docs"})
For a more detailed example of a deployment task notebook, see the documentation (AWS | Azure).
After the agent is deployed, you can chat with it in AI playground to perform additional checks, share it with SMEs in your organization for feedback, or embed it in a production application. For details, see the documentation (AWS | Azure).