Lakeflow Jobs
Lakeflow Jobs is workflow automation for Databricks, providing orchestration for data processing workloads so that you can coordinate and run multiple tasks as part of a larger workflow. You can optimize and schedule the execution of frequent, repeatable tasks and manage complex workflows.
What are jobs?
In Databricks, a job is used to schedule and orchestrate tasks on Databricks in a workflow. Common data processing workflows include ETL workflows, running notebooks, and machine learning (ML) workflows, as well as integrating with external systems like dbt.
Jobs consist of one or more tasks, and support custom control flow logic like branching (if / else statements) or looping (for each statements) using a visual authoring UI. Tasks can load or transform data in an ETL workflow, or build, train and deploy ML models in a controlled and repeatable way as part of your machine learning pipelines.
Example: Daily data processing and validation job
The example below shows a job in Databricks.
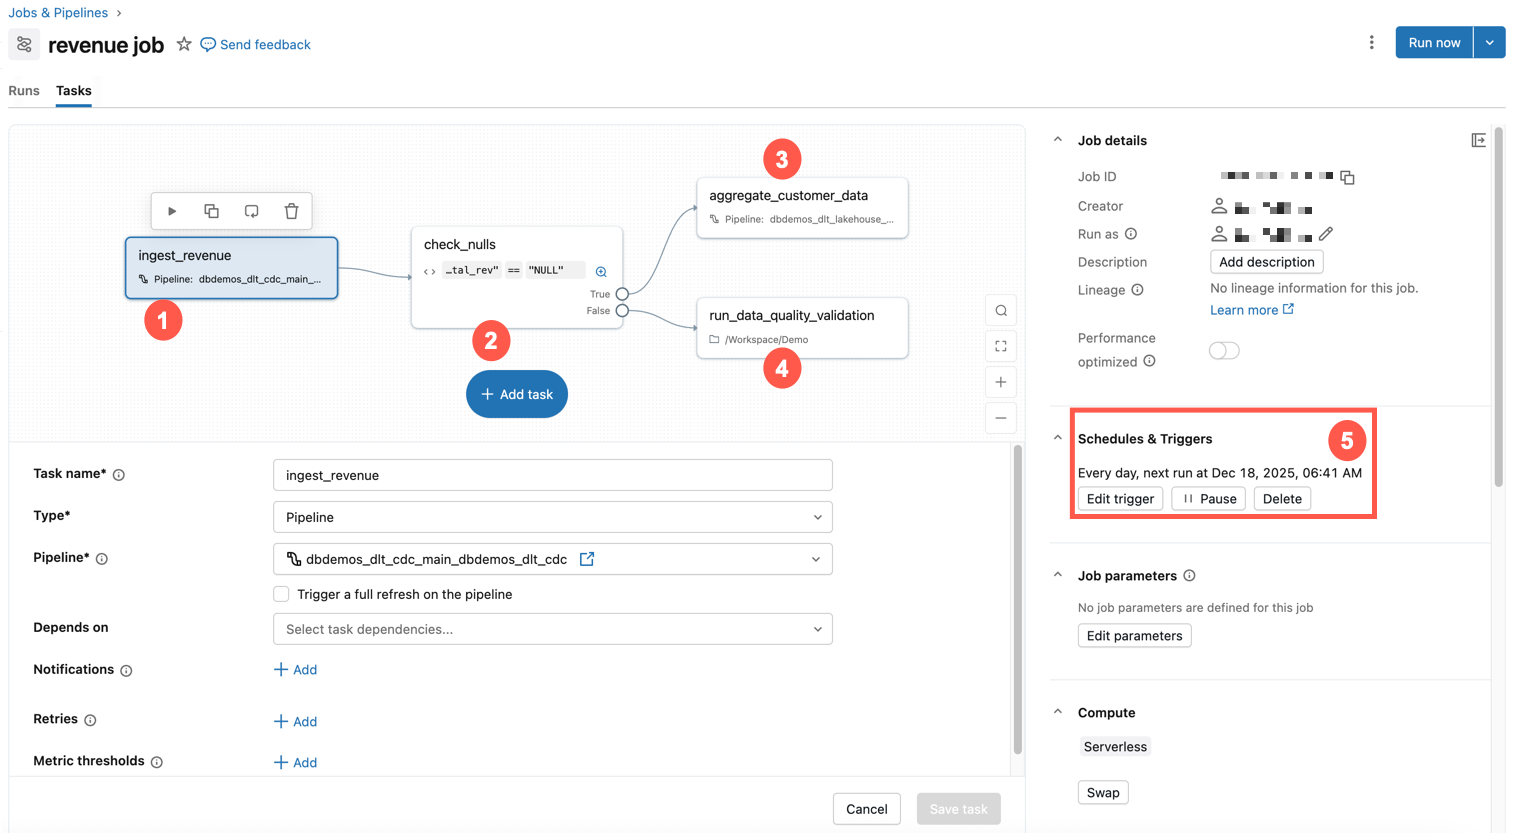
This example job has the following characteristics:
- The first task ingests revenue data.
- The second task is an if / else check for nulls.
- If not, then a transformation task is run.
- Otherwise, it runs a notebook task with a data quality validation.
- It is scheduled to run at the same time every day.
To get a quick introduction to creating your own job, see Create your first workflow with Lakeflow Jobs.
Orchestration concepts
There are three main concepts when using Lakeflow Jobs for orchestration in Databricks: jobs, tasks, and triggers.
Job - A job is the primary resource for coordinating, scheduling, and running your operations. Jobs can vary in complexity from a single task running a Databricks notebook to hundreds of tasks with conditional logic and dependencies. The tasks in a job are visually represented by a Directed Acyclic Graph (DAG). You can specify properties for the job, including:
- Trigger - this defines when to run the job.
- Parameters - run-time parameters that are automatically pushed to tasks within the job.
- Notifications - emails or webhooks to be sent when a job fails or takes too long.
- Git - source control settings for the job tasks.
Task - A task is a specific unit of work within a job. Each task can perform a variety of operations, including:
- A notebook task runs a Databricks notebook. You specify the path to the notebook and any parameters that it requires.
- A pipeline task runs a pipeline. You can specify existing Lakeflow pipelines, such as a materialized view or streaming table.
- A Python script task runs a Python file. You provide the path to the file and any necessary parameters.
There are many types of tasks. For a complete list, see Types of tasks. Tasks can have dependencies on other tasks, and conditionally run other tasks, allowing you to create complex workflows with conditional logic and dependencies.
Trigger - A trigger is a mechanism that initiates running a job based on specific conditions or events. A trigger can be time-based, such as running a job at a scheduled time (for example, every day at 2 AM), or event-based, such as running a job when new data arrives in cloud storage.
Monitoring and observability
Jobs provide built-in support for monitoring and observability. The following topics give an overview of this support. For more details about monitoring jobs and orchestration, see Monitor Lakeflow Jobs.
Job monitoring and observability in the UI - In the Databricks UI you can view jobs, including details such as the job owner and the result of the last run, and filter by job properties. You can view a history of job runs, and get detailed information about each task in the job.
Job run status and metrics - Databricks reports job run success, and logs and metrics for each task within a job run to diagnose issues and understand performance.
Notifications and alerts - You can set up notifications for job events via email, Slack, custom webhooks and a host of other options.
Custom queries through system tables - Databricks provides system tables that record job runs and tasks across the account. You can use these tables to query and analyze job performance and costs. You can create dashboards to visualize job metrics and trends, to help monitor the health and performance of your workflows.
Limitations
The following limitations exist:
- A workspace is limited to 2000 concurrent task runs. A
429 Too Many Requestsresponse is returned when you request a run that cannot start immediately. - The number of jobs a workspace can create in an hour is limited to 10000 (includes “runs submit”). This limit also affects jobs created by the REST API and notebook workflows.
- A workspace can contain up to 12000 saved jobs.
- A job can contain up to 1000 tasks.
- When tasks use dynamic values in their parameters, job parameters are limited to 10,000 characters.
Manage workflows programmatically
Databricks has tools and APIs that allow you to schedule and orchestrate your workflows programmatically, including the following:
- Databricks CLI
- Declarative Automation Bundles
- Databricks extension for Visual Studio Code
- Databricks SDKs
- Jobs REST API
For examples of using tools and APIs to create and manage jobs, see Automate job creation and management. For documentation on all available developer tools, see Developer tools use cases.
External tools use the Databricks tools and APIs to programmatically schedule workflows. For example, you can also schedule your jobs using tools such as Apache Airflow. See Orchestrate Lakeflow Jobs with Apache Airflow.