Configure private connectivity to resources in your VPC
Databricks charges for networking costs when serverless workloads connect to customer resources, and when performance-intensive services egress data cross-region back to clients. See Understand Databricks networking costs.
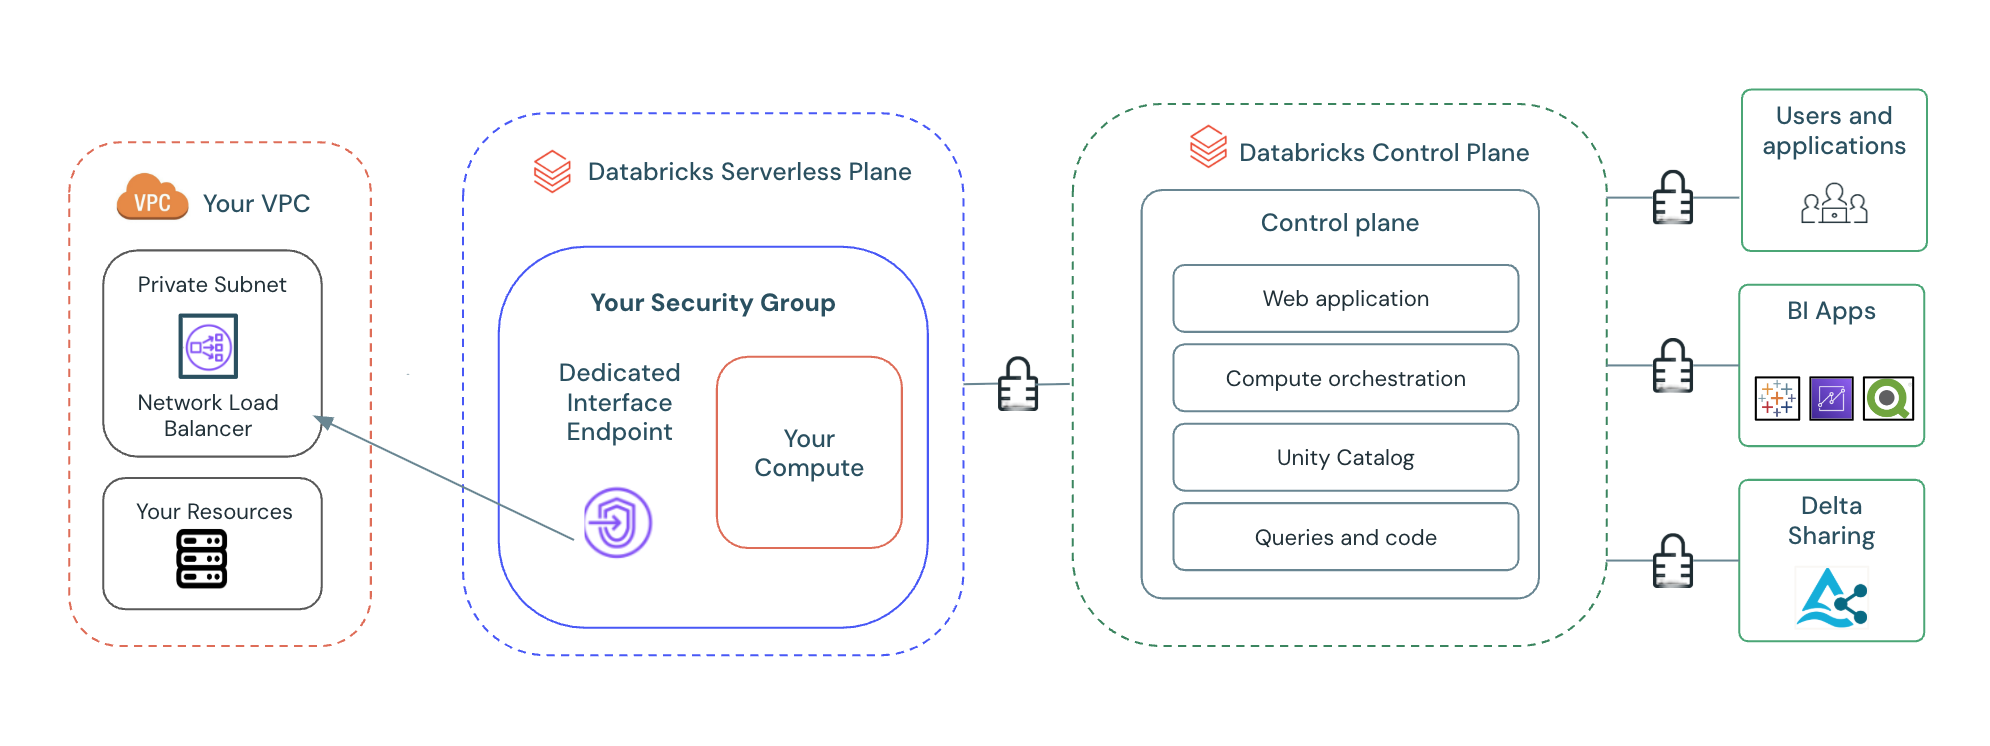
This page explains how to use the Databricks account console UI to configure PrivateLink connections from serverless compute to resources in your virtual private cloud (VPC) through a network load balancer (NLB). This feature supports both in-region and cross-region Private Link connections to an NLB.
Configuring private connectivity for serverless compute provides:
- A dedicated and private connection: Your private endpoint is exclusively tied to your Databricks account, ensuring access is restricted to authorized workspaces only.
- Enhanced data exfiltration mitigation: While Databricks Serverless with Unity Catalog provides built-in data exfiltration protection, PrivateLink adds an extra layer of network defense. By placing your resources in a private subnet and controlling access through VPC endpoint services and dedicated VPC endpoints, you reduce the risk of unauthorized data movement.
Requirements
- The workspace is on the Enterprise plan.
- You are the account admin of your Databricks account.
- You have at least one workspace using serverless compute. For supported regions, see Serverless availability.
- Each Databricks account can have up to 10 NCCs per region.
- Each region can have 30 private endpoints, distributed as needed across 1-10 NCCs.
- Each NCC can be attached to up to 50 workspaces.
- Each private endpoint rule for private connectivity to resources in your VPC supports up to 100 domain names.
- DNS chasing and DNS redirect are not supported. All domain names must resolve directly to the backend resources.
- [Cross-region only] The VPC endpoint service must be in at least two availability zones.
- [Cross-region only] The consumer's region must be added to the endpoint service configuration on the VPC endpoint service.
Step 1: Create a Network Load Balancer (NLB) in AWS
Create a Network Load Balancer in AWS that will serve as the frontend for your VNet resources. To create an NLB, follow the instructions in the AWS documentation. Configure the NLB to route traffic to your target resource using an internal scheme.
Step 2: Create a VPC endpoint service in your AWS account
You must create a VPC endpoint service to securely expose your NLB to your private endpoint. For instructions, refer to the AWS documentation Create a service powered by AWS PrivateLink.
If your VPC endpoint service is in us-east-1, provision the VPC endpoint in one or more of the following availability zones:
use1-az1use1-az2use1-az4use1-az5use1-az6
Be sure to complete the following:
- Verify the Acceptance required box is checked for Required acceptance for endpoints.
- Allowlist a Databricks serverless stable IAM role. Choose one of these two methods:
- For simplified deployment:
- After your VPC endpoint service is created, allow * in the Allow principals tab. This allows Databricks to create one VPC endpoint to link to your VPC endpoint service.
- For granular permission control:
- After your VPC endpoint service is created, navigate to the Allow principals tab.
- Add the Databricks Serverless stable IAM role to the allowlist. This enables Databricks to create a VPC endpoint that links to your service. The ARN must use the consumer region (the region of your workspace). Use the format for your deployment type:
- AWS commercial:
arn:aws:iam::565502421330:role/private-connectivity-role-<region>(for example,arn:aws:iam::565502421330:role/private-connectivity-role-us-east-1for us-east-1) - AWS GovCloud (Civilian):
arn:aws-us-gov:iam::347038500609:role/private-connectivity-role-us-gov-west-1 - AWS GovCloud (DoD):
arn:aws-us-gov:iam::347034940029:role/private-connectivity-role-us-gov-west-1
- AWS commercial:
- Add the Databricks Serverless stable IAM role to the allowlist. This enables Databricks to create a VPC endpoint that links to your service. The ARN must use the consumer region (the region of your workspace). Use the format for your deployment type:
- After your VPC endpoint service is created, navigate to the Allow principals tab.
- For simplified deployment:
- Go to Endpoint services and select the Network Load Balancer you just created. From there, navigate to the Security tab and verify that Enforce inbound rules on PrivateLink traffic is Off.
- [Cross-region only] Verify the VPC endpoint service is in at least two availability zones.
- [Cross-region only] Add the consumer's region to the endpoint service configuration on the VPC endpoint service.
If your target resource is an RDS multi-AZ deployment, RDS does not provide stable IPs. In this case, the RDS IP changes each time the failover occurs. To automate NLB target group IP address synchronization, see Access Amazon RDS across VPCs using AWS PrivateLink and Network Load Balancer.
Step 3: Create a Network connectivity configurations (NCC) object
You can skip this step if an NCC exists in the same region and AWS account that you intend to use.
- In the account console, click Security.
- Select the Network connectivity configurations tab.
- Click Add network configuration.
- Enter a name for the NCC.
- Choose the region. This must match your workspace region.
- Click Add.
Step 4: Create an AWS interface VPC endpoint
This step links your VPC endpoint service to your NCC. To create a private endpoint:
- In the account console, click Security.
- Click Network connectivity configurations.
- Select the NCC object you created in Step 3.
- In the Private endpoint rules tab, click Add private endpoint rule.
- Enter the full AWS VPC endpoint Service name. This Service name establishes the connection to the private endpoint's destination resources.
- Provide the fully qualified domain name(s) (FQDNs) of the destination resource. The domain name must correspond to the destination resource referenced in your connection URL. Outbound connections from Databricks serverless whose destination hostname matches one of these domain names will be resolved to route privately to the specified endpoint service.
- Example: If your destination is an RDS instance, the FQDN typically follows the format:
<RDS instance DB identifier>.<random hash>.<region>.rds.amazonaws.com.
- Example: If your destination is an RDS instance, the FQDN typically follows the format:
- Return to the Private endpoint rules tab of the NCC detail page.
- Select your new VPC endpoint.
- Copy the VPC endpoint ID.
Domains added as PrivateLink entries are implicitly allowlisted in network policies.
Step 5: Accept the VPC endpoint on your VPC endpoint service
After creating the VPC endpoint rule in Databricks, you must approve the connection request in AWS. To approve the connection:
- Open the Amazon VPC console.
- In the navigation pane, choose Endpoint services.
- Select the endpoint service.
- From the Endpoint connections tab, filter for the endpoint ID returned in step 5 using the search box.
- Choose Actions. Accept endpoint connection request.
- When prompted for confirmation, choose Accept.
It can take a few minutes for the connection to fully establish.
Step 6: Confirm VPC endpoint status
Verify the VPC endpoint connection is successfully established. To confirm the connection:
- Refresh the Network connectivity configurations page in the account console.
- On the Private endpoint rules tab, confirm that the Status column for your new private endpoint is
ESTABLISHED.
Step 7: Attach the NCC to one or more workspaces
This step associates your configured private connectivity with your workspaces. Skip this step if your workspace is already attached to the desired NCC. To attach the NCC to a workspace:
- Navigate to Workspaces in the left-hand navigation.
- Select an existing workspace.
- Under the Networking category, select the Network connectivity configuration dropdown and choose the NCC you've created.
- Repeat for all workspaces you'd like this NCC to apply to.
NCCs are regional objects that can only be attached to workspaces in the same region.
Next steps
- Manage private endpoint rules: Control network traffic to and from your VPC endpoints by defining specific rules that permit or deny connections. See Manage private endpoint rules.
- Configure a firewall for serverless compute access: Implement a firewall to restrict and secure inbound and outbound network connections for your serverless compute environments. See Serverless compute firewall configuration.
- Understand data transfer and connectivity costs: Data transfer and connectivity refer to moving data into and out of Databricks serverless environments. Networking charges for serverless products only apply to customers using Databricks serverless compute. See Understand Databricks networking costs.