Databricks extension for Visual Studio Code
The Databricks extension for Visual Studio Code enables you to connect to your remote Databricks workspaces from Visual Studio Code or Cursor on your local development machine. You can then:
- Define, deploy, and run Declarative Automation Bundles to apply CI/CD patterns and best practices to your Lakeflow Jobs, Lakeflow pipelines, and MLOps Stacks using the Visual Studio Code UI. See What are Declarative Automation Bundles? and Declarative Automation Bundles extension features.
- Run local Python code files from Visual Studio Code on Databricks clusters or serverless compute in your remote workspaces. See Run a Python file on a cluster.
- Run local Python code files (
.py) and Python, R, Scala, and SQL notebooks (.py,.ipynb,.r,.scala, and.sql) from Visual Studio Code as Lakeflow Jobs in your remote workspaces. See Run a Python file as a job. - Set up and configure your debugging environment and Databricks Connect using a simple checklist that triggers selection dialogs. See Debug code using Databricks Connect for the Databricks extension for Visual Studio Code.
- Debug notebooks cell by cell within Visual Studio Code with Databricks Connect. See Run and debug notebook cells with Databricks Connect using the Databricks extension for Visual Studio Code.
- Synchronize local code that you develop in Visual Studio Code with code in your remote workspaces. See Sync your workspace folder with Databricks
The Databricks extension for Visual Studio Code supports running R, Scala, and SQL notebooks as automated jobs but does not provide any deeper support for these languages within Visual Studio Code.
Get started
To get started using the Databricks extension for Visual Studio Code:
- Install the extension.
- Create a new Databricks project or convert an existing Visual Studio Code project.
- Configure your project easily using the Databricks extension UI.
- Run some Python code as part of the extension tutorial.
- Debug your code using the Databricks Connect integration.
- Test your code using
pytest. See Run Python tests using the Databricks extension for Visual Studio Code.
Create a new Databricks project
Once the extension is installed, you can create a new Databricks project using the Databricks extension for Visual Studio Code:
- Launch Visual Studio Code.
- Click the Databricks icon in the Visual Studio Code sidebar to open the extension.
- Click Create a new project.
- In the Command Palette, select a host and authentication method for the project. See Set up authorization for the Databricks extension for Visual Studio Code.
- In Provide a path to a folder where you would want your new project to be, enter the path to a folder on your local development computer where you want to create the project, or click Open folder selection dialog and select the path to the project folder.
- For Template to use in the Databricks project initialization view, use the up and down arrows to select a project template, and then press Enter. For information about bundle project templates, see Declarative Automation Bundles project templates.
- Type a Unique name for this project for the project or leave the default project name of
my_project, then pressing Enter. - Choose whether to add a stub (sample) notebook, a stub (sample) Delta Live Tables pipeline, or a stub (sample) Python package to the project, or any combination of these stubs (samples).
- Press any key to close the Databricks Project Init editor tab.
- For Select the project you want to open, choose the project you just created.
Open an existing Declarative Automation Bundles project
A Declarative Automation Bundles project has a databricks.yml file in the project's root folder. See Declarative Automation Bundles configuration. If you want to use the extension with an existing Declarative Automation Bundles project:
-
Launch Visual Studio Code. From the main menu, click File > Open Folder and navigate to the directory that contains your bundle project.
-
Click the Databricks icon in the Visual Studio Code sidebar to open and begin using features of the extension.
If the Databricks extension for Visual Studio Code discovers more than one Declarative Automation Bundles project in the current folder, it lets you choose to open a project or create a project configuration file in the root folder.
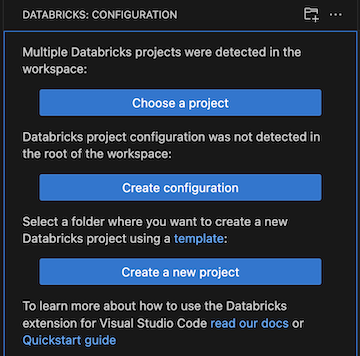
- If you chose a project, in the Command Palette, select your existing Declarative Automation Bundles project.
- If you create a configuration in the root folder, that folder becomes a bundle project.
-
Select a host and authentication method for the project. See Set up authorization for the Databricks extension for Visual Studio Code.
If you open a project created using the Databricks extension for Visual Studio Code v1, migration is attempted automatically using the project's existing authentication and workspace configuration. The migration button is only available if the automatic migration fails.
Switch between Databricks projects
The Databricks extension for Visual Studio Code allows you to have multiple Databricks projects within your Visual Studio Code workspace and easily switch between them. With your multi-bundle project open in the Visual Studio Code workspace:
-
Click the Databricks icon in the Visual Studio Code sidebar to open the extension.
-
Click Local Folder to select the project for the extension to use.
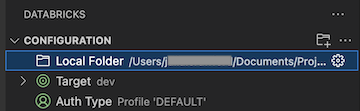
Run actions are only available for files in the active bundle.
Convert a project to a Databricks project
If you have an existing project that you want to convert to a Databricks project:
- Launch Visual Studio Code. From the main menu, click File > Open Folder and navigate to your project to open it.
- Click the Databricks icon in the Visual Studio Code sidebar to open the extension.
- Click Create configuration.
- In the Command Palette, select a host and authentication method for the project. See Set up authorization for the Databricks extension for Visual Studio Code.