SSO to Databricks with JumpCloud
This page shows how to configure JumpCloud as the identity provider for single sign-on (SSO) in your Databricks account. JumpCloud supports SAML 2.0.
Enable JumpCloud SSO using SAML
-
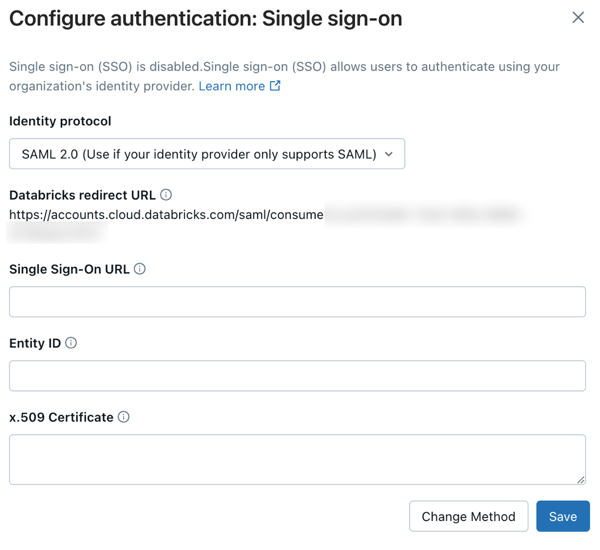
Copy the redirect URL from Databricks.
- As an account admin, log in to the account console and click Security.
- Click the Authentication tab.
- Next to Authentication, click Manage.
- Choose Single sign-on with my identity provider.
- Click Continue.
- Under Identity protocol, select SAML 2.0.
- On the Authentication tab, make note of the Databricks Redirect URL value.

-
Create a SAML application in JumpCloud.
- In a new browser tab, log in to your JumpCloud admin portal.
- In the sidebar, under User Authentication, click SSO Applications.
- Click Add New Application > Custom Application > Next.
- In Select the features you would like to enable, select Manage Single Sign-on (SSO) and Configure SSO with SAML.
- In Enter General Info, enter a Display label and a Description.
- Click Save Application.
-
Configure the SSO settings.
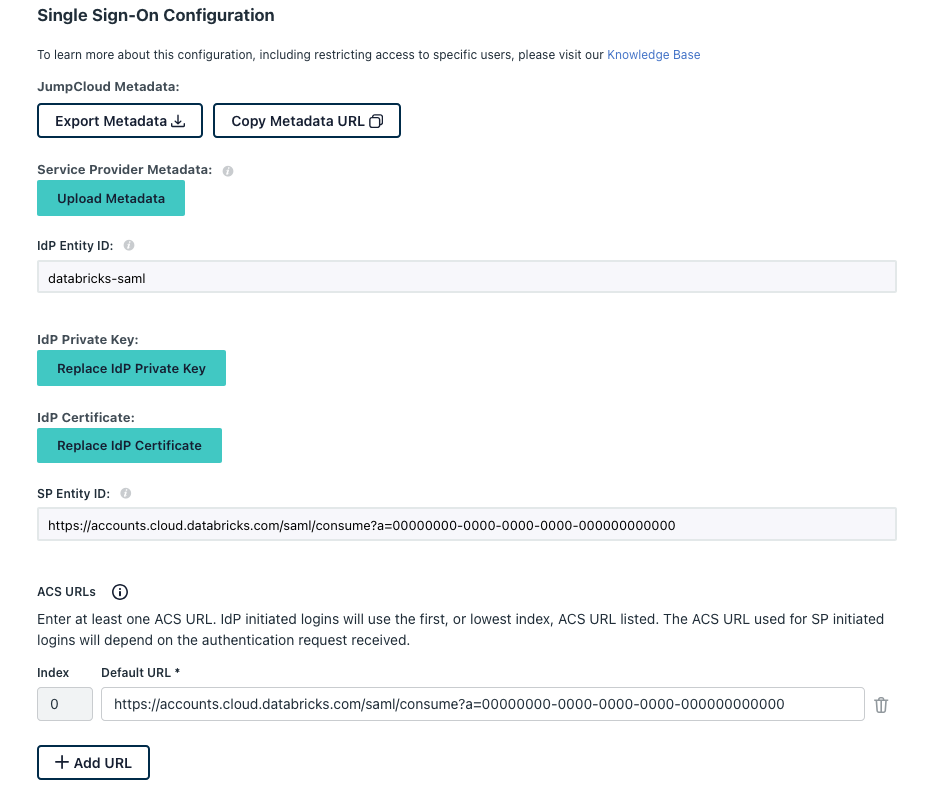
- Click the SSO tab.
- Set IdP Entity ID to a value to uniquely identify this SSO application in your JumpCloud environment. Save this value.
- Set SP Entity ID to the Databricks Redirect URL you copied above.
- Set ACS URLs to the Databricks Redirect URL you copied above.

-
Set the SAML configurations.
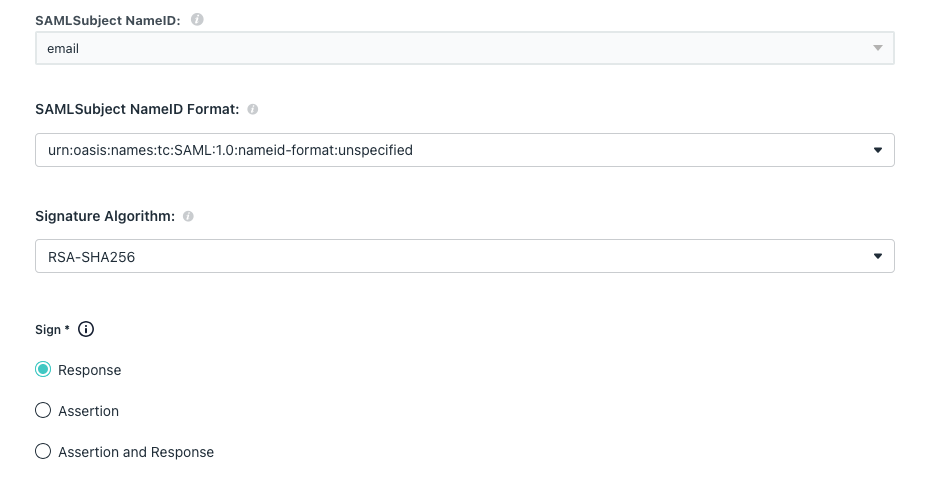
- On the SSO tab, in SAMLSubject NameID select email.
- In SAMLSubject NameID Format select urn:oasis:names:tc:SAML:1.0:nameid-format:unspecified.
- In Signature Algorithm select RSA-SHA256.
- In Sign select Response.
- Copy and save the IDP URL.

-
Download the JumpCloud certificate.
-
In the sidebar, click IDP Certificate Valid and Download Certificate. The certificate is downloaded locally as a file with the
.cerextension. -
Open the
.cerfile in a text editor and copy the file contents. The file is the entire x.509 certificate for the JumpCloud SAML application.important- Do not open it using the macOS keychain, which is the default application for that file type in macOS.
- The certificate is sensitive data. Use caution about where to download it. Delete it from local storage as soon as possible.
-
-
Configure Databricks in the Databricks account console SSO page.
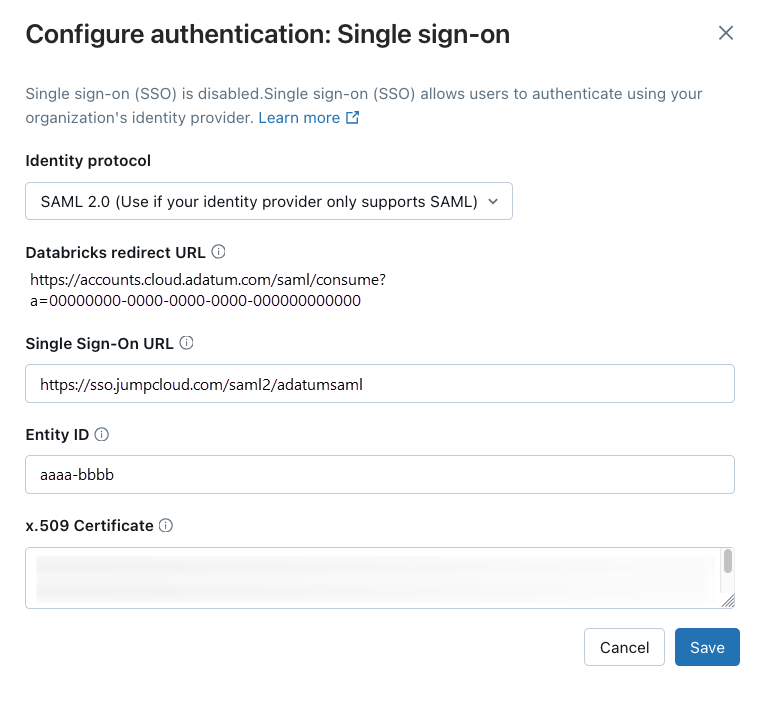
- Set Single Sign-On URL to the JumpCloud field IDP URL.
- Set Identity Provider Entity ID to the JumpCloud field IdP Entity ID.
- Set x.509 Certificate to the JumpCloud x.509 certificate, including the markers for the beginning and end of the certificate.
- Click Save.
- Click Test SSO to validate that your SSO configuration is working properly.
- Click Enable SSO to enable single sign-on for your account.
- Test account console login with SSO.

Configure unified login and add users to Databricks
After you configure SSO, Databricks recommends that you configure unified login and add users to your account using SCIM provisioning.
-
Configure unified login
Unified login allows you to use the account console SSO configuration in your Databricks workspaces. If your account was created after June 21, 2023 or you did not configure SSO before December 12, 2024, unified login is enabled on your account for all workspaces and it cannot be disabled. To configure unified login, see Enable unified login.
-
Add users to Databricks
-
Enable JIT provisioning
Databricks recommends enabling JIT to automatically add users to Databricks when they first log in using SSO. JIT provisioning is on by default for accounts created after May 1, 2025 when SSO is configured. See Automatically provision users (JIT).
-
Configure SCIM provisioning
Databricks recommends using SCIM provisioning to sync users and groups automatically from your identity provider to your Databricks account. SCIM streamlines onboarding a new employee or team by using your identity provider to create users and groups in Databricks and give them the proper level of access. See Sync users and groups from your identity provider using SCIM.
-