SSO to Databricks with OneLogin
This page shows how to configure OneLogin as the identity provider for single sign-on (SSO) in your Databricks account. OneLogin supports both OpenID Connect (OIDC) and SAML 2.0. To sync users and groups from OneLogin, see Sync users and groups from your identity provider using SCIM.
To prevent getting locked out of Databricks during single sign-on testing, keep the account console open in a different browser window. You can also configure emergency access with security keys to prevent lockout. See Emergency access to prevent lockouts.
Enable OneLogin single sign-on
Choose your identity protocol:
- OIDC
- SAML 2.0
-
As an account admin, log in to the account console and click Security.
-
Click the Authentication tab.
-
Next to Authentication, click Manage.
-
Choose Single sign-on with my identity provider.
-
Click Continue.
-
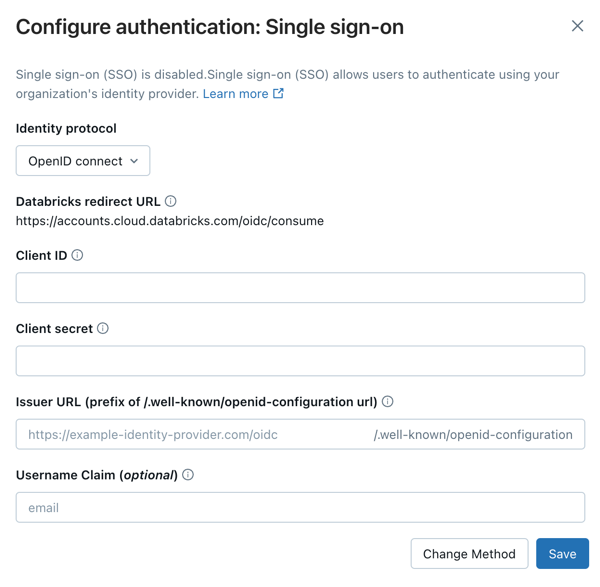
Under Identity protocol, select OpenID Connect.
-
On the Authentication tab, make note of the Databricks Redirect URL value.

-
In a new browser tab, log in to OneLogin.
-
Click Administration.
-
Click Applications.
-
Click Add App.
-
Search for
OpenId Connectand select the OpenId Connect (OIDC) app. -
Enter a name and click Save.
-
In the Configuration tab, Databricks Redirect URL from step 4. You can choose to configure the other settings or you can leave them to their default values.
-
In the SSO tab, copy the copy the client ID, client secret, and issuer URL values.
-
Client ID is the unique identifier for the Databricks application you created in OneLogin.
-
Client secret is a secret or password generated for the Databricks application that you created. It is used to authorize Databricks with your identity provider.
-
Issuer URL is the URL where you can find OneLogin's OpenID Configuration Document. That OpenID Configuration Document must found be in
{issuer-url}/.well-known/openid-configuration.Remove the
/.well-known/openid-configurationending from the URL. You can specify query parameters by appending them to the issuer URL, for example{issuer-url}?appid=123.
-
-
Return to the Databricks account console Authentication tab and enter values you copied from the identity provider application to the Client ID, Client secret, and OpenID issuer URL fields.
-
Optionally, enter a Username claim if you want to use a claim other than
emailas users' Databricks usernames. See your identity provider's documentation for specific information on claim values.
-
Click Save.
-
Click Test SSO to validate that your SSO configuration is working properly.
-
Click Enable SSO to enable single sign-on for your account.
-
Test account console login with SSO.
-
As an account admin, log in to the account console and click Security.
-
Click the Authentication tab.
-
Next to Authentication, click Manage.
-
Choose Single sign-on with my identity provider.
-
Click Continue.
-
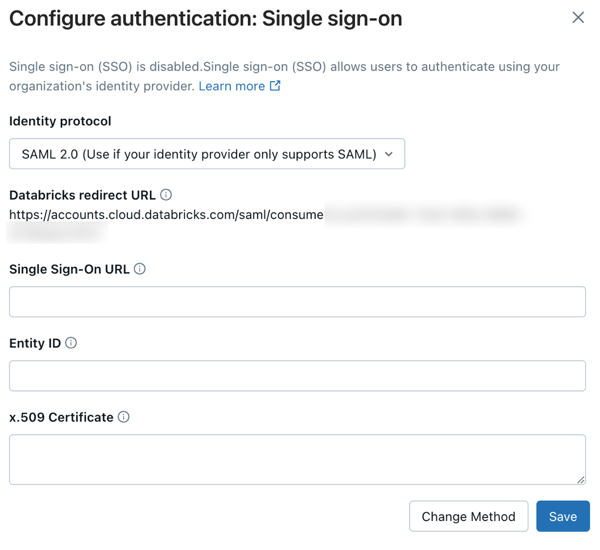
Under Identity protocol, select SAML 2.0.
-
On the Authentication tab, make note of the Databricks Redirect URL value.
-
In a new browser tab, log in to OneLogin.
-
Click Administration.
-
Click Applications.
-
Click Add App.
-
Search for SAML Custom Connector (Advanced) and click the result by OneLogin, Inc.
-
Set Display Name to Databricks.
-
Click Save. The application's Info tab loads.
-
Click Configuration.
-
In Gather required information, set each of the following fields to the Databricks SAML URL:
- Audience
- Recipient
- ACS (Consumer) URL Validator
- ACS (Consumer) URL
- Single Logout URL
- Login URL
-
Set SAML signature element to Both.
-
Click Parameters.
-
Set Credentials are to Configured by admins and shared by all users.
-
Click Email. Set the value to email and enable Include in SAML Assertion.
-
Click the SSO tab.
-
Copy the following values:
- x.509 certificate
- Issuer URL
- SAML 2.0 endpoint (HTTP)
-
Verify that SAML signature element is set to Response or Both.
-
Verify that Encrypt assertion is disabled.
-
Return to the Databricks account console Authentication tab and enter values you copied from OneLogin:
- Single Sign-On URL: The OneLogin SAML 2.0 endpoint (HTTP)
- Identity Provider Entity ID: The OneLogin Issuer URL
- x.509 Certificate: The OneLogin x.509 certificate, including the markers for the beginning and ending of the certificate
-
Click Save.
-
Click Test SSO to validate that your SSO configuration is working properly.
-
Click Enable SSO to enable single sign-on for your account.
-
Test account console login with SSO.
Configure unified login and add users to Databricks
After you configure SSO, Databricks recommends that you configure unified login and add users to your account using SCIM provisioning.
-
Configure unified login
Unified login allows you to use the account console SSO configuration in your Databricks workspaces. If your account was created after June 21, 2023 or you did not configure SSO before December 12, 2024, unified login is enabled on your account for all workspaces and it cannot be disabled. To configure unified login, see Enable unified login.
-
Add users to Databricks
-
Enable JIT provisioning
Databricks recommends enabling JIT to automatically add users to Databricks when they first log in using SSO. JIT provisioning is on by default for accounts created after May 1, 2025 when SSO is configured. See Automatically provision users (JIT).
-
Configure SCIM provisioning
Databricks recommends using SCIM provisioning to sync users and groups automatically from your identity provider to your Databricks account. SCIM streamlines onboarding a new employee or team by using your identity provider to create users and groups in Databricks and give them the proper level of access. See Sync users and groups from your identity provider using SCIM.
-