Install the Databricks extension for Visual Studio Code
This article describes how to install and open the Databricks extension for Visual Studio Code, and then configure a project for the extension to use. See Databricks extension for Visual Studio Code.
Requirements
To use the Databricks extension for Visual Studio Code:
-
You must have at least one Databricks workspace available, and the workspace must contain at least one Databricks cluster. If you do not have a cluster available, you can create a cluster as part of the Databricks extension for Visual Studio Code installation.
noteDatabricks SQL warehouses are not supported by this extension.
-
You must have Visual Studio Code version 1.86.0 or above installed. To view your installed version, click Code > About Visual Studio Code from the main menu on Linux or macOS and Help > About on Windows. To download, install, and configure Visual Studio Code, see Setting up Visual Studio Code.
-
Visual Studio Code must be configured for Python coding, including the availability of a Python interpreter. For details, see Getting Started with Python in VS Code.
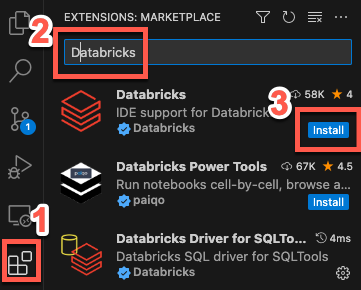
Install and open the extension
-
In Visual Studio Code, open the Extensions view (View > Extensions from the main menu).
-
In Search Extensions in Marketplace, enter Databricks.
-
Click the Databricks extension and then click Install.
noteBe sure to choose the extension that is Databricks verified ownership.
-
Click Reload Required, or restart Visual Studio Code.
-
To open the extension, on the sidebar, click the Databricks icon.
-
Configure the Databricks extension for Visual Studio Code to connect to your Databricks workspace. See Configure your Databricks project using the Databricks extension for Visual Studio Code.
Install a different version of the extension
If you want to install a specific version of the Databricks extension for Visual Studio Code, such as a previous version, or to upgrade to the release version, in Visual Studio Code, in the Extensions view (View > Extensions from the main menu):
-
Click Databricks, then click the Uninstall dropdown arrow.
-
Click Install Another Version and choose a version.
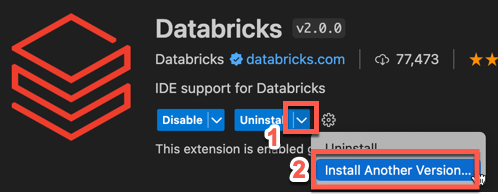
Alternatively, to upgrade to the release version, click Switch to Release Version.
-
To apply version change, click Restart Extensions or restart Visual Studio Code.
For more information, see the Visual Studio Code extension documentation.
Uninstall the extension
If you must uninstall the Databricks extension for Visual Studio Code, in Visual Studio Code, click View > Extensions from the main menu, then:
- In the list of extensions, select the Databricks extension.
- Click Uninstall.
- Click Reload Required, or restart Visual Studio Code.