Ingest data from SQL Server
This page describes how to ingest data from SQL Server and load it into Databricks using Lakeflow Connect. The SQL Server connector supports Azure SQL Database, Azure SQL Managed Instance, and Amazon RDS SQL databases. This includes SQL Server running on Azure virtual machines (VMs) and Amazon EC2. The connector also supports SQL Server on-premises using Azure ExpressRoute and AWS Direct Connect networking.
Before you begin
To create an ingestion gateway and an ingestion pipeline, you must meet the following requirements:
-
Your workspace is enabled for Unity Catalog.
-
Serverless compute is enabled for your workspace. See Serverless compute requirements.
-
If you plan to create a connection: You have
CREATE CONNECTIONprivileges on the metastore.If your connector supports UI-based pipeline authoring, you can create the connection and the pipeline at the same time by completing the steps on this page. However, if you use API-based pipeline authoring, you must create the connection in Catalog Explorer before you complete the steps on this page. See Connect to managed ingestion sources.
-
If you plan to use an existing connection: You have
USE CONNECTIONprivileges orALL PRIVILEGESon the connection. -
You have
USE CATALOGprivileges on the target catalog. -
You have
USE SCHEMA,CREATE TABLE, andCREATE VOLUMEprivileges on an existing schema orCREATE SCHEMAprivileges on the target catalog.
-
You have access to a primary SQL Server instance. Change tracking and change data capture features are not supported on read replicas or secondary instances.
-
Unrestricted permissions to create clusters, or a custom policy (API only). A custom policy for the gateway must meet the following requirements:
-
Family: Job Compute
-
Policy family overrides:
{
  "cluster_type": {
    "type": "fixed",
    "value": "dlt"
  },
  "num_workers": {
    "type": "unlimited",
    "defaultValue": 1,
    "isOptional": true
  },
  "runtime_engine": {
    "type": "fixed",
    "value": "STANDARD",
    "hidden": true
  }
} -
Databricks recommends specifying the smallest possible worker nodes for ingestion gateways because they do not impact gateway performance. The following compute policy enables Databricks to scale the ingestion gateway to meet the needs of your workload. The minimum requirement is 8 cores to enable efficient and performant data extraction from your source database.
Python{
"driver_node_type_id": {
"type": "fixed",
"value": "r5n.16xlarge"
},
"node_type_id": {
"type": "fixed",
"value": "m5n.large"
}
}
For more information about cluster policies, see Select a compute policy.
-
To ingest from SQL Server, you must also complete the source setup.
Option 1: Databricks UI
Admin users can create a connection and a pipeline at the same time in the UI. This is the simplest way to create managed ingestion pipelines.
-
In the sidebar of the Databricks workspace, click Data Ingestion.
-
On the Add data page, under Databricks connectors, click SQL Server.
The ingestion wizard opens.
-
On the Ingestion gateway page of the wizard, enter a unique name for the gateway.
-
Select a catalog and a schema for the staging ingestion data, then click Next.
-
On the Ingestion pipeline page, enter a unique name for the pipeline.
-
For Destination catalog, select a catalog to store the ingested data.
-
Select the Unity Catalog connection that stores the credentials required to access the source data.
If there are no existing connections to the source, click Create connection and enter the authentication details you obtained from the source setup. You must have
CREATE CONNECTIONprivileges on the metastore. -
Click Create pipeline and continue.
-
On the Source page, select the tables to ingest.
-
Optionally change the default history tracking setting. For more information, see Enable history tracking (SCD type 2).
-
Click Next.
-
On the Destination page, select the Unity Catalog catalog and schema to write to.
If you don't want to use an existing schema, click Create schema. You must have
USE CATALOGandCREATE SCHEMAprivileges on the parent catalog. -
Click Save and continue.
-
(Optional) On the Settings page, click Create schedule. Set the frequency to refresh the destination tables.
-
(Optional) Set email notifications for pipeline operation success or failure.
-
Click Save and run pipeline.
Option 2: Other interfaces
Before you ingest using Databricks Asset Bundles, Databricks APIs, Databricks SDKs, or the Databricks CLI, you must have access to an existing Unity Catalog connection. For instructions, see Connect to managed ingestion sources.
Create the staging catalog and schema
The staging catalog and schema can be the same as the destination catalog and schema. The staging catalog can't be a foreign catalog.
- CLI
export CONNECTION_NAME="my_connection"
export TARGET_CATALOG="main"
export TARGET_SCHEMA="lakeflow_sqlserver_connector_cdc"
export STAGING_CATALOG=$TARGET_CATALOG
export STAGING_SCHEMA=$TARGET_SCHEMA
export DB_HOST="cdc-connector.database.windows.net"
export DB_USER="..."
export DB_PASSWORD="..."

output=$(databricks connections create --json '{
  "name": "'"$CONNECTION_NAME"'",
  "connection_type": "SQLSERVER",
  "options": {
    "host": "'"$DB_HOST"'",
    "port": "1433",
    "trustServerCertificate": "false",
    "user": "'"$DB_USER"'",
    "password": "'"$DB_PASSWORD"'"
  }
}')

export CONNECTION_ID=$(echo $output | jq -r '.connection_id')
Create the gateway and ingestion pipeline
The ingestion gateway extracts snapshot and change data from the source database and stores it in the Unity Catalog staging volume. You must run the gateway as a continuous pipeline. This helps to accommodate any change log retention policies that you have on the source database.
The ingestion pipeline applies the snapshot and change data from the staging volume into destination streaming tables.
- Databricks Asset Bundles
- Notebook
- CLI
This tab describes how to deploy an ingestion pipeline using Databricks Asset Bundles. Bundles can contain YAML definitions of jobs and tasks, are managed using the Databricks CLI, and can be shared and run in different target workspaces (such as development, staging, and production). For more information, see Databricks Asset Bundles.
-
Create a new bundle using the Databricks CLI:
Bashdatabricks bundle init -
Add two new resource files to the bundle:
- A pipeline definition file (
resources/sqlserver_pipeline.yml). - A workflow file that controls the frequency of data ingestion (
resources/sqlserver.yml).
The following is an example
resources/sqlserver_pipeline.ymlfile:YAMLvariables:
# Common variables used multiple places in the DAB definition.
gateway_name:
default: sqlserver-gateway
dest_catalog:
default: main
dest_schema:
default: ingest-destination-schema
resources:
pipelines:
gateway:
name: ${var.gateway_name}
gateway_definition:
connection_name: <sqlserver-connection>
gateway_storage_catalog: main
gateway_storage_schema: ${var.dest_schema}
gateway_storage_name: ${var.gateway_name}
target: ${var.dest_schema}
catalog: ${var.dest_catalog}
pipeline_sqlserver:
name: sqlserver-ingestion-pipeline
ingestion_definition:
ingestion_gateway_id: ${resources.pipelines.gateway.id}
objects:
# Modify this with your tables!
- table:
# Ingest the table test.ingestion_demo_lineitem to dest_catalog.dest_schema.ingestion_demo_line_item.
source_catalog: test
source_schema: ingestion_demo
source_table: lineitem
destination_catalog: ${var.dest_catalog}
destination_schema: ${var.dest_schema}
- schema:
# Ingest all tables in the test.ingestion_whole_schema schema to dest_catalog.dest_schema. The destination
# table name will be the same as it is on the source.
source_catalog: test
source_schema: ingestion_whole_schema
destination_catalog: ${var.dest_catalog}
destination_schema: ${var.dest_schema}
target: ${var.dest_schema}
catalog: ${var.dest_catalog}The following is an example
resources/sqlserver_job.ymlfile:YAMLresources:
jobs:
sqlserver_dab_job:
name: sqlserver_dab_job
trigger:
# Run this job every day, exactly one day from the last run
# See https://docs.databricks.com/api/workspace/jobs/create#trigger
periodic:
interval: 1
unit: DAYS
email_notifications:
on_failure:
- <email-address>
tasks:
- task_key: refresh_pipeline
pipeline_task:
pipeline_id: ${resources.pipelines.pipeline_sqlserver.id} - A pipeline definition file (
-
Deploy the pipeline using the Databricks CLI:
Bashdatabricks bundle deploy
Update the Configuration cell in the following notebook with the source connection, target catalog, target schema, and tables to ingest from the source.
Create gateway and ingestion pipeline
To create the gateway:
output=$(databricks pipelines create --json '{
"name": "'"$GATEWAY_PIPELINE_NAME"'",
"gateway_definition": {
  "connection_id": "'"$CONNECTION_ID"'",
  "gateway_storage_catalog": "'"$STAGING_CATALOG"'",
  "gateway_storage_schema": "'"$STAGING_SCHEMA"'",
  "gateway_storage_name": "'"$GATEWAY_PIPELINE_NAME"'"
  }
}')

export GATEWAY_PIPELINE_ID=$(echo $output | jq -r '.pipeline_id')
To create the ingestion pipeline:
databricks pipelines create --json '{
"name": "'"$INGESTION_PIPELINE_NAME"'",
"ingestion_definition": {
  "ingestion_gateway_id": "'"$GATEWAY_PIPELINE_ID"'",
  "objects": [
    {"table": {
        "source_catalog": "tpc",
        "source_schema": "tpch",
        "source_table": "lineitem",
        "destination_catalog": "'"$TARGET_CATALOG"'",
        "destination_schema": "'"$TARGET_SCHEMA"'",
        "destination_table": "<YOUR_DATABRICKS_TABLE>",
        }},
     {"schema": {
        "source_catalog": "tpc",
        "source_schema": "tpcdi",
        "destination_catalog": "'"$TARGET_CATALOG"'",
        "destination_schema": "'"$TARGET_SCHEMA"'"
        }}
    ]
  }
}'
Start, schedule, and set alerts on your pipeline
You can create a schedule for the pipeline on the pipeline details page.
-
After the pipeline has been created, revisit the Databricks workspace, and then click Pipelines.
The new pipeline appears in the pipeline list.
-
To view the pipeline details, click the pipeline name.
-
On the pipeline details page, you can schedule the pipeline by clicking Schedule.
-
To set notifications on the pipeline, click Settings, and then add a notification.
For each schedule that you add to a pipeline, Lakeflow Connect automatically creates a job for it. The ingestion pipeline is a task within the job. You can optionally add more tasks to the job.
Verify successful data ingestion
The list view on the pipeline details page shows the number of records processed as data is ingested. These numbers refresh automatically.
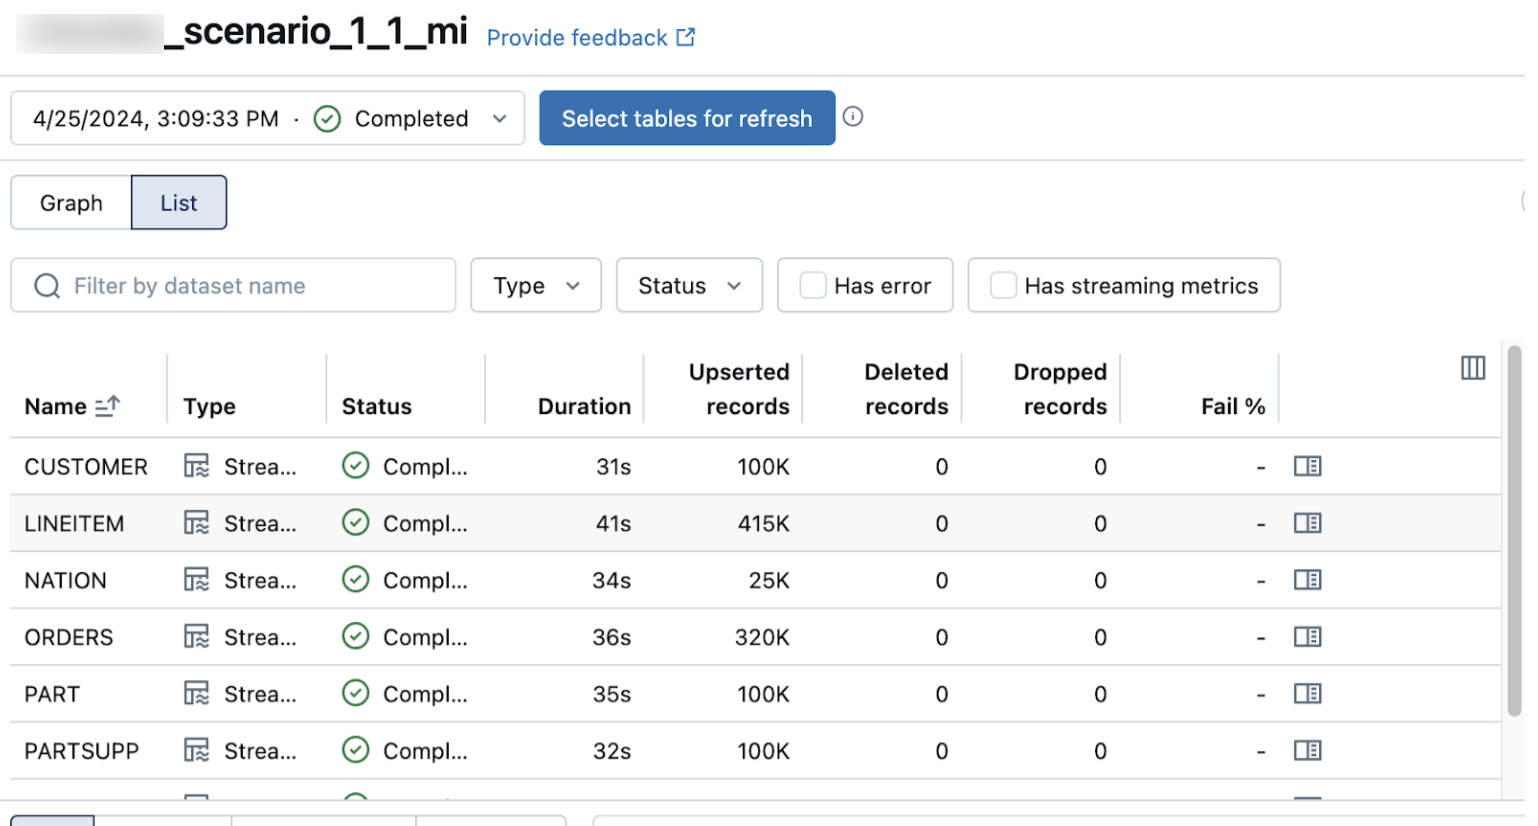
The Upserted records and Deleted records columns are not shown by default. You can enable them by clicking on the columns configuration ![]() button and selecting them.
button and selecting them.