Create custom model serving endpoints
This article describes how to create model serving endpoints that serve custom models using Databricks Model Serving.
Model Serving provides the following options for serving endpoint creation:
- The Serving UI
- REST API
- MLflow Deployments SDK
For creating endpoints that serve generative AI models, see Create foundation model serving endpoints.
Requirements
- Your workspace must be in a supported region.
- If you use custom libraries or libraries from a private mirror server with your model, see Use custom Python libraries with Model Serving before you create the model endpoint.
- For creating endpoints using the MLflow Deployments SDK, you must install the MLflow Deployment client. To install it, run:
import mlflow.deployments

client = mlflow.deployments.get_deploy_client("databricks")
Identity and access
To create or update a model serving endpoint, both the caller and the endpoint's recorded creator must:
- Be a member of the workspace.
- Hold the
workspace-accessentitlement.
Creator identity
When you create an endpoint, Databricks records the calling identity as the endpoint's creator. This identity — typically a service principal — is used to access Unity Catalog resources on behalf of the endpoint and cannot be changed after creation.
If the recorded creator lacks the required Unity Catalog grants or has been removed from the workspace, you must delete the endpoint and recreate it under a service principal that has the required permissions and is a current workspace member.
Configuration and served-entity updates re-evaluate the recorded creator's workspace membership and grants. Updates fail with PERMISSION_DENIED if the recorded creator is no longer a workspace member, even when the caller has valid permissions.
Served entity grants
The recorded creator must hold the following grants on each served entity. Grants validated at endpoint creation or update cause the request to fail with PERMISSION_DENIED if missing. Grants required at query time are not validated upfront — missing grants cause runtime errors when the endpoint serves traffic.
Resource type | Required grant | When validated |
|---|---|---|
Unity Catalog model |
| Endpoint creation or update |
If a Unity Catalog model declares transitive function dependencies, the recorded creator also needs EXECUTE on those upstream functions.
Manage endpoint access
To understand access control options for model serving endpoints, see Manage permissions on a model serving endpoint.
Create an endpoint
- Serving UI
- REST API
- MLflow Deployments SDK
- Workspace Client
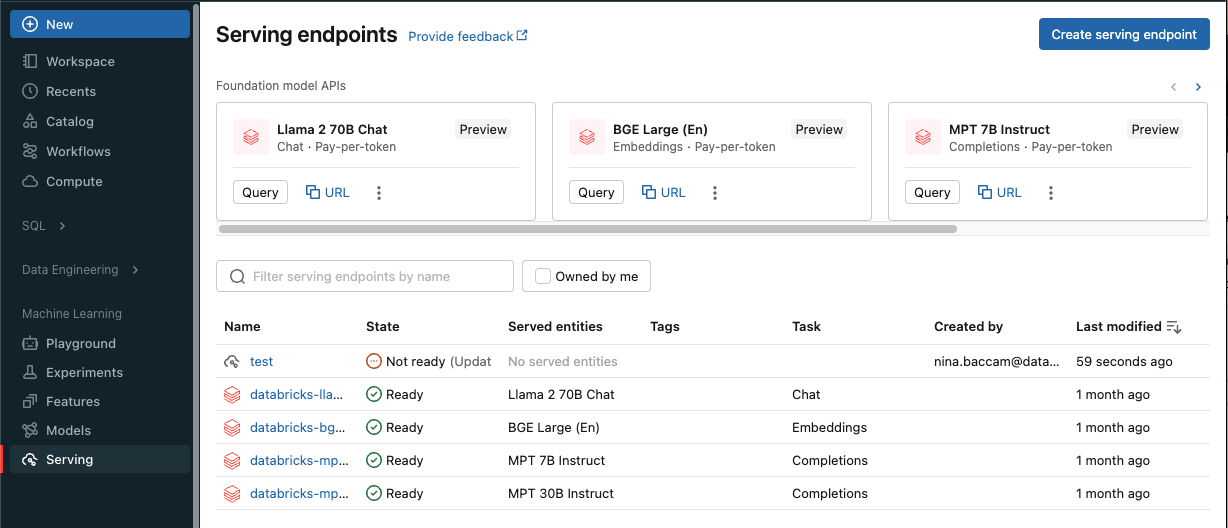
You can create an endpoint for model serving with the Serving UI.
-
Click Serving in the sidebar to display the Serving UI.
-
Click Create serving endpoint.
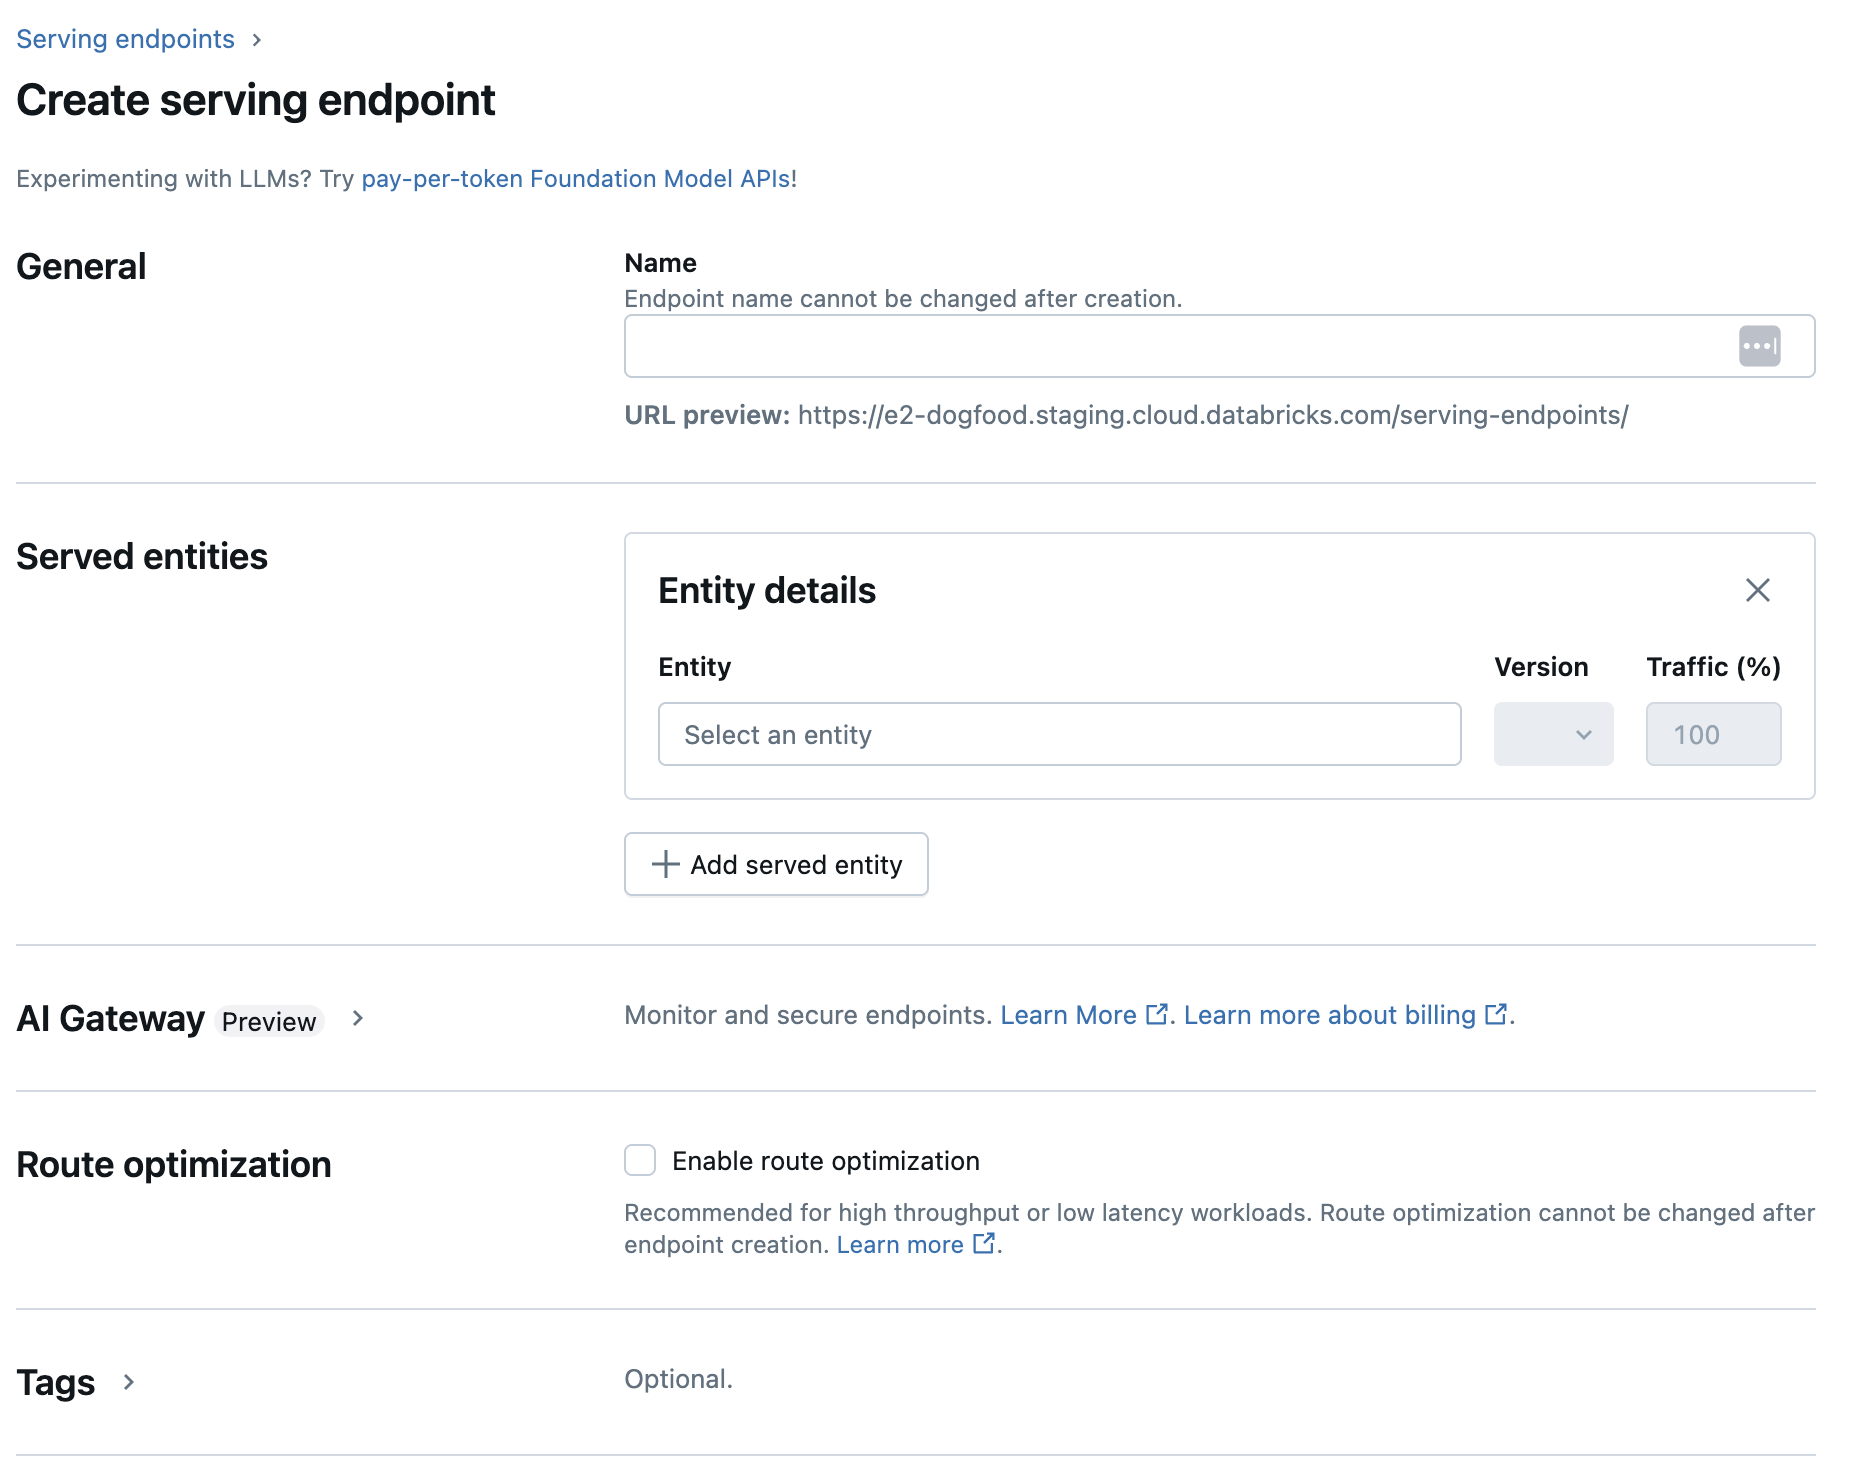
For models in Unity Catalog (recommended) or the legacy Workspace Model Registry:
-
In the Name field provide a name for your endpoint.
- Endpoint names cannot use the
databricks-prefix. This prefix is reserved for Databricks preconfigured endpoints.
- Endpoint names cannot use the
-
In the Served entities section
- Click into the Entity field to open the Select served entity form.
- Select either My models- Unity Catalog or My models- Model Registry based on where your model is registered. The form dynamically updates based on your selection.
- Not all models are custom models. Models can be foundation models or features for feature serving.
- Select which model and model version you want to serve.
- Select the percentage of traffic to route to your served model.
- Select what size compute to use. You can use CPU or GPU computes for your workloads. See Compute type for available workload types, including the
CPU_MEDIUMandCPU_LARGEoptions for models that need more memory than the standardCPUtype. For GPU code examples, see GPU workload types. - Under Compute Scale-out, select the size of the compute scale out that corresponds with the number of requests this served model can process at the same time. This number should be roughly equal to QPS x model run time. For customer-defined compute settings, see model serving limits.
- Available sizes are Small for 0-4 requests, Medium 8-16 requests, and Large for 16-64 requests.
- Specify if the endpoint should scale to zero when not in use. Scale to zero is not recommended for production endpoints, as capacity is not guaranteed when scaled to zero. When an endpoint scales to zero, there is additional latency, also referred to as a cold start, when the endpoint scales back up to serve requests.
- Under Advanced configuration, you can:
- Rename the served entity to customize how it appears in the endpoint.
- Add an instance profile to connect to AWS resources from your endpoint.
- Add environment variables to connect to resources from your endpoint or log your feature lookup DataFrame to the endpoint's inference table. Logging the feature lookup DataFrame requires MLflow 2.14.0 or above.
- (Optional) To add additional served entities to your endpoint, click Add served entity and repeat the configuration steps above. You can serve multiple models or model versions from a single endpoint and control the traffic split between them. See serve multiple models for more information.
-
In the Route optimization section, you can enable route optimization for your endpoint. Route optimization is recommended for endpoints with high QPS and throughput requirements. See Route optimization on serving endpoints.
-
In the AI Gateway section, you can select which governance features to enable on your endpoint. See AI governance with Unity AI Gateway.
-
Click Create. The Serving endpoints page appears with Serving endpoint state shown as Not Ready.
You can create endpoints using the REST API. See POST /api/2.0/serving-endpoints for endpoint configuration parameters.
The following example creates an endpoint that serves the third version of the my-ads-model model that is registered in the Unity Catalog model registry. To specify a model from Unity Catalog, provide the full model name including parent catalog and schema such as, catalog.schema.example-model. This example uses custom-defined concurrency with min_provisioned_concurrency and max_provisioned_concurrency. Concurrency values must be multiples of 4.
POST /api/2.0/serving-endpoints

{
  "name": "uc-model-endpoint",
  "config":
  {
    "served_entities": [
      {
        "name": "ads-entity",
        "entity_name": "catalog.schema.my-ads-model",
        "entity_version": "3",
        "min_provisioned_concurrency": 4,
        "max_provisioned_concurrency": 12,
        "scale_to_zero_enabled": false
      }
    ]
  }
}
The following is an example response. The endpoint's config_update state is NOT_UPDATING and the served model is in a READY state.
{
  "name": "uc-model-endpoint",
  "creator": "user@email.com",
  "creation_timestamp": 1700089637000,
  "last_updated_timestamp": 1700089760000,
  "state": {
    "ready": "READY",
    "config_update": "NOT_UPDATING"
  },
  "config": {
    "served_entities": [
      {
        "name": "ads-entity",
        "entity_name": "catalog.schema.my-ads-model",
        "entity_version": "3",
        "min_provisioned_concurrency": 4,
        "max_provisioned_concurrency": 12,
        "scale_to_zero_enabled": false,
        "workload_type": "CPU",
        "state": {
          "deployment": "DEPLOYMENT_READY",
          "deployment_state_message": ""
        },
        "creator": "user@email.com",
        "creation_timestamp": 1700089760000
      }
    ],
    "config_version": 1
  },
  "tags": [
    {
      "key": "team",
      "value": "data science"
    }
  ],
  "id": "e3bd3e471d6045d6b75f384279e4b6ab",
  "permission_level": "CAN_MANAGE",
  "route_optimized": false
}
MLflow Deployments provides an API for create, update and deletion tasks. The APIs for these tasks accept the same parameters as the REST API for serving endpoints. See POST /api/2.0/serving-endpoints for endpoint configuration parameters.
The following example creates an endpoint that serves the third version of the my-ads-model model that is registered in the Unity Catalog model registry. You must provide the full model name including parent catalog and schema such as, catalog.schema.example-model. This example uses custom-defined concurrency with min_provisioned_concurrency and max_provisioned_concurrency. Concurrency values must be multiples of 4.
import mlflow
from mlflow.deployments import get_deploy_client

mlflow.set_registry_uri("databricks-uc")
client = get_deploy_client("databricks")

endpoint = client.create_endpoint(
    name="unity-catalog-model-endpoint",
    config={
        "served_entities": [
            {
                "name": "ads-entity",
                "entity_name": "catalog.schema.my-ads-model",
                "entity_version": "3",
                "min_provisioned_concurrency": 4,
                "max_provisioned_concurrency": 12,
                "scale_to_zero_enabled": False
            }
        ]
    }
)
The following example shows how to create an endpoint using the Databricks Workspace Client SDK.
from databricks.sdk import WorkspaceClient
from databricks.sdk.service.serving import EndpointCoreConfigInput, ServedEntityInput

w = WorkspaceClient()

w.serving_endpoints.create(
    name="uc-model-endpoint",
    config=EndpointCoreConfigInput(
        served_entities=[
            ServedEntityInput(
                name="ads-entity",
                entity_name="catalog.schema.my-ads-model",
                entity_version="3",
                workload_size="Small",
                scale_to_zero_enabled=False
            )
        ]
    )
)
You can also:
- Enable inference tables to automatically capture incoming requests and outgoing responses to your model serving endpoints.
- If you have inference tables enabled on your endpoint, you can log your feature lookup DataFrame to the inference table.
You can also:
- Add an instance profile to a model serving endpoint
- Configure access to resources from model serving endpoints
GPU workload types
GPU deployment is compatible with the following package versions:
- PyTorch 1.13.0 - 2.0.1
- TensorFlow 2.5.0 - 2.13.0
- MLflow 2.4.0 and above
The following examples show how to create GPU endpoints using different methods.
- Serving UI
- REST API
- MLflow Deployments SDK
- Workspace Client
To configure your endpoint for GPU workloads with the Serving UI, select the desired GPU type from the Compute Type dropdown when creating your endpoint. Follow the same steps in Create an endpoint, but select a GPU workload type instead of CPU.
To deploy your models using GPUs, include the workload_type field in your endpoint configuration.
POST /api/2.0/serving-endpoints

{
  "name": "gpu-model-endpoint",
  "config": {
    "served_entities": [{
      "entity_name": "catalog.schema.my-gpu-model",
      "entity_version": "1",
      "workload_type": "GPU_SMALL",
      "workload_size": "Small",
      "scale_to_zero_enabled": false
    }]
  }
}
The following example shows how to create a GPU endpoint using the MLflow Deployments SDK.
import mlflow
from mlflow.deployments import get_deploy_client

mlflow.set_registry_uri("databricks-uc")
client = get_deploy_client("databricks")

endpoint = client.create_endpoint(
    name="gpu-model-endpoint",
    config={
        "served_entities": [{
            "entity_name": "catalog.schema.my-gpu-model",
            "entity_version": "1",
            "workload_type": "GPU_SMALL",
            "workload_size": "Small",
            "scale_to_zero_enabled": False
        }]
    }
)
The following example shows how to create a GPU endpoint using the Databricks Workspace Client SDK.
from databricks.sdk import WorkspaceClient
from databricks.sdk.service.serving import EndpointCoreConfigInput, ServedEntityInput

w = WorkspaceClient()

w.serving_endpoints.create(
    name="gpu-model-endpoint",
    config=EndpointCoreConfigInput(
        served_entities=[
            ServedEntityInput(
                entity_name="catalog.schema.my-gpu-model",
                entity_version="1",
                workload_type="GPU_SMALL",
                workload_size="Small",
                scale_to_zero_enabled=False
            )
        ]
    )
)
The available GPU workload types depend on your cloud provider, as summarized in the following table.
GPU workload type | GPU instance | GPU memory |
|---|---|---|
| 1xT4 | 16GB |
| 1xA10G | 24GB |
| 4xA10G | 96GB |
| 8xA10G | 192GB |
For GPU endpoints, the concurrency value determines the number of replicas allocated to serve your model. The number of replicas equals the concurrency value divided by 4. For example, setting min_provisioned_concurrency to 12 provisions 3 replicas.
Modify a custom model endpoint
After enabling a custom model endpoint, you can update the compute configuration as desired. This configuration is particularly helpful if you need additional resources for your model. Workload size and compute configuration play a key role in what resources are allocated for serving your model.
Configuration and served-entity updates re-validate the endpoint's recorded creator workspace membership and per-served-entity grants. Confirm both still hold before submitting an update; see Identity and access.
To avoid update failures:
- Use a long-lived service principal owned by your team as the endpoint creator.
- Do not use a personal user account that might be deactivated or removed from the workspace later.
- The recorded creator must remain a workspace member for the lifetime of the endpoint.
Updates to the endpoint configuration can fail. When failures occur the existing active configuration stays effective as if the update didn’t happen.
Verify that the update was successfully applied by reviewing the status of your endpoint.
Until the new configuration is ready, the old configuration keeps serving prediction traffic. While there is an update in progress, another update cannot be made. However, you can cancel an in progress update from the Serving UI.
- Serving UI
- REST API
- MLflow Deployments SDK
After you enable a model endpoint, select Edit endpoint to modify the compute configuration of your endpoint.
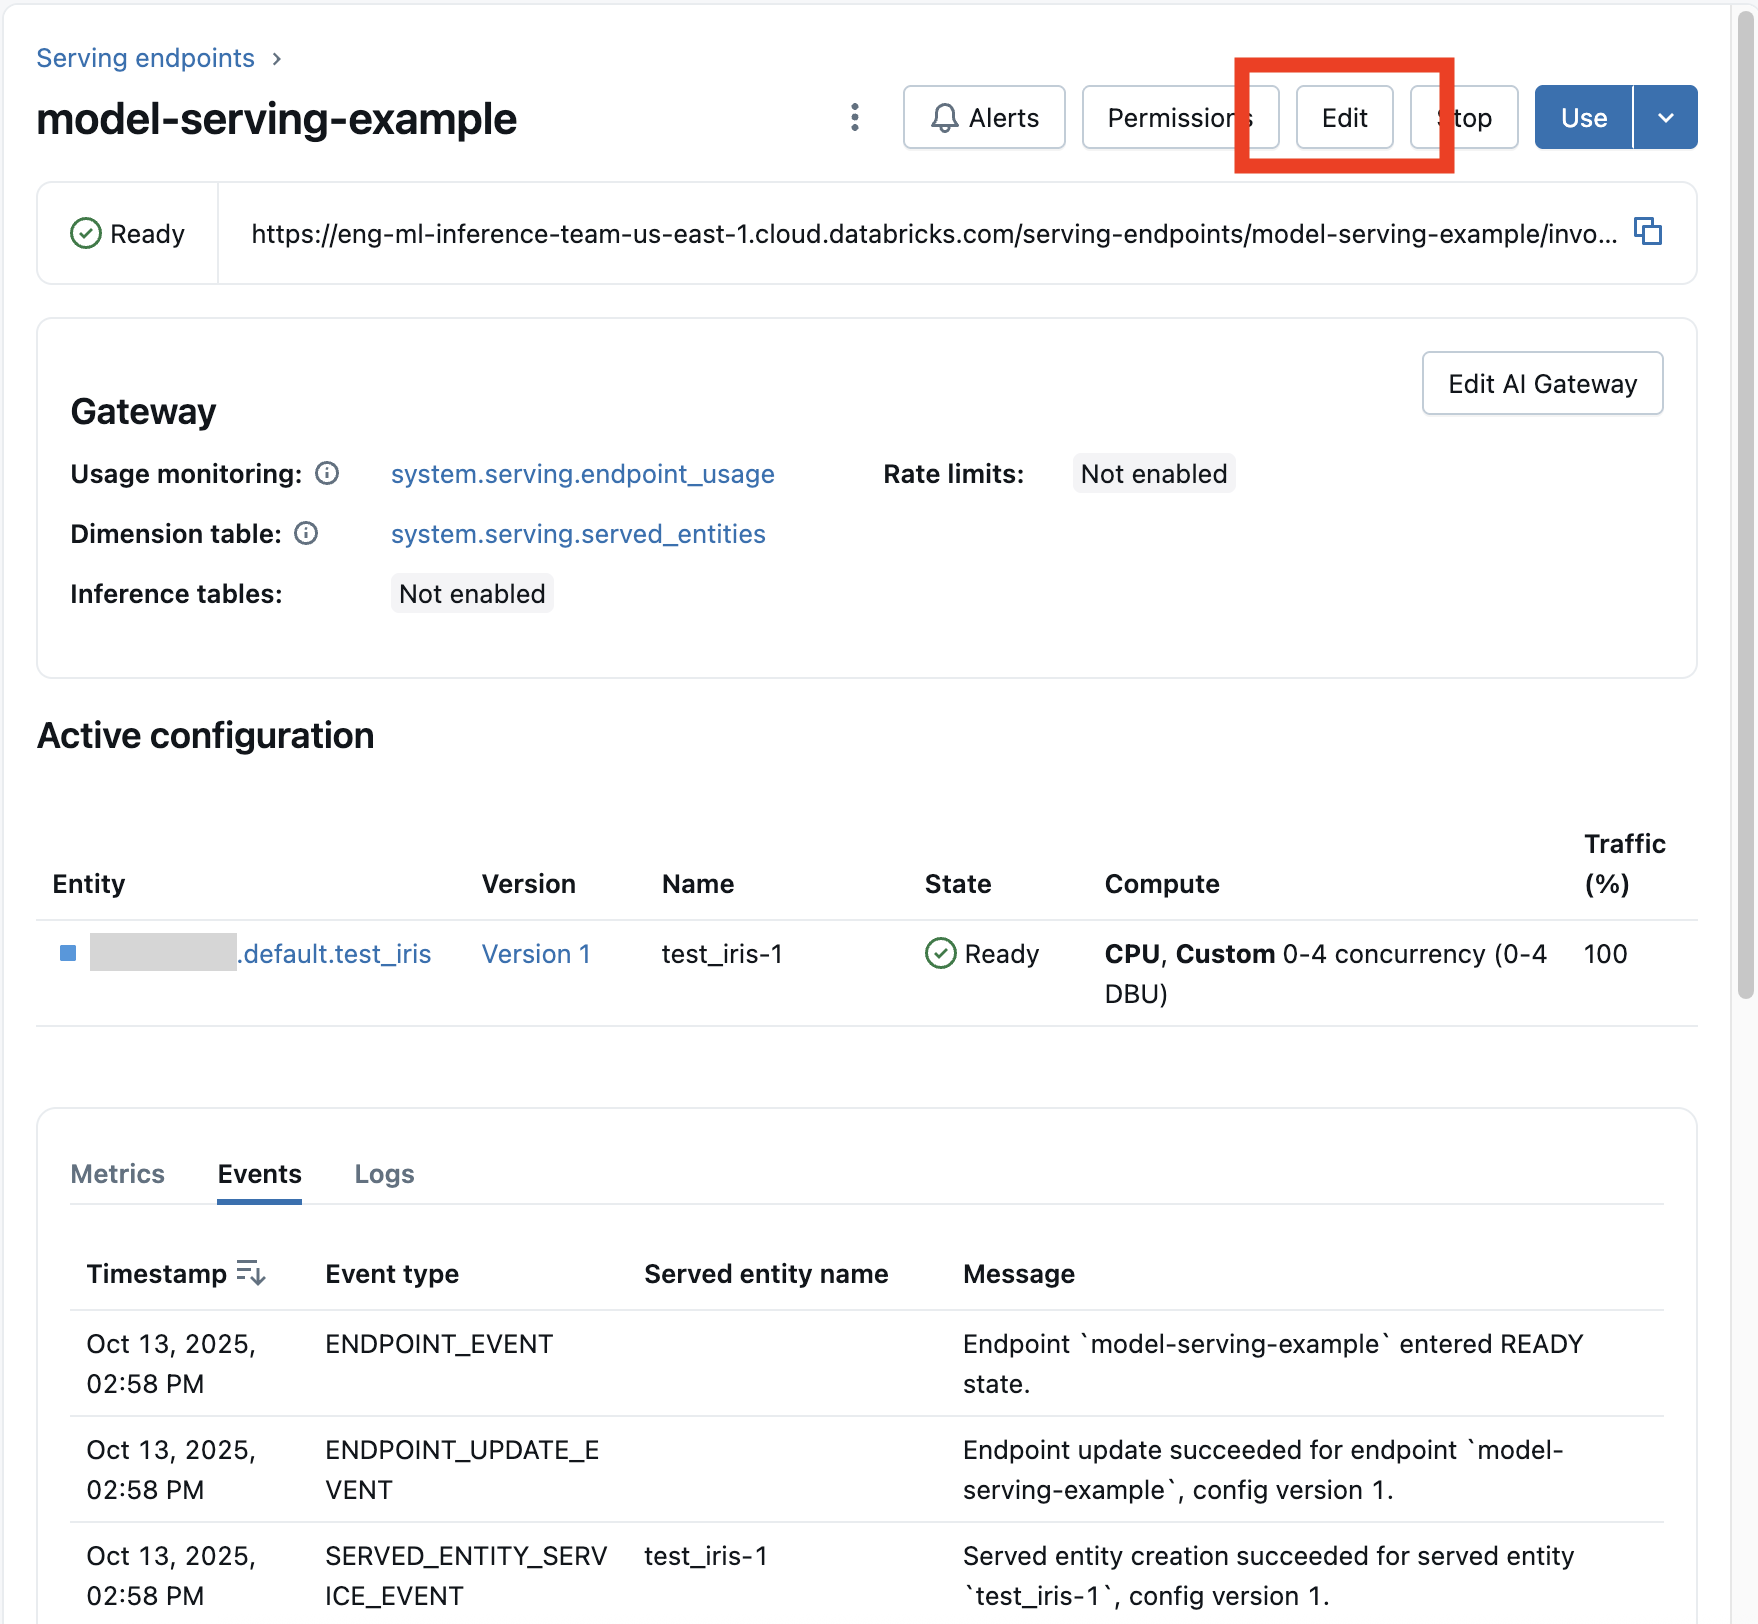
You can change most aspects of the endpoint configuration, except for the endpoint name and certain immutable properties.
You can cancel an in progress configuration update by selecting Cancel update on the endpoint's details page.
The following is an endpoint configuration update example using the REST API. See PUT /api/2.0/serving-endpoints/{name}/config.
PUT /api/2.0/serving-endpoints/{name}/config

{
  "name": "unity-catalog-model-endpoint",
  "config":
  {
    "served_entities": [
      {
        "entity_name": "catalog.schema.my-ads-model",
        "entity_version": "5",
        "workload_size": "Small",
        "scale_to_zero_enabled": true
      }
    ],
    "traffic_config":
    {
      "routes": [
        {
          "served_model_name": "my-ads-model-5",
          "traffic_percentage": 100
        }
      ]
    }
  }
}
The MLflow Deployments SDK uses the same parameters as the REST API, see PUT /api/2.0/serving-endpoints/{name}/config for request and response schema details.
The following code sample uses a model from the Unity Catalog model registry:
import mlflow
from mlflow.deployments import get_deploy_client

mlflow.set_registry_uri("databricks-uc")
client = get_deploy_client("databricks")

endpoint = client.update_endpoint_config(
  endpoint=f"{endpointname}",
  config={
    "served_entities": [
        {
            "entity_name": f"{catalog}.{schema}.{model_name}",
            "entity_version": "1",
            "workload_size": "Small",
            "scale_to_zero_enabled": True
        }
    ],
    "traffic_config": {
        "routes": [
            {
                "served_model_name": f"{model_name}-1",
                "traffic_percentage": 100
            }
        ]
    }
  }
)
Scoring a model endpoint
To score your model, send requests to the model serving endpoint.
Additional resources
- Manage model serving endpoints.
- External models in Model Serving.
- If you prefer to use Python, you can use the Databricks real-time serving Python SDK.
Notebook examples
The following notebooks include different Databricks registered models that you can use to get up and running with model serving endpoints. For additional examples, see Tutorial: Deploy and query a custom model.
The model examples can be imported into the workspace by following the directions in Import a notebook. After you choose and create a model from one of the examples, register it in Unity Catalog, and then follow the UI workflow steps for model serving.