SSO to Databricks with Microsoft Entra ID
This page shows how to configure Microsoft Entra ID as the identity provider for single sign-on (SSO) in your Databricks account. Microsoft Entra ID supports both OpenID Connect (OIDC) and SAML 2.0. To sync users and groups from Microsoft Entra ID, see Sync users and groups from your identity provider using SCIM.
To prevent getting locked out of Databricks during single sign-on testing, keep the account console open in a different browser window. You can also configure emergency access with security keys to prevent lockout. See Emergency access to prevent lockouts.
Enable Microsoft Entra ID single sign-on
Choose your identity protocol:
- OIDC
- SAML 2.0
-
As an account admin, log in to the account console and click Security.
-
Click the Authentication tab.
-
Next to Authentication, click Manage.
-
Choose Single sign-on with my identity provider.
-
Click Continue.
-
Under Identity protocol, select OpenID Connect.
-
On the Authentication tab, make note of the Databricks Redirect URL value.
-
In another browser tab, create a Microsoft Entra ID application:
- Log in to the Azure portal as an administrator.
- In the left navigation, click Microsoft Entra ID.
- Click App registrations > New registration.
- Enter a name.
- Under Supported account types choose: Accounts in this organizational directory only.
- Under Redirect URI, choose web and paste the Databricks Redirect URL value.
- Click Register.
-
Gather the required information from the Microsoft Entra ID application:
- Under Essentials, copy the Application (client) ID.
- Click Endpoints.
- Copy the URL under OpenID Connect metadata document
- In the left pane, click Certificates & secrets.
- Click + New client secret.
- Enter a description and choose an expiration.
- Click Add.
- Copy the secret value.
-
Return to the Databricks account console Authentication page and enter values you copied from the identity provider application to the Client ID, Client secret, and OpenID issuer URL fields. Remove the
/.well-known/openid-configurationending from the URL.You can specify query parameters by appending them to the issuer URL, for example
{issuer-url}?appid=123. -
Optionally, enter the name of a claim in the Username claim if you want to use a claim other than
emailas users' Databricks usernames. For more information, see Customize a claim to use for your account's usernames.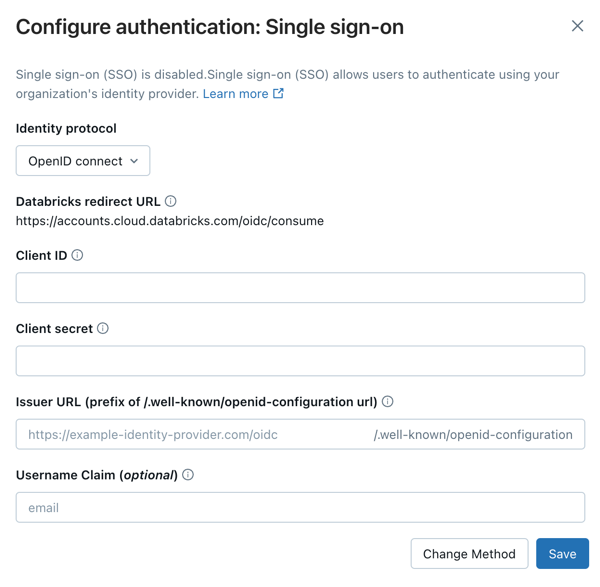
-
Click Save.
-
Click Test SSO to validate that your SSO configuration is working properly. Databricks opens a new browser window and attempts to authenticate using Microsoft Entra ID. Complete the sign-in flow and review the test results.
-
Click Enable SSO to enable single sign-on for your account.
-
Test account console login with SSO. For testing steps, see Test your SSO configuration.
-
As an account admin, log in to the account console and click Security.
-
Click the Authentication tab.
-
Next to Authentication, click Manage.
-
Choose Single sign-on with my identity provider.
-
Click Continue.
-
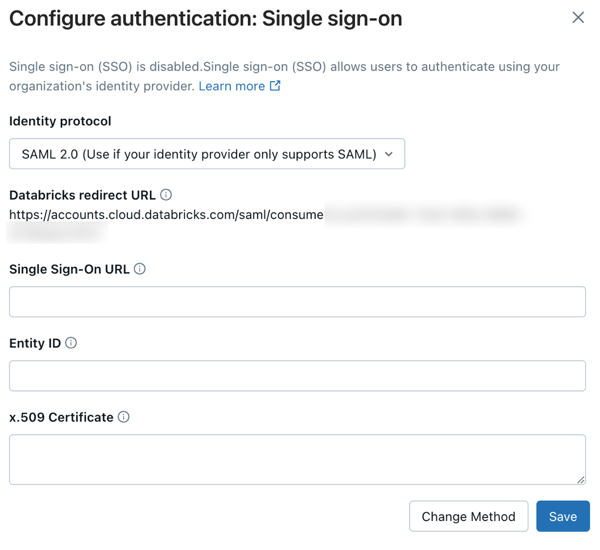
Under Identity protocol, select SAML 2.0.
-
On the Authentication tab, make note of the Databricks Redirect URL value.
-
In another browser tab, create a Microsoft Entra ID application:
- Log in to Azure portal as an administrator.
- In the left navigation, click Microsoft Entra ID > Enterprise applications. The All applications pane opens and displays a random sample of the applications in your Microsoft Entra ID tenant.
- Click New application.
- Click Create your own application.
- Enter a name.
- Under What are you looking to do with your application? choose Integrate any other application you don't find in the gallery.
-
Configure the Microsoft Entra ID application:
-
Click Properties.
-
Set Assignment required to No. This option allows all users to sign in to the Databricks account. Users must have access to this SAML application to log into your Databricks account using SSO.
-
In the application's properties pane, click Set up single sign on.
-
Click SAML to configure the application for SAML authentication. The SAML properties pane appears.
-
Next to Basic SAML configuration, click Edit.
-
Set Entity ID to the Databricks SAML URL you got from the Databricks SSO configuration page.
-
Set Reply URL to the Databricks SAML URL you got from the Databricks SSO configuration page.
-
Next to SAML Signing Certificate, click Edit.
-
In the Signing Option drop-down list, select Sign SAML response and assertion and set the Signing Algorithm to SHA-256 for enhanced security.
-
In Attributes & Claims, click Edit.
-
Set the Unique User Identifier (Name ID) field to
user.mail. -
Under SAML Certificates, next to Certificate (Base64), click Download. The certificate is downloaded locally as a file with the
.cerextension. -
Open the
.cerfile in a text editor and copy the file contents. The file is the entire x.509 certificate for the Microsoft Entra ID SAML application.important- Do not open it using the macOS keychain, which is the default application for that file type in macOS.
- The certificate is sensitive data. Use caution about where to download it. Delete it from local storage as soon as possible.
-
In the Azure portal, under Set up Microsoft Entra ID SAML Toolkit, copy and save the Login URL and Microsoft Entra ID Identifier.
-
-
Return to the Databricks account console Authentication tab and enter values you copied from Microsoft Entra ID:
- Single Sign-On URL: The Microsoft Entra ID Login URL
- Identity Provider Entity ID: The Microsoft Entra ID Microsoft Entra ID Identifier
- x.509 Certificate: The Microsoft Entra ID x.509 certificate, including the markers for the beginning and end of the certificate
-
Click Save.
-
Click Test SSO to validate that your SSO configuration is working properly. Databricks opens a new browser window and attempts to authenticate using Microsoft Entra ID. Complete the sign-in flow and review the test results.
-
Click Enable SSO to enable single sign-on for your account.
-
Test account console login with SSO. For testing steps, see Test your SSO configuration.
Add users to Databricks
After you configure SSO, add users to your account. Databricks recommends syncing users from your identity provider using automatic identity management, which syncs users and groups automatically from your identity provider to your Databricks account. See Configure Microsoft Entra ID for automatic identity management. Alternatively, if your identity provider does not support automatic identity management, you can configure SCIM provisioning. See Sync users and groups from your identity provider using SCIM.
Just-in-time (JIT) provisioning, which automatically adds users to Databricks when they first log in using SSO, is on by default for accounts created after May 1, 2025. See Automatically provision users (JIT).
Enable unified login
For most accounts, unified login is already enabled, which means the account-level SSO configuration applies to all workspaces. If your account was created before June 21, 2023, you might need to enable it. See Enable unified login.
Customize a claim to use for your account's usernames
By default, usernames in Databricks are represented as a user's email address. To assign usernames using a different value, configure a custom claim in your Microsoft Entra ID account.
Choose your identity protocol:
- OIDC
- SAML 2.0
For OIDC applications, configure optional claims using the Token configuration page in your Microsoft Entra ID App Registration.
-
Sign in to the Microsoft Entra admin center as at least a Cloud Application Administrator.
-
Browse to Identity > Applications > App registrations and select the application you created for Databricks SSO.
-
In the sidebar, under Manage, click Token configuration.
-
Click Add optional claim.
-
For Token type, select ID.
-
Select the claim you want to include in the token (for example,
email,preferred_username, or another available claim) and click Add.noteThe list of available claims depends on your token version. If you need claims that aren't in the predefined list, use directory extension attributes or a custom claims provider. See Configure optional claims in the Microsoft Entra documentation.
-
If prompted to turn on the Microsoft Graph email permission, select the checkbox and click Add.
-
In the Databricks account console, enter the claim name from step 6 in the Username claim field and click Save.
-
Click Test SSO to validate your configuration, then click Enable SSO.
Some optional claims, such as upn, might not be included in tokens issued by certain Microsoft Entra ID token endpoints (for example, the v2.0 endpoint). If SSO fails after configuring a custom username claim:
- Verify the claim is present in the ID token by inspecting it with jwt.ms.
- See the optional claims reference for which claims are supported for each token version.
For SAML applications, configure custom claims using the Attributes & Claims settings in your Microsoft Entra ID Enterprise Application.
- Sign in to the Microsoft Entra admin center as at least a Cloud Application Administrator.
- Browse to Identity > Applications > Enterprise applications and select the application you created for Databricks SSO.
- In the sidebar, click Single sign-on.
- In Attributes & Claims, click Edit.
- Click Add new claim.
- Enter a Name for the claim. This is the name you enter in the Username claim field of your Databricks SSO configuration.
- For Source, select Attribute.
- For Source attribute, select the desired Microsoft Entra ID attribute for this claim.
- Click Save.
- In the Databricks account console, enter the claim name from step 5 in the Username claim field and click Save.
- Click Test SSO to validate your configuration, then click Enable SSO.