Build and share a chat UI with Databricks Apps
Use Databricks Apps to build and deploy a chat UI for your agent. Agent app templates include this chat UI with no additional setup. Use this page to customize the template UI or to add a chat UI to an agent deployed without a template.
Requirements
This chat UI works with any Databricks agent, except legacy schemas, including:
- Agents deployed on Apps
- Agents deployed on Model Serving with the Chat or Responses task type
- Foundation model endpoints with Chat task type
You must have the following development tools:
-
NPM CLI: Required for local development. See GitHub - NPM CLI
-
Databricks CLI: Required for authentication, see the installation guide.
- Install the Databricks CLI.
- Set your profile name:
Bash
export DATABRICKS_CONFIG_PROFILE='your_profile_name' - Configure authentication:
Bash
databricks auth login --profile "$DATABRICKS_CONFIG_PROFILE"
Example chat application
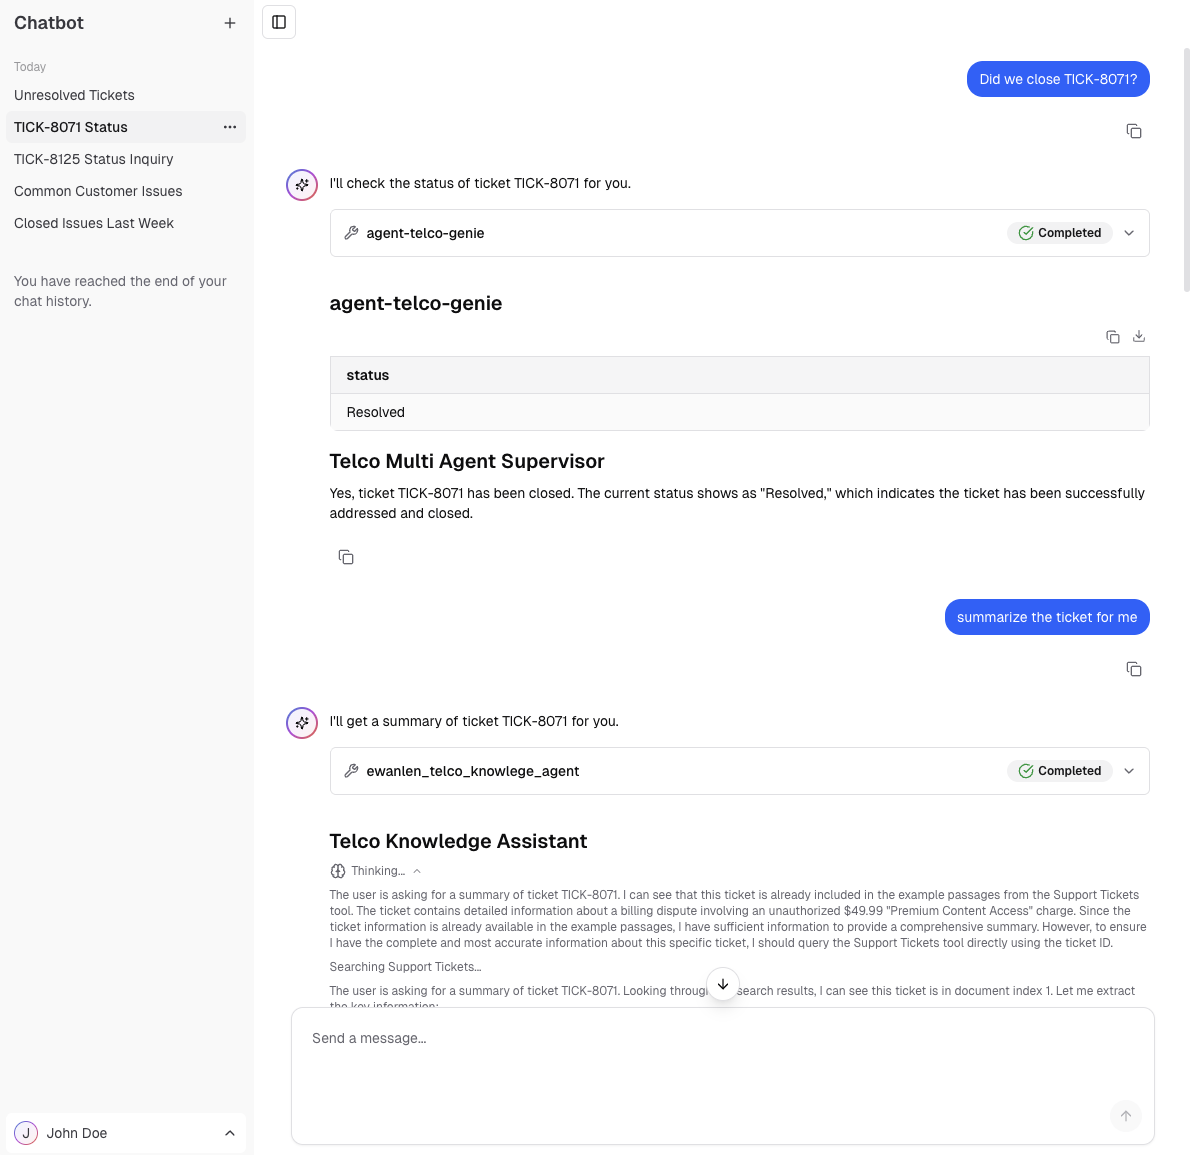
The example app, e2e-chatbot-app-next uses NextJS, React, and AI SDK to build a production-ready chat interface.
See the project README.md for detailed instructions on how to use the template.
The example app demonstrates the following:
- Streaming output: Displays agent responses as they generate with automatic fallback to non-streaming mode
- Tool calls: Renders tool calls for agents authored using Custom Agents best practices
- Databricks Agent and Foundation Model integration: Direct connection to Foundation Models, Databricks Agent serving endpoints, Knowledge Assistant, and Supervisor Agent.
- Databricks authentication: Uses Databricks authentication to identify end users of the chat app and securely manage their conversations.
- Persistent chat history: Stores conversations in Databricks Lakebase (Postgres) with full governance
Open the following sections to enable optional features:
Enable chat history
Enable user feedback
Enable user feedback
Users can provide thumbs up/down feedback on responses, which gets logged in an MLflow experiment.
If you are using an agent template such as agent-openai-agents-sdk or agent-langgraph, the bundle automatically configures authentication for the app to write user feedback to the MLflow experiment. Feedback works after databricks bundle deploy with no extra steps.
If you are using the standalone e2e-chatbot-app-next pointed at an existing agent endpoint, run the quickstart script described in the template README.md to configure authentication for the MLflow experiment.
Also bind a Lakebase database to persist the thumbs up/down state across page reloads. See Enable chat history.
Host multiple apps on the same database instance
Host multiple apps on the same database instance
This example only creates one database per app, because the app code targets a fixed ai_chatbot schema in the database instance. To host multiple apps out of the same instance, you must do the following:
- Update the database instance name in
databricks.yml. - Update references to
ai_chatbotin the codebase to your new desired schema name within the existing database instance. - Run
npm run db:generateto regenerate database migrations. - Deploy the app.
Enable user authorization (Public Preview)
Enable user authorization
User authorization is in Public Preview. Your workspace admin must enable it before you can configure user authorization for your app.
Some serving endpoints require the app to forward the user's access token instead of the app's service principal token. This is called user authorization, sometimes referred to as on-behalf-of-user authorization.
Supervisor Agent endpoints always require user authorization. Custom model serving endpoints also require user authorization when the endpoint has API scopes configured in its auth policy.
The e2e-chatbot-app-next template automatically detects whether the configured serving endpoint requires user authorization. If the app is missing required scopes, it displays a warning banner listing the missing scopes.
To configure user authorization, add the required scopes when you create or edit an app in the Databricks UI:
- In the Configure resources step, under User authorization, click +Add scope.
- Add the
model-servingscope. This scope is required for all endpoints that use user authorization. - Add any additional scopes listed in the endpoint's auth policy.
For detailed instructions, see Add scopes to an app.
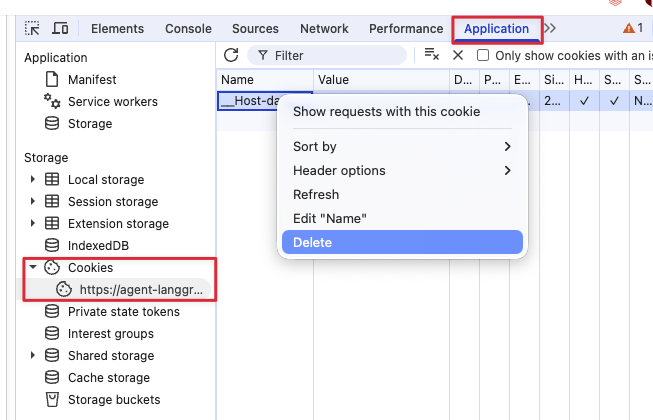
After you add or change scopes, you must clear cookies for the app URL. Otherwise, the session will continue to use the previous scopes:
- Go to the app URL.
- In Chrome, open DevTools (F12, or Cmd+Option+I on macOS, or Ctrl+Shift+I on Windows or Linux).
- Open the Application tab, select your app's URL under Storage > Cookies, then right-click each cookie and choose Delete, as shown below.
Clear browser cookies after changing scopes
After you add or change scopes, the change takes effect immediately and the app does not need to restart. However, your browser session reuses the tokens issued before the change, so clear your cookies for the app URL before testing. Otherwise the session keeps using the previous scopes.
Share the app
Grant users permission to view the app (see Configure permissions for a Databricks app), then share the app URL.
Known limitations
- No support for image or other multi-modal inputs
- This app only supports Databricks CLI auth (local development) and service principal auth (deployed apps) only. PAT, Azure managed identities, and other mechanisms are not supported.
- Unity Catalog function scopes are not supported for user authorization.
Streamlit agent chat app
The previous Streamlit template, e2e-chatbot-app, is still available but lacks the production features of e2e-chatbot-app-next.