10-minute demo: Collect human feedback
This tutorial shows how to collect end-user feedback, add developer annotations, create expert review sessions, and use that feedback to evaluate your GenAI app's quality.
What you will achieve
By the end of this tutorial, you will:
- Instrument a GenAI app with MLflow tracing
- Collect end-user feedback, simulated using the SDK in this example
- Add developer feedback interactively through the UI
- View feedback alongside your traces
- Collect expert feedback by creating a labeling session for structured expert review
Environment setup
Install required packages:
mlflow[databricks]: Use the latest version of MLflow to get more features and improvements.openai: This app will use the OpenAI API client to call Databricks-hosted models.
%pip install -q --upgrade "mlflow[databricks]>=3.1.0" databricks-openai
dbutils.library.restartPython()
Create an MLflow experiment. If you are using a Databricks notebook, you can skip this step and use the default notebook experiment. Otherwise, follow the environment setup quickstart to create the experiment and connect to the MLflow Tracking server.
Step 1: Create and trace a simple app
First, create a simple GenAI app using an LLM with MLflow tracing. The app uses the OpenAI API to call a Databricks-hosted Foundation Model endpoint.
from databricks_openai import DatabricksOpenAI
import mlflow

# Enable automatic tracing for the OpenAI client
mlflow.openai.autolog()

# Create an OpenAI client that is connected to Databricks-hosted LLMs.
client = DatabricksOpenAI()

# Create a RAG app with tracing
@mlflow.trace
def my_chatbot(user_question: str) -> str:
    # Retrieve relevant context
    context = retrieve_context(user_question)

    # Generate response using LLM with retrieved context
    response = client.chat.completions.create(
        model="databricks-claude-sonnet-4",  # If using OpenAI directly, use "gpt-4o" or "gpt-3.5-turbo"
        messages=[
            {"role": "system", "content": "You are a helpful assistant. Use the provided context to answer questions."},
            {"role": "user", "content": f"Context: {context}\n\nQuestion: {user_question}"}
        ],
        temperature=0.7,
        max_tokens=150
    )
    return response.choices[0].message.content

@mlflow.trace(span_type="RETRIEVER")
def retrieve_context(query: str) -> str:
    # Simulated retrieval. In production, this could search a vector database
    if "mlflow" in query.lower():
        return "MLflow is the largest open source AI engineering platform for agents, LLMs, and ML models. MLflow enables teams of all sizes to debug, evaluate, monitor, and optimize their AI applications while controlling costs and managing access to models and data. With over 30 million monthly downloads, thousands of organizations rely on MLflow each day to ship AI to production with confidence."
    return "General information about machine learning and data science."

# Run the app to generate a trace
response = my_chatbot("What is MLflow?")
print(f"Response: {response}")

# Get the trace ID for the next step
trace_id = mlflow.get_last_active_trace_id()
print(f"Trace ID: {trace_id}")
Step 2: Collect end-user feedback
When users interact with your app, they can provide feedback through UI elements like thumbs up/down buttons. This quickstart simulates an end user giving negative feedback by using the SDK directly.
from mlflow.entities.assessment import AssessmentSource, AssessmentSourceType

# Simulate end-user feedback from your app
# In production, this could be triggered when a user clicks thumbs down in your UI
mlflow.log_feedback(
    trace_id=trace_id,
    name="user_feedback",
    value=False,  # False for thumbs down - user is unsatisfied
    rationale="Missing details about MLflow's key features like Projects and Model Registry",
    source=AssessmentSource(
        source_type=AssessmentSourceType.HUMAN,
        source_id="enduser_123",  # In production, this is the actual user ID
    ),
)

print("End-user feedback recorded!")

# In a real app, you could:
# 1. Return the trace_id with your response to the frontend
# 2. When user clicks thumbs up/down, call your backend API
# 3. Your backend calls mlflow.log_feedback() with the trace_id
Step 3: View feedback in the UI
Launch the MLflow UI to see your traces with feedback:
- Navigate to your MLflow experiment.
- Navigate to the Logs tab.
- Click on your trace.
- The trace details dialog appears. Under Assessments on the right side of the dialog, the
user_feedbackshowsfalse, indicating that the user marked the response thumbs-down.

Step 4: Add developer annotations using the UI
As a developer, you can also add your own feedback and notes directly in the UI:
- In the Logs tab, click on a trace to open it.
- Click on any span (choose the root span for trace-level feedback).
- In the Assessments tab on the right, click Add new assessment and fill in the following:
- Type:
Feedback. - Name:
accuracy_score. - Value:
.75. - Rationale:
This answer includes the core elements of ML lifecycle management, experiment tracking, packaging, and deployment. However, it does not mention the model registry, project packaging, integration with Generative AI and LLMs, or unique features available in Databricks-managed MLflow, which are now considered essential to a complete description of the platform.
- Type:
- Click Create.
After you refresh the page, columns for the new assessments appear in the Logs table.
Step 5: Send trace for expert review
The negative end-user feedback from Step 2 signals a potential quality issue, but only domain experts can confirm if there's truly a problem and provide the correct answer. Create a labeling session to get authoritative expert feedback:
from mlflow.genai.label_schemas import create_label_schema, InputCategorical, InputText
from mlflow.genai.labeling import create_labeling_session

# Define what feedback to collect
accuracy_schema = create_label_schema(
    name="response_accuracy",
    type="feedback",
    title="Is the response factually accurate?",
    input=InputCategorical(options=["Accurate", "Partially Accurate", "Inaccurate"]),
    overwrite=True
)

ideal_response_schema = create_label_schema(
    name="expected_response",
    type="expectation",
    title="What would be the ideal response?",
    input=InputText(),
    overwrite=True
)

# Create a labeling session
labeling_session = create_labeling_session(
    name="quickstart_review",
    label_schemas=[accuracy_schema.name, ideal_response_schema.name],
)

# Add your trace to the session
# Get the most recent trace from the current experiment
traces = mlflow.search_traces(
    max_results=1  # Gets the most recent trace
)
labeling_session.add_traces(traces)

# Share with reviewers
print(f"Trace sent for review!")
print(f"Share this link with reviewers: {labeling_session.url}")

Expert reviewers can now do the following:
-
Open the Review App URL.
-
See your trace with the question and response (including any end-user feedback).
-
Assess whether the response is actually accurate.
-
Provide the correct answer in
expected_responseto the question "What is MLflow?":MLflow is the largest open source AI engineering platform for agents, LLMs, and ML models. MLflow enables teams of all sizes to debug, evaluate, monitor, and optimize their AI applications while controlling costs and managing access to models and data. With over 30 million monthly downloads, thousands of organizations rely on MLflow each day to ship AI to production with confidence. -
Submit their expert assessments as ground truth.
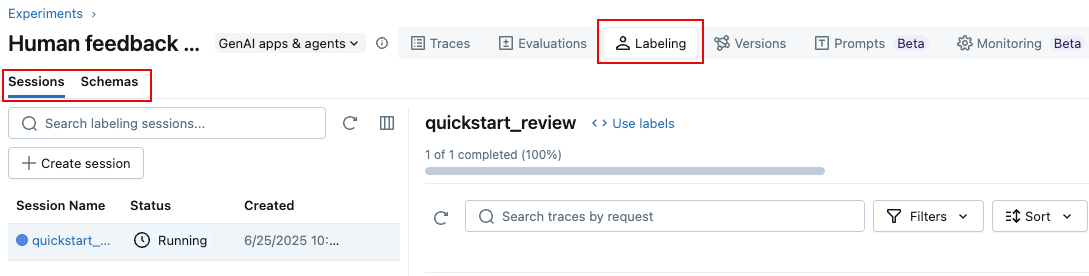
You can also use the MLflow 3 UI to create a labeling session, as follows:
- On the Experiment page, click the Labeling tab.
- At the left, use the Sessions and Schemas tabs to add a new label schema and create a new session.
Step 6: Use feedback to evaluate your app
After experts provide feedback, use their expected_response labels to evaluate your app with MLflow's Correctness scorer:
This example directly uses the traces for evaluation. In your application, Databricks recommends adding labeled traces to an MLflow Evaluation Dataset which provides version tracking and lineage. Learn about building evaluation datasets.
from mlflow.genai.scorers import Correctness

# Get traces from the labeling session
labeled_traces = mlflow.search_traces(
    run_id=labeling_session.mlflow_run_id,  # Labeling Sessions are MLflow Runs
)

# Evaluate your app against expert expectations
eval_results = mlflow.genai.evaluate(
    data=labeled_traces,
    predict_fn=my_chatbot,  # The app we created in Step 1
    scorers=[Correctness()]  # Compares outputs to expected_response
)
The Correctness scorer compares your app's outputs against the expert-provided expected_response, giving you quantitative feedback on alignment with expert expectations.

Next steps
Learn more details about collecting different types of human feedback:
- Label during development - Learn advanced annotation techniques for development
- Vibe check with domain experts - Test your app interactively with experts
- Collect domain expert feedback - Set up systematic expert review processes