Configure private connectivity to AWS-managed resources
This feature is in Public Preview. To join this preview, contact your Databricks account team.
Databricks charges for networking costs when serverless workloads connect to customer resources, and when performance-intensive services egress data cross-region back to clients. See Understand Databricks networking costs.
This page explains how to configure private connectivity from serverless compute to AWS-managed resources using the Databricks account console UI.
Configuring private connectivity for serverless compute provides:
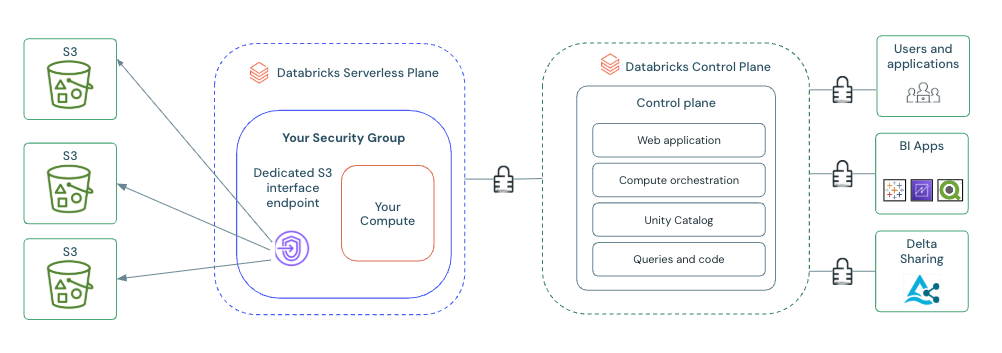
- A dedicated and private connection: Ensures secure and isolated access between your serverless workspaces and the AWS resource, limiting access to authorized connections only.
- Enhanced data exfiltration mitigation: While serverless compute with Unity Catalog provides built-in data exfiltration protection, PrivateLink adds an extra layer of network defense. Using AWS PrivateLink, your data traffic remains entirely in the AWS network, never traversing the public internet. This architecture, combined with controlled access through VPC endpoints, reduces the attack surface for data exfiltration.
The dedicated VPC endpoint configured in this procedure handles serverless compute access to the AWS resource. The Databricks control plane also reaches some resources for metadata operations. For S3, Unity Catalog accesses your bucket from the control plane, so your bucket policy must allow Unity Catalog in addition to the serverless endpoint. See Step 3. If you also access the resource from within your company's network, include your corporate VPN IPs in the resource's policy.
When you access an S3 bucket through this private connection, like from a notebook or query, refer to the bucket using its regional DNS, such as {your-s3-bucket}.s3.{region}.amazonaws.com. Legacy global endpoints like {your-s3-bucket}.s3.amazonaws.com are not supported.
Supported resources
Private connectivity from serverless compute supports the following AWS-managed resources:
Resource | Endpoint DNS |
|---|---|
Bedrock |
|
Bedrock Agent |
|
Bedrock Agent Runtime |
|
Bedrock Runtime |
|
DynamoDB |
|
EMR |
|
Glue |
|
Key Management Service (KMS) |
|
Lambda |
|
RDS |
|
RDS Data API |
|
RDS Performance Insights |
|
Redshift |
|
Redshift Data API |
|
Redshift Serverless |
|
S3 (same region or cross-region) |
|
Secrets Manager |
|
Security Token Service (STS) |
|
Simple Notification Service (SNS) |
|
Simple Queue Service (SQS) |
|
- S3 is the only resource that supports per-bucket scoping and cross-region private connectivity. For all other resources, the private endpoint applies to all traffic from workspaces attached to the NCC that targets the resource type — there is no per-instance scoping.
- Private connectivity to SAP BDC data sources is also supported. For details, see Create and manage the SAP Business Data Cloud (BDC) connector.
- When you access your S3 bucket through this private connection (for example, from a notebook or query), refer to the bucket using its regional DNS, such as
{your-s3-bucket}.s3.{region}.amazonaws.com. Legacy global endpoints like{your-s3-bucket}.s3.amazonaws.comare not supported.
Requirements
- The workspace is on the Enterprise plan.
- You are the account administrator of your Databricks account.
- You have at least one functional workspace using serverless compute.
- You have appropriate AWS IAM permissions to create and modify the AWS resource's policy and to create VPC endpoints.
- Each Databricks account can have up to 10 NCCs per region.
- Each region can have 30 private endpoints, distributed as needed across 1-10 NCCs.
- Each NCC can be attached to up to 50 workspaces.
- For S3, each NCC can have one S3 private endpoint rule per region, and each rule can include up to 100 bucket names.
Configure private connectivity
Create a network connectivity configurations (NCC) object
You can skip this step if you have an existing NCC in the same region and AWS account that you want to use.
- In the account console, click Security.
- Select the Network connectivity configurations tab.
- Select Add network configuration.
- Enter a name for the NCC.
- Select the region. This must match your workspace region.
- Click Add.
Create an AWS interface endpoint
Do not enable your private endpoint until you have updated the resource policy.
- Go to the Private endpoint rules section in your NCC.
- Select Add private endpoint rule.
- Under Resource type, select the AWS resource you want to connect to (for example, S3 bucket, Bedrock, or RDS). For the full list, see Supported resources.
- Configure the rule settings:
- Endpoint Service: This field is automatically populated to establish the connection to your private endpoint's destination resource.
- S3 bucket names (S3 only): Enter the bucket names for your destination resources. For all other resource types, no bucket or resource name field appears — the private endpoint applies to all traffic to the selected resource type.
- Region (S3 only): Optionally specify the region of the destination S3 buckets. If you don't specify a region, the NCC's region is used. This enables cross-region S3 private connectivity.
Restrict access to the private endpoint
Before you enable the private endpoint, restrict access to the AWS resource so that only traffic from the VPC endpoint returned in the previous step, and any other sources you approve, can reach it. Where you apply this restriction depends on whether the resource supports resource-based policies:
How to restrict access | Resources |
|---|---|
Add a | DynamoDB, Glue, KMS, Lambda, Secrets Manager, SNS, SQS |
Add a | S3 |
Add a | Bedrock, Bedrock Agent, Bedrock Agent Runtime, Bedrock Runtime, EMR, RDS, RDS Data API, RDS Performance Insights, Redshift, Redshift Data API, Redshift Serverless, STS |
In every case, use an explicit Deny rather than an Allow. In AWS, access is denied by default, so an Allow statement only grants access. Allow statements can't confine access to a specific path. To limit access to the private endpoint, deny every request whose source is not the VPC endpoint, because an explicit Deny overrides any Allow.
A Deny statement with "Principal": "*" blocks every request that doesn't carry a matching aws:SourceVpce key, including access from the AWS console, the AWS CLI, and IAM identities in your account. Before you enable the endpoint, add every source you still need, such as administrative IAM roles or corporate VPN IP ranges, to the policy. Otherwise, you can lose console and administrative access to the resource. Enabling the endpoint manually in the next step gives you time to update these policies before serverless traffic starts routing through the endpoint.
- Resource-based policy
- S3 bucket
- IAM role policy
These resources let you attach a policy directly to the resource. Add a Deny statement that denies any request whose source is not the VPC endpoint returned in the previous step. The following example denies all access to a DynamoDB table unless the request comes through that endpoint:
{
  "Version": "2012-10-17",
  "Statement": [
    {
      "Sid": "DenyAccessOutsideVpcEndpoint",
      "Effect": "Deny",
      "Principal": "*",
      "Action": "dynamodb:*",
      "Resource": "arn:aws:dynamodb:{region}:{account-id}:table/{table-name}",
      "Condition": {
        "StringNotEquals": {
          "aws:SourceVpce": "vpce-12345"
        }
      }
    }
  ]
}
Replace vpce-12345 with the VPC endpoint returned in the previous step. The policy mechanism and the Action values depend on the resource. For example, KMS uses key policies and Secrets Manager uses secret resource policies. Refer to the AWS documentation for your resource.
S3 uses a bucket policy, but it needs one addition. Unity Catalog operations reach your bucket from the Databricks control plane rather than through your serverless VPC endpoint, so a policy that denies everything except the serverless endpoint also blocks Unity Catalog. Allow the control plane's S3 gateway VPC endpoints by adding their VPC IDs to the policy with the aws:SourceVpc condition key. Find the control plane VPC IDs for your region in Outbound IPs from Databricks control plane.
The following bucket policy denies all access unless the request comes through the serverless VPC endpoint, a Databricks control plane VPC, or an approved corporate VPN IP:
{
  "Version": "2012-10-17",
  "Statement": [
    {
      "Sid": "DenyAllOtherAccess",
      "Effect": "Deny",
      "Principal": "*",
      "Action": "s3:*",
      "Resource": ["arn:aws:s3:::{bucket-name}", "arn:aws:s3:::{bucket-name}/*"],
      "Condition": {
        "StringNotEqualsIfExists": {
          "aws:SourceVpce": "vpce-12345",
          "aws:SourceVpc": ["vpc-11111", "vpc-22222"]
        },
        "NotIpAddressIfExists": {
          "aws:SourceIp": ["1.2.3.4/32", "5.6.7.8/32"]
        }
      }
    }
  ]
}
- Replace
vpce-12345with the serverless VPC endpoint returned in the previous step. - Replace
vpc-11111andvpc-22222with the Databricks control plane VPC IDs for your region. See Outbound IPs from Databricks control plane. - Replace the
aws:SourceIpvalues with your corporate VPN IP ranges, or remove theNotIpAddressIfExistsblock if you don't need access from your network.
The ...IfExists operators apply each condition only when the request carries that key, so a request from any single approved source is allowed.
These resources don't support attaching a policy to the resource. Instead, add a Deny statement as an inline policy on the IAM role that the resource's service credential uses. The following inline policy denies all access unless the request comes through the VPC endpoint returned in the previous step:
{
  "Version": "2012-10-17",
  "Statement": [
    {
      "Sid": "DenyAccessOutsideVpcEndpoint",
      "Effect": "Deny",
      "Action": "*",
      "Resource": "*",
      "Condition": {
        "StringNotEquals": {
          "aws:SourceVpce": "vpce-12345"
        }
      }
    }
  ]
}
Replace vpce-12345 with the VPC endpoint returned in the previous step.
These private endpoints cover each AWS service's API: management operations and, for the Data API variants (rds-data and redshift-data), HTTP-based SQL queries. They do not cover direct JDBC or ODBC database connections to RDS or Redshift instances, which use separate instance DNS names.
Refresh the UI or make an API call to confirm the rule's status changes to ESTABLISHED.
Enable private endpoint rule
- Click the kebab menu button.
- Click Update rule.
- Select Enable rule.
This step routes traffic for the configured AWS resource through PrivateLink for any workspace attached to the NCC. Before proceeding, verify you have updated the resource policy to allow resource access from the VPC endpoint.
Attach the NCC to one or more workspaces
This step associates your configured private connectivity with your serverless workspaces. Skip this step if your workspace is already attached to the desired NCC. To attach the NCC to a workspace:
- Go to Workspaces in the left-hand navigation.
- Select an existing workspace.
- Select Update Workspace.
- Under Network connectivity configurations, select the drop-down menu and select the NCC you've created.
- Repeat for all workspaces you'd like this NCC to apply to.
Verify connectivity
The way you verify connectivity depends on the resource type. For resources other than S3, simulate traffic from a notebook by making a call to the resource through the appropriate AWS SDK (for example, a Bedrock model invocation or a Lambda function call), then check the resource's access logs to confirm that the request arrives through the VPC endpoint.
The following example tests connectivity to an S3 bucket by registering it as an external location and running a query:
-
Register your bucket as an external location. See external locations.
-
Open the SQL editor.
-
Run:
SQLCREATE TABLE {catalog}.{schema}.test_connectivity LOCATION 's3://{your-s3-bucket}/test_connectivity'
It can take ten minutes for the connection to fully establish.
If your network policy restricts external access, direct connections to your AWS S3 bucket's FQDNs like {your-s3-bucket}.s3.{region}.amazonaws.com are blocked. You must explicitly add the required FQDNs to your network policy's Allowed domains to allow this access. See Manage network policies for serverless egress control.
Access to your S3 buckets must use regional endpoints like {your-s3-bucket}.s3.{region}.amazonaws.com. Legacy endpoints like {your-s3-bucket}.s3.amazonaws.com are not supported.
To verify connectivity for a resource that you cannot register as a Unity Catalog external location, such as a Delta Sharing endpoint, run a DNS lookup against the resource's endpoint from a notebook and confirm that it resolves to a private IP address:
%sh nslookup <resource-endpoint>
Next steps
- Configure private connectivity to AWS resources in your VPC: Use PrivateLink to establish secure and isolated access to AWS services in your VPC from your serverless workspaces, bypassing the public internet. See Configure private connectivity to resources in your VPC.
- Configure a firewall for serverless compute access: Configure your data source firewalls to permit traffic from the Databricks serverless compute plane. See Serverless compute firewall configuration.
- Understand data transfer and connectivity costs: Data transfer and connectivity refer to moving data into and out of serverless environments. Networking charges for serverless products only apply to customers using serverless compute. See Understand Databricks networking costs.