Configure SSO using SAML
This page shows how to configure single sign-on (SSO) to authenticate to the account console and Databricks workspaces using SAML. For a demo for configuring SAML SSO with Okta, see Secure Your Databricks Access with SAML SSO.
For an overview of single sign-on in the account, see Configure SSO in Databricks.
Enable SSO using SAML
The following instructions describe how to use SAML 2.0 to authenticate account console users.
To prevent getting locked out of Databricks during single sign-on testing, Databricks recommends keeping the account console open in a different browser window. You can also configure emergency access with security keys to prevent lockout. See Emergency access to prevent lockouts.
-
View the account console SSO page and copy the SAML URL:
- As an account admin, log in to the account console and click Security.
- Click the Authentication tab.
- Next to Authentication, click Manage.
- Choose Single sign-on with my identity provider.
- Click Continue.
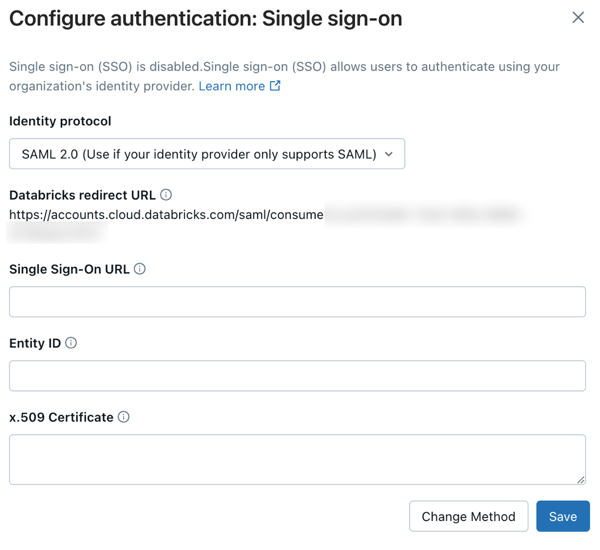
- Under Identity protocol, select SAML 2.0.
- Copy the value in the Databricks Redirect URL field. You will need the Databricks SAML URL for a later step.
- As an account admin, log in to the account console and click Security.
-
In another browser window or tab, create a Databricks application in your identity provider:
- Go to your identity provider (IdP).
- Create a new client application (web):
- Use your identity provider's documentation as needed.
- For the SAML URL field (which might be called a redirect URL), use the Databricks SAML URL that you copied from the Databricks page.
- Copy the following objects and fields from your new Databricks application:
- The x.509 certificate: A digital certificate provided by your Identity Provider for securing communications between Databricks and the Identity Provider
- The single-sign-on (SSO) URL for your identity provider. This is the URL that initiates SSO with your identity provider. It is also sometimes referred to as the SAML endpoint.
- The identity provider issuer: This is the unique identifier for your SAML identity provider. This is sometimes referred to as the Entity ID or Issuer URL.
-
Set your Databricks account to use your identity provider:
- Return to the browser tab or window with the Databricks account console SSO page.
- Type or paste the following fields from your identity provider's Databricks application: the single sign-on URL, the identity provider entity ID, and the x.509 Certificate.
- Click Save.
- Click Test SSO to validate that your SSO configuration is working properly.
- Click Enable SSO to enable single sign-on for your account.
- Test account console login with SSO.
-
Grant all account users access to the Databricks application in your identity provider. You might need to modify the access permissions for the application.
Configure unified login and add users to Databricks
After you configure SSO, Databricks recommends that you configure unified login and add users to your account using SCIM provisioning.
-
Configure unified login
Unified login allows you to use the account console SSO configuration in your Databricks workspaces. If your account was created after June 21, 2023 or you did not configure SSO before December 12, 2024, unified login is enabled on your account for all workspaces and it cannot be disabled. To configure unified login, see Enable unified login.
-
Add users to Databricks
-
Enable JIT provisioning
Databricks recommends enabling JIT to automatically add users to Databricks when they first log in using SSO. JIT provisioning is on by default for accounts created after May 1, 2025 when SSO is configured. See Automatically provision users (JIT).
-
Configure SCIM provisioning
Databricks recommends using SCIM provisioning to sync users and groups automatically from your identity provider to your Databricks account. SCIM streamlines onboarding a new employee or team by using your identity provider to create users and groups in Databricks and give them the proper level of access. See Sync users and groups from your identity provider using SCIM.
-
Replace an expiring SAML certificate
When your SAML certificate is expiring, you need to update it in Databricks. This process involves temporarily disabling SSO, updating the certificate, and then re-enabling SSO.
When SSO is disabled:
- Your SSO configuration is not deleted, however you can edit the settings.
- Users cannot use SSO until it is re-enabled.
- Emergency access users can continue to log in with a password and MFA. See Emergency access to prevent lockouts.
In order to replace an expiring SAML certificate, do the following:
- Export the new federation metadata XML from your identity provider. This file contains the new x.509 certificate required by Databricks.
- As an account admin, log in to the account console and click Security
- Click the Authentication tab.
- Next to Authentication, click Manage.
- Click Disable SSO.
- Replace the existing text in the x.509 Certificate field with the new x.509 certificate from your identity provider.
- Click Enable SSO.
- Test account console login with SSO.
Troubleshooting SAML SSO
The following table lists SAML error codes that might be encountered during SSO authentication. Each entry provides the machine-readable error name, a detailed explanation, and recommended next steps for troubleshooting. Use this information to quickly identify and resolve SAML authentication issues in your workspace.
Error name | Details | Next steps |
|---|---|---|
| The username entered is not associated with this workspace or account. | Ensure the user is added to your Databricks workspace or account. If user provisioning is automated (for example, using SCIM), verify SCIM is working. Contact Databricks support with the error message, user's email address, and timestamp of the login attempt. |
| SAML authentication is not enabled for this Databricks workspace. | Enable SAML in the workspace settings. Contact your Databricks admin or Databricks support with the error message. |
| The SAML request could not be constructed due to invalid IdP metadata or configuration. | Check IdP metadata for missing or invalid fields. Verify ACS URL and Entity ID settings. Contact IdP support with the error message, metadata file, and ACS URL. |
| The SAML assertion is expired or not yet valid. | Verify the system clocks on the IdP and Databricks are synchronized (using NTP). Contact IdP support with the error message, browser HAR, and IdP logs. |
| The SAML response is not signed, but a signature is required. | Enable signing for SAML responses in the IdP. Contact IdP support with the error message and IdP configuration details. |
| The SAML assertion is not signed, but a signature is required. | Ensure the IdP signs assertions in the SAML settings. Contact IdP support with the error message and IdP configuration details. |
| No signature was found in the SAML response or assertion. | Ensure SAML responses or assertions are signed. Contact IdP support with the error message and full SAML response. |
| The signature on the SAML response or assertion is invalid. | Verify the correct public key is configured in Databricks. Contact IdP support with the error message and IdP configuration details. |
| The NameID is missing from the SAML assertion, which is required for login. | Update the IdP to include NameID in assertions. Contact IdP support with the error message, IdP configuration details, and SAML attribute mapping configuration. |
| Unable to initialize SAML request. Databricks could not create a SAML request to relay to the IdP, possibly due to incorrect or missing entity ID or SSO URL. | Ensure the configuration in Databricks matches the IdP. Check the Entity ID (IdP issuer ID or URL) and SSO URL. Contact Databricks and IdP support with the error message and IdP configuration details. |
| SAML response validation failed. Databricks could not validate the SAML response from the IdP. | Examine the SAML response and review the validation error. Contact IdP support with the error message, SAML response, and validation error message. |