Build a Scala JAR using Declarative Automation Bundles
This article describes how to build, deploy, and run a Scala JAR with Declarative Automation Bundles. For information about bundles, see What are Declarative Automation Bundles?.
For example configuration that builds a Java JAR and uploads it to Unity Catalog, see Bundle that uploads a JAR file to Unity Catalog.
Requirements
This tutorial requires that your Databricks workspace meets the following requirements:
- Unity Catalog is enabled. See Enable a workspace for Unity Catalog.
- You must have a Unity Catalog volume in Databricks where you want to store the build artifacts, and permissions to upload the JAR to a specified volume path. See Create and manage Unity Catalog volumes.
- Serverless compute is enabled. Make sure to review the serverless compute feature limitations.
- Your workspace is in a supported region.
In addition, your local development environment must have the following installed:
- Java Development Kit (JDK) 17
- IntelliJ IDEA
- sbt
- Databricks CLI version 0.218.0 or above. To check your installed version of the Databricks CLI, run the command
databricks -v. To install the Databricks CLI, see Install or update the Databricks CLI. - Databricks CLI authentication is configured with a
DEFAULTprofile. To configure authentication, see Configure access to your workspace.
Step 1: Create the bundle
First, create the bundle using the bundle init command and the Scala project bundle template.
The Scala JAR bundle template creates a bundle that builds a JAR, uploads it to the specified volume, and defines a job with a Spark task with the JAR that runs on serverless compute. The Scala in the template project defines a UDF that applies a simple transformation to a sample DataFrame and outputs the results. The source for the template is in the bundle-examples repository.
-
Run the following command in a terminal window on your local development machine. It prompts for the value of some required fields.
Bashdatabricks bundle init default-scala -
For a name for the project, enter
my_scala_project. This determines the name of the root directory for this bundle. This root directory is created within your current working directory. -
For volumes destination path, provide the Unity Catalog volumes path in Databricks where you want the bundle directory to be created that will contain the JAR and other artifacts, for example
/Volumes/my-catalog/my-schema/bundle-volumes.noteThe template project configures serverless compute, but if you change it to use classic compute, your admin may need to allowlist the Volumes JAR path you specify. See Allowlist libraries and init scripts on compute with standard access mode (formerly shared access mode).
Step 2: Configure VM options
-
Import the current directory in your IntelliJ where
build.sbtis located. -
Choose Java 17 in IntelliJ. Go to File > Project Structure > SDKs.
-
Open
src/main/scala/com/examples/Main.scala. -
Navigate to the configuration for Main to add VM options:
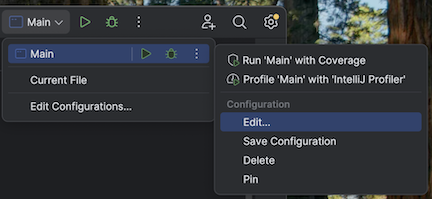
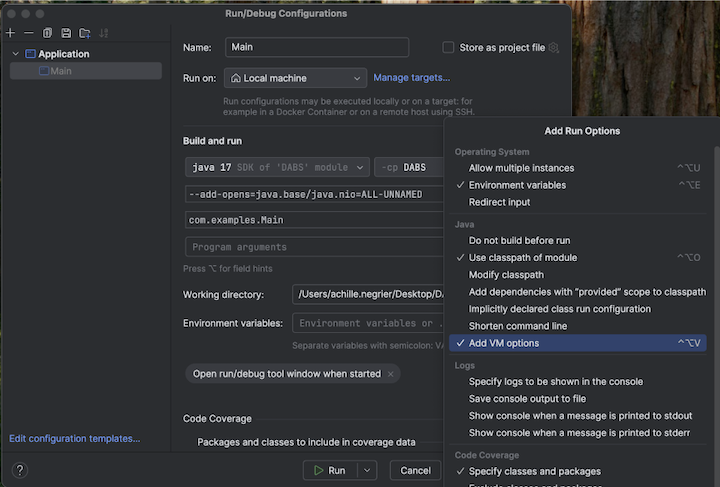
-
Add the following to your VM options:
--add-opens=java.base/java.nio=ALL-UNNAMED
Alternatively, or if you are using Visual Studio Code, add the following to your sbt build file:
fork := true
javaOptions += "--add-opens=java.base/java.nio=ALL-UNNAMED"
Then run your application from the terminal:
sbt run
Step 3: Explore the bundle
To view the files that the template generated, switch to the root directory of your newly created bundle and open this directory in your IDE. The template uses sbt to compile and package Scala files and works with Databricks Connect for local development. For detailed information, see the generated project README.md.
Files of particular interest include the following:
databricks.yml: This file specifies the bundle's programmatic name, includes a reference to the job definition, and specifies settings about the target workspace.resources/my_scala_project.job.yml: This file specifies the job's JAR task and cluster settings.src/: This directory includes the source files for the Scala project.build.sbt: This file contains important build and dependent library settings.README.md: This file contains these getting started steps, and local build instructions and settings.
Step 4: Validate the project's bundle configuration file
Next, check whether the bundle configuration is valid using the bundle validate command.
-
From the root directory, run the Databricks CLI
bundle validatecommand. Among other checks, this verifies that the volume specified in the configuration file exists in the workspace.Bashdatabricks bundle validate -
If a summary of the bundle configuration is returned, then the validation succeeded. If any errors are returned, fix the errors, then repeat this step.
If you make any changes to your bundle after this step, repeat this step to check whether your bundle configuration is still valid.
Step 5: Deploy the local project to the remote workspace
Now deploy the bundle to your remote Databricks workspace using the bundle deploy command. This step builds the JAR file and uploads it to the specified volume.
-
Run the Databricks CLI
bundle deploycommand:Bashdatabricks bundle deploy -t dev -
To check whether the locally built JAR file was deployed:
- In your Databricks workspace's sidebar, click Catalog Explorer.
- Navigate to the volume destination path you specified when you initialized the bundle. The JAR file should be located in the following folder inside that path:
/my_scala_project/dev/<user-name>/.internal/.
-
To check whether the job was created:
- In your Databricks workspace's sidebar, click Jobs & Pipelines.
- Optionally, select the Jobs and Owned by me filters.
- Click [dev
<your-username>]my_scala_project. - Click the Tasks tab.
There should be one task: main_task.
If you make any changes to your bundle after this step, repeat the validation and deployment steps.
Step 6: Run the deployed project
Finally, run the Databricks job using the bundle run command.
-
From the root directory, run the Databricks CLI
bundle runcommand, specifying the name of the job in the definition filemy_scala_project.job.yml:Bashdatabricks bundle run -t dev my_scala_project -
Copy the value of
Run URLthat appears in your terminal and paste this value into your web browser to open your Databricks workspace. -
In your Databricks workspace, after the task completes successfully and shows a green title bar, click the main_task task to see the results.