Author bundles in the workspace
Declarative Automation Bundles can be created and modified directly in the workspace.
For requirements for using bundles in the workspace, see Declarative Automation Bundles in the workspace requirements.
For more information about bundles, see What are Declarative Automation Bundles?.
Create a bundle
To create a bundle in the Databricks workspace:
-
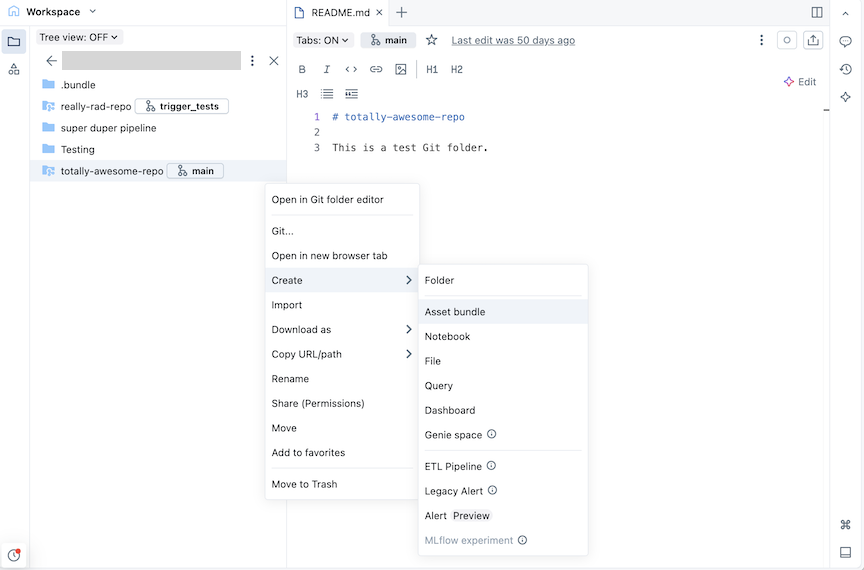
Navigate to the Git folder where you want to create your bundle.
-
Click the Create button, then click Bundle. Alternatively, right click on the Git folder or its associated kebab in the workspace tree and click Create > Bundle:
-
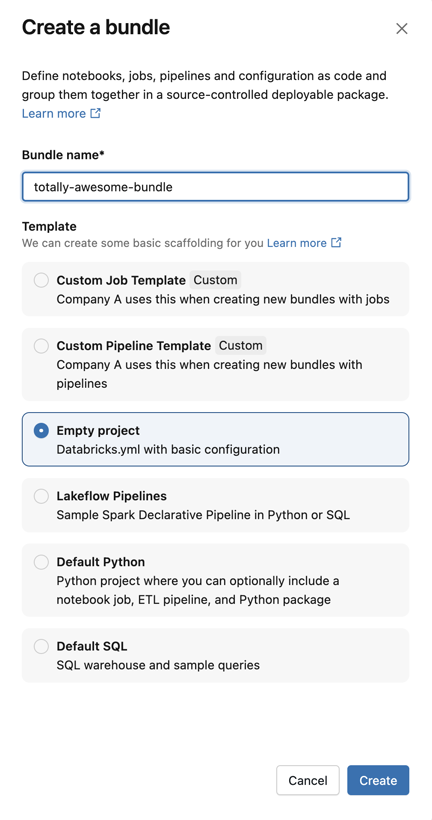
In the Create a bundle dialog, give the bundle a name, such as totally-awesome-bundle. The bundle name can only contain letters, numbers, dashes, and underscores.
-
For Template, choose whether you want to create a bundle using a custom template, an empty bundle, a bundle that runs a sample Python notebook, or a bundle that runs SQL. If you have the Lakeflow Pipelines Editor enabled, you will also see an option to create an ETL pipeline project. Any custom templates configured in the workspace, will also be available.
-
Some templates require additional configuration. Click Next to finish configuring the project.
Template
Configuration options
Lakeflow pipelines
- Default catalog to use for the pipeline data
- Use personal schema (recommended) for each user collaborating on this bundle
- Initial language for the code files in the pipeline
Default Python
- Include a sample notebook
- Include a sample pipeline
- Include a sample Python package
- Use serverless compute
Default SQL
- SQL warehouse path
- Initial catalog
- Use personal schema
- Initial schema during development
-
Click Create and deploy.
This creates an initial bundle in the Git folder, which includes the files for the project template that you selected, a .gitignore Git configuration file, and the required Declarative Automation Bundles databricks.yml file. The databricks.yml file contains the main configuration for the bundle. For details, see Declarative Automation Bundles configuration.
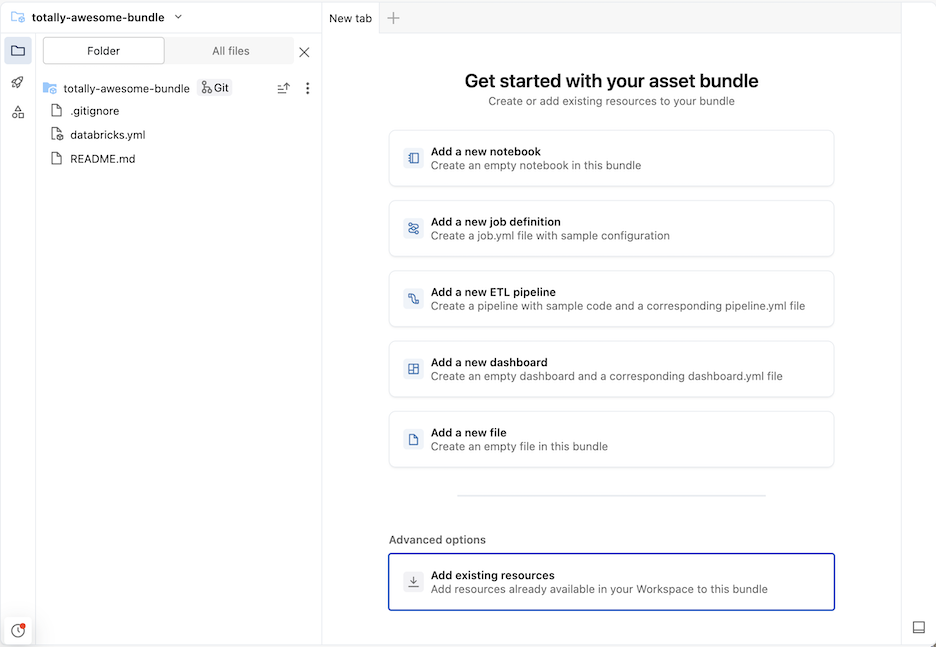
Any changes made to the files within the bundle can be synced with the remote repository associated with the Git folder. A Git folder can contain many bundles.
Add new files to a bundle
A bundle contains the databricks.yml file that defines deployment and workspace configurations, source files, such as notebooks, Python files, and test files, and definitions and settings for Databricks resources, such as Lakeflow Jobs and Lakeflow pipelines. Similar to any workspace folder, you can add new files to your bundle.
To open a new tab to the bundle view that lets you modify bundle files, navigate to the bundle folder in the workspace, then click Open in editor to the right of the bundle name.
Add source code files
To add new notebooks or other files to a bundle in the workspace UI, navigate to the bundle folder, then:
- Click Create in the upper right and choose one of the following file types to add to your bundle: Notebook, File, Query, Dashboard.
- Alternatively, click the kebab to the left of Share and import a file.
In order for the file to be part of the bundle deployment, after you add a file to your bundle folder you must add it to the databricks.yml bundle configuration, or create a job or pipeline definition file that includes it. See Add an existing resource to a bundle.
Create a resource definition
Bundles contain definitions for resources such as jobs and pipelines to include in a deployment. When the bundle is deployed, resources defined in the bundle are created in the workspace (or updated if they have already been deployed). These definitions are specified in YAML or Python, and you can create and edit these configurations directly in the UI.
-
Navigate to the bundle folder in the workspace where you want to define a new resource.
tipIf you have previously opened the bundle in the editor in the workspace, you can use the workspace browser authoring contexts list to navigate to the bundle folder. See Authoring contexts.
-
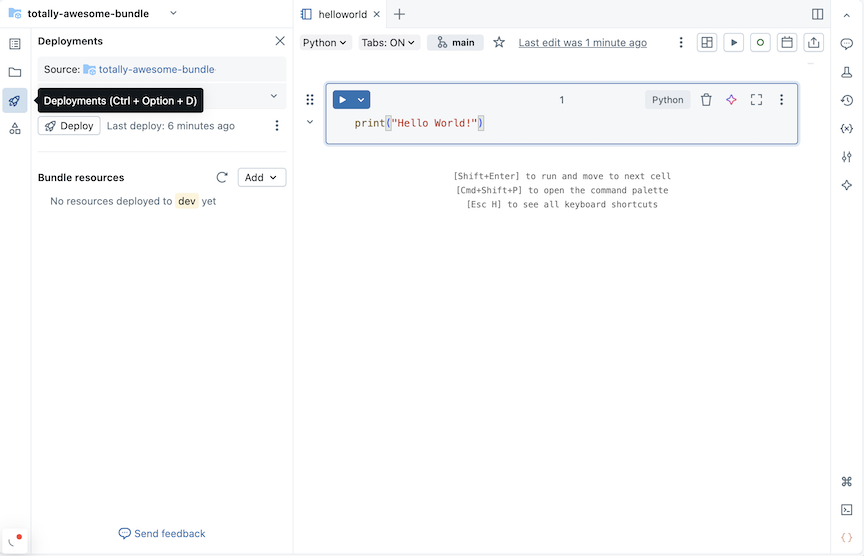
To the right of the bundle name, click Open in editor to navigate to the bundle editor view.
-
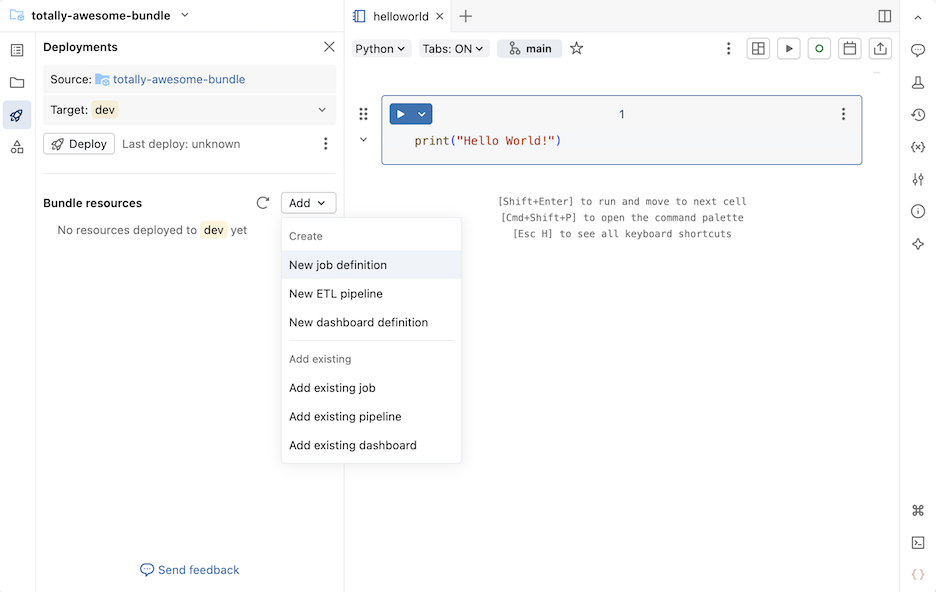
Click the deployment icon for the bundle to switch to the Deployments panel.
-
In the Bundle resources section, click Add, then choose a resource definition to create.
New job definition
To create a bundle configuration file that defines a job:
-
In the Bundle resources section of the Deployments panel, click Add, then New job definition.
-
Type a name for the job into the Job name field of the Create job definition dialog. Click Create.
-
Add YAML to the job definition file that was created. The following example YAML defines a job that runs a notebook:
YAMLresources:
jobs:
run_notebook:
name: run-notebook
queue:
enabled: true
tasks:
- task_key: my-notebook-task
notebook_task:
notebook_path: ../helloworld.ipynb
For details about defining a job in YAML, see job. For YAML syntax for other supported job task types, see Add tasks to jobs in Declarative Automation Bundles.
New pipeline definition
If you have enabled the Lakeflow Pipelines Editor in your workspace, see New ETL pipeline.
To add a pipeline definition to your bundle:
-
In the Bundle resources section of the Deployments panel, click Add, then New pipeline definition.
-
Type a name for the pipeline into the Pipeline name field of the Add pipeline to existing bundle dialog.
-
Click Add and deploy.
For a pipeline with the name test_pipeline that runs a notebook, the following YAML is created in a file test_pipeline.pipeline.yml:
resources:
  pipelines:
    test_pipeline:
      name: test_pipeline
      libraries:
        - notebook:
            path: ../test_pipeline.ipynb
      serverless: true
      catalog: main
      target: test_pipeline_${bundle.environment}
You can modify the configuration to run an existing notebook. For details about defining a pipeline in YAML, see pipeline.
New ETL pipeline
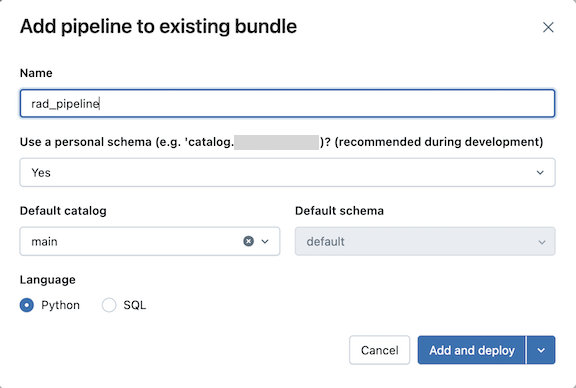
To add a new ETL pipeline definition:
-
In the Bundle resources section of the Deployments panel, click Add, then New ETL pipeline.
-
Type a name for the pipeline into the Name field of the Add pipeline to existing bundle dialog. The name must be unique within the workspace.
-
For the Use personal schema field, select Yes for development scenarios and No for production scenarios.
-
Select a Default catalog and a Default schema for the pipeline.
-
Choose a language for the pipeline source code.
-
Click Add and deploy.
-
Review the details in the Deploy to dev confirmation dialog, then click Deploy.
An ETL pipeline is created with example exploration and transformation tables.
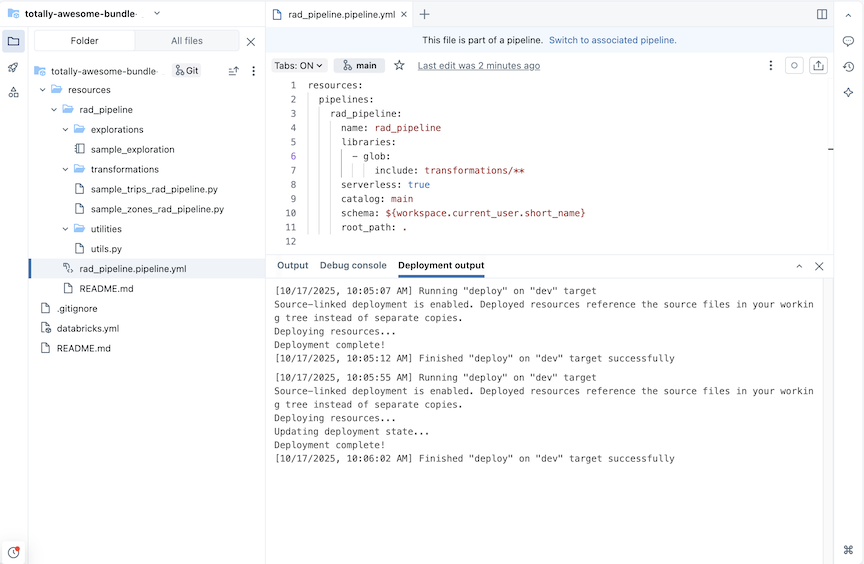
For a pipeline with the name rad_pipeline, the following YAML is created in a file rad_pipeline.pipeline.yml. This pipeline is configured to run on serverless compute. For pipeline configuration reference, see pipeline.
resources:
  pipelines:
    rad_pipeline:
      name: rad_pipeline
      libraries:
        - glob:
            include: transformations/**
      serverless: true
      catalog: main
      schema: ${workspace.current_user.short_name}
      root_path: .
New dashboard definition
To create a bundle configuration file that defines a dashboard:
-
In the Bundle resources section of the Deployments panel, click Add, then New dashboard definition.
-
Type a name for the dashboard into the Dashboard name field of the Add dashboard to existing bundle dialog.
-
Select a Warehouse for the dashboard. Click Add and deploy.
A new empty dashboard and a configuration *.dashboard.yml file are created in the bundle. The dashboard is stored in the warehouse specified in the configuration file.
For details about dashboards, see Dashboards. For YAML syntax for dashboard configuration, see dashboard.
Add an existing resource to a bundle
You can add existing resources to your bundle using the workspace UI or by adding resource configuration to your bundle.
Use the bundle workspace UI
To add an existing job, pipeline, or dashboard to a bundle:
-
Navigate to the bundle folder in the workspace where you want to add a resource.
tipIf you have previously opened the bundle in the editor in the workspace, you can use the workspace browser authoring contexts list to navigate to the bundle folder. See Authoring contexts.
-
To the right of the bundle name, click Open in editor to navigate to the bundle editor view.
-
Click the deployment icon for the bundle to switch to the Deployments panel.
-
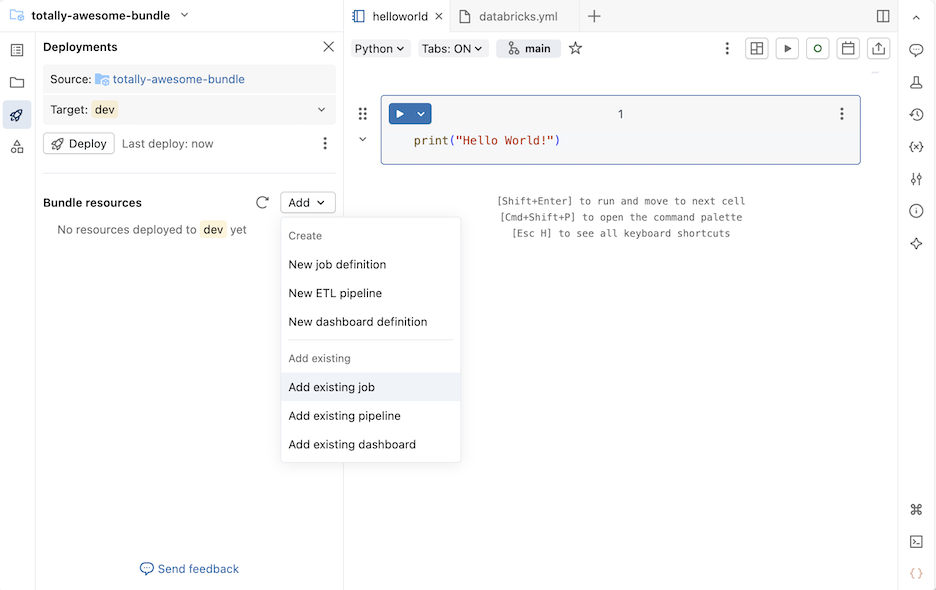
In the Bundle resources section, click Add, then click Add existing job, Add existing pipeline, or Add existing dashboard.
-
In the Add existing ... dialog, select the existing resource from the drop down.
-
When you add an existing resource to a bundle, Databricks creates a definition in a bundle configuration file for this resource. Because you can modify this definition in the bundle, the resource defined in the bundle can diverge from the resource used to create it.
Choose an option for how to handle updates to the bundle resource configuration:
- Update on production deploys: The existing resource becomes linked to the resource in the bundle, and any changes you make to the resource in the bundle are applied to the existing resource when you deploy to the
prodtarget. - Update on development deploys: The existing resource becomes linked to the resource in the bundle, and any changes you make to the resource in the bundle are applied to the existing resource when you deploy to the
devtarget. - (Advanced) Don't update: The existing resource is not linked to the bundle. Changes made to the resource in the bundle are never applied to the existing resource. Instead, a copy is created. For more information about binding bundle resources to their corresponding workspace resource, see databricks bundle deployment bind.
- Update on production deploys: The existing resource becomes linked to the resource in the bundle, and any changes you make to the resource in the bundle are applied to the existing resource when you deploy to the
-
Click Add ... to add the existing resource to the bundle.
Add bundle configuration
An existing resource can also be added to your bundle by defining bundle configuration to include it in your bundle deployment. The following example adds an existing pipeline to a bundle.
Assuming you have a pipeline named taxifilter that runs the taxifilter.ipynb notebook in your shared workspace:
-
In your Databricks workspace's sidebar, click Jobs & Pipelines.
-
Optionally, select the Pipelines and Owned by me filters.
-
Select the existing
taxifilterpipeline. -
In the pipeline page, click the kebab to the left of the Development deployment mode button. Then click View settings YAML.
-
Click the copy icon to copy the bundle configuration for the pipeline.
-
Navigate to your bundle in Workspace.
-
Click the deployment icon for the bundle to switch to the Deployments panel.
-
In the Bundle resources section, click Add, then New pipeline definition.
noteIf you instead see a New ETL pipeline menu item, then you have the Lakeflow Pipelines Editor enabled. To add an ETL pipeline to a bundle, see Create a source-controlled pipeline.
-
Type
taxifilterinto the Pipeline name field of the Add pipeline to existing bundle dialog. Click Create. -
Paste the configuration for the existing pipeline into the file. This example pipeline is defined to run the
taxifilternotebook:YAMLresources:
pipelines:
taxifilter:
name: taxifilter
catalog: main
libraries:
- notebook:
path: /Workspace/Shared/taxifilter.ipynb
target: taxifilter_${bundle.environment}
You can now deploy the bundle, then run the pipeline resource through the UI.
Edit bundle resources
This feature is in Beta.
You can edit job and pipelines that are part of your bundle directly in the workspace UI. Changes are automatically applied to the configuration YAML for those resources in the bundle.
To edit a job or pipeline in a bundle:
- From the Deployments pane of the bundle editor, click the job or pipeline in Bundle resources to open the job or pipeline.
- Make changes to the job or pipeline, such as adding a notebook task or changing the pipeline schema.
- A workspace notification appears that confirms that the edits to the job or pipeline were applied to the bundle configuration. You can click the YAML file link in the notification to view the configuration changes in the bundle editor.
- Deploy the bundle so that the configuration changes are applied to the deployment.
Editing resources is always disabled in production mode.
Limitations
The following limitations apply to editing resources in the workspace:
- When you edit a field whose value comes from a bundle variable or substitution, the change only updates that field. It does not update the variable's definition, so other fields that reference the same variable are not affected.
- Updates to job permissions are not yet supported.
- Scheduling a pipeline or dashboard creates a job that starts the resource on a schedule, but the job and associated pipeline or dashboard aren’t linked and schedules aren’t shown in the pipelines or dashboards UI. To modify the schedule, edit the trigger in the job that was created.