Delta Sharingの株式を作成する
このページでは、 Delta Sharingの株式を作成する方法について説明します。
共有は、Unity Catalog 内のセキュリティ保護可能なオブジェクトであり、次のデータ資産を 1 人以上の受信者と共有するために使用します。
- テーブルとテーブルパーティション
- ストリーミングテーブル
- 管理された Iceberg テーブル
- 海外のIcebergテーブル
- 外部スキーマとテーブル
- ビュー(行レベルと列レベルでアクセスを制限する動的ビューを含む)
- マテリアライズドビュー
- ボリューム
- Python UDF
- ノートブック
- AIモデル
スキーマ (データベース) 全体を共有する場合、受信者は、スキーマを共有した時点でスキーマ内のすべてのテーブル、ストリーミングテーブル、ビュー、マテリアライズドビュー、モデル、ボリュームにアクセスできるほか、将来スキーマに追加されるデータや AI アセットにもアクセスできます。
共有には、1 つの Unity Catalog メタストアからのデータと AI アセットのみを含めることができます。 データ資産と AI 資産は、いつでも共有に追加したり、共有から削除したりできます。
共有を作成する前に、アカウントに Delta Sharing が設定されていることを確認してください (プロバイダー向け) 。
共有モデルの詳細については、共有、プロバイダー、および受信者を参照してください。
必要条件
完了するタスクごとに記載された要件を満たしていることを確認します。
データ資産を共有に追加する場合、Databricks ではグループを共有所有者として使用することをお勧めします。
タスク | 要件 |
|---|---|
シェアを作成する |
|
以下を共有に追加します。
|
|
スキーマ全体または外部スキーマを共有する |
|
共有へのボリュームの追加 |
|
Python UDFを共有に追加する |
|
共有にモデルを追加する |
|
ノートブックファイルを共有に追加する |
|
コンピュート要件
- Databricks ノートブックを使用して共有を作成する場合、コンピュート リソースは Databricks Runtime 11.3 LTS 以上を使用し、標準または専用アクセス モード (以前の共有およびシングル ユーザー) を持っている必要があります。
- SQLステートメントを使用して共有にスキーマを追加する場合 (またはスキーマを更新または削除する場合)、 Databricks Runtime 13.3 LTS以上を実行している SQL ウェアハウスまたはコンピュートを使用する必要があります。 カタログエクスプローラ を使用して同じことを実行する場合、コンピュートの要件はありません。
共有オブジェクトを作成してください
共有オブジェクトを作成する前に、要件を満たしていることを確認してください。
共有を作成するには、カタログ エクスプローラー、 Databricks Unity Catalog CLI 、またはDatabricksノートブックまたはDatabricks SQLクエリ エディターのCREATE SHARE SQLコマンドを使用します。
- Catalog Explorer
- SQL
- CLI
-
Databricks ワークスペースで、[
 カタログ] をクリックします。
 -
[カタログ ] ウィンドウの上部にある [
 ] 歯車アイコンをクリックし、[ Delta Sharing ] を選択します。
または、右上隅の 「共有」> Delta Sharing をクリックします。
-
自分が共有 タブで、 データの共有 ボタンをクリックします。
-
共有の作成 ページで、共有の 名前 とオプションのコメントを入力します。
-
保存して続行 をクリックします。
データ資産を引き続き追加することも、停止して後で戻ることもできます。
-
[データ アセットの追加] タブで、共有するデータ アセットを選択します。
詳細な手順、追加要件、および関連する制限については、以下を参照してください。
-
保存して続行 をクリックします。
-
[ ノートブックの追加 ] タブで、共有するノートブックを選択します。
詳細な手順については、「 共有にノートブック ファイルを追加する」を参照してください。
-
保存して続行 をクリックします。
-
[ 受信者の追加 ] タブで、共有する受信者を選択します。
詳細な手順については、Delta Sharing データ共有へのアクセスを管理する (プロバイダー向け)を参照してください。
-
「 データの共有 」をクリックして、受信者とデータを共有します。
まだ受信者を作成していない場合は、 「データの共有」 をクリックして受信者を作成し、後でアクセス権を付与してください。
ノートブックまたは Databricks SQL クエリ エディターで次のコマンドを実行します。
CREATE SHARE [IF NOT EXISTS] <share-name>
[COMMENT "<comment>"];
これで、テーブル、ストリーミングテーブル、ボリューム、ビュー、マテリアライズドビュー、およびモデルを共有に追加できます。
詳細な手順、追加要件、および関連する制限については、以下を参照してください。
Databricks CLI を使用して次のコマンドを実行します。
databricks shares create <share-name>
--comment を使用してコメントを追加したり、--json を使用してアセットを共有に追加したりできます。詳細については、以下のセクションを参照してください。
これで、テーブル、ストリーミングテーブル、ボリューム、ビュー、マテリアライズドビュー、およびモデルを共有に追加できます。
詳細な手順、追加要件、および関連する制限については、以下を参照してください。
共有にテーブルを追加する
テーブルを共有に追加する前に、要件を満たしていることを確認してください。
ワークスペース管理者であり、テーブルを含むスキーマとカタログに対する USE SCHEMA および USE CATALOG のアクセス許可をワークスペース管理者グループから継承した場合、テーブルを共有に追加することはできません。 まず、スキーマとカタログに対する USE SCHEMA 権限と USE CATALOG 権限を自分自身に付与する必要があります。
テーブルコメント、列コメント、 および主キー制約 は、2024 年 7 月 25 日以降に Databricks-to-Databricks 共有を使用して受信者と共有される共有に含まれます。 リリース日より前に受信者と共有された共有を通じてコメントと制約の共有を開始する場合は、コメントと制約の共有をトリガーするために、受信者のアクセス権を取り消して再付与する必要があります。
テーブルを共有に追加するには、カタログ エクスプローラー、 Databricks Unity Catalog CLI 、またはDatabricksノートブックまたはDatabricks SQLクエリ エディターのSQLコマンドを使用します。
- Catalog Explorer
- SQL
- CLI
-
Databricks ワークスペースで、[
カタログ] をクリックします。 -
[カタログ ] ウィンドウの上部にある [
] 歯車アイコンをクリックし、[ Delta Sharing ] を選択します。または、右上隅の 「共有」> Delta Sharing をクリックします。
-
「自分が共有した共有」 タブで、テーブルを追加したい共有を見つけて、その名前をクリックします。行追跡機能を有効にしたテーブルを追加できます。受信者は行追跡列を照会できます。
-
「 アセットの管理」>「アセットの編集 」をクリックします。
-
アセット編集 ページで、スキーマ(データベース)全体または個々のテーブルを選択します。
-
テーブルを選択するには、まずカタログを選択し、次にテーブルを含むスキーマを選択し、最後にテーブル自体を選択します。
ワークスペース検索を使用して、名前、列名、またはコメントでテーブルを検索できます。ワークスペースオブジェクトの検索を参照してください。
-
スキーマを選択するには、まずカタログを選択し、次にスキーマを選択します。
共有スキーマの詳細については、「 共有にスキーマを追加する」を参照してください。
-
-
履歴 : テーブル履歴を共有して、受信者がタイムトラベル クエリを実行したり、 Spark構造化ストリーミングや実行トランザクションでテーブルを読み取ったりできるようにします。 Databricks-to-Databricks共有では、パフォーマンスを向上させるためにテーブルのDeltaログも共有されます。 「履歴共有によるテーブル読み取りパフォーマンスの向上」を参照してください。履歴の共有には、Databricks Runtime 12.2 LTS 以上が必要です。
また、顧客が table_changes() 関数を使用してテーブルのチェンジデータフィード (CDF) をクエリできるようにする場合は、 テーブルで CDF を有効にして から、 WITH HISTORYで共有する必要があります。
-
(オプション) エイリアス または パーティション 列の下にある
 をクリックして、エイリアスまたはパーティションを追加します。エイリアスとパーティションは、スキーマ全体を選択した場合には使用できません。テーブル履歴は、スキーマ全体を選択する場合、デフォルトによって含まれます。
- エイリアス : テーブル名を読みやすくするための代替テーブル名。エイリアスは、受信者に表示され、クエリで使用する必要があるテーブル名です。エイリアスが指定されている場合、受信者は実際のテーブル名を使用できません。
- パーティション : テーブルの一部のみを共有します。たとえば、
(column = 'value').共有するテーブルパーティションの指定および受信者のプロパティを使用してパーティションのフィルタリングを行うを参照してください。
-
[ 保存 ]をクリックします。
ノートブックまたは Databricks SQL クエリ エディターで次のコマンドを実行して、テーブルを追加します。
ALTER SHARE <share-name> ADD TABLE <catalog-name>.<schema-name>.<table-name>  [COMMENT "<comment>"]
   [PARTITION(<clause>)] [AS <alias>]
   [WITH HISTORY | WITHOUT HISTORY];
次を実行して、スキーマ全体を追加します。ADD SCHEMAコマンドを使用するには、SQLウェアハウスまたは13.3LTS 以降のDatabricks Runtimeを実行するコンピュートが必要です。共有スキーマの詳細については、「 共有にスキーマを追加する」を参照してください。
ALTER SHARE <share-name> ADD SCHEMA <catalog-name>.<schema-name>
[COMMENT "<comment>"];
次のオプションがあります。PARTITION と AS <alias> は、スキーマ全体を選択した場合は使用できません。
-
PARTITION(<clause>): テーブルの一部のみを共有する場合は、パーティションを指定できます。たとえば、(column = 'value')のように指定します。共有するテーブル パーティションの指定および受信者のプロパティを使用してパーティションのフィルター処理を行うをご覧ください。 -
AS <alias>: 代替テーブル名、またはテーブル名を読みやすくするための エイリアス 。エイリアスは、受信者に表示され、クエリで使用する必要があるテーブル名です。エイリアスが指定されている場合、受信者は実際のテーブル名を使用できません。<schema-name>.<table-name>の形式を使用します。 -
WITH HISTORYまたはWITHOUT HISTORY:WITH HISTORYが指定されている場合は、完全な履歴を含むテーブルが共有され、受信者はタイムトラベルクエリ、ストリーミング読み取り、トランザクションの実行が可能になります。Databricks-to-Databricks共有では、履歴共有によってテーブルのDeltaログも共有され、パフォーマンスが向上します。 テーブル共有の安全な動作は、コンピュートがDatabricks Runtime 16.2 以降を実行している場合はWITH HISTORY、それ以前のDatabricks Runtimeバージョンの場合はWITHOUT HISTORYです。 スキーマ共有の場合、Databricks Runtime のバージョンに関係なく、デフォルトはWITH HISTORYです。WITH HISTORYおよびWITHOUT HISTORYには、Databricks Runtime 12.2 LTS 以上が必要です。「履歴共有によるテーブル読み取りパフォーマンスの向上」も参照してください。
タイムトラベル クエリやストリーミング読み取りの実行に加えて、受信者がtable_changes() 関数を使用してテーブルのチェンジデータフィード(CDF) をクエリできるようにしたい場合は、テーブルを共有する前にテーブルで CDF を有効にする必要がありますWITH HISTORY 。
ALTER SHAREオプションの詳細については、「ALTER SHARE」を参照してください。
テーブルを追加するには、 Databricks CLI を使用して次のコマンドを実行します。
databricks shares update <share-name> \
  --json '{
    "updates": [
      {
        "action": "ADD",
        "data_object": {
          "name": "<table-full-name>",
          "data_object_type": "TABLE",
          "shared_as": "<table-alias>"
        }
      }
    ]
  }'
スキーマを追加するには、次の Databricks CLI コマンドを実行します。
databricks shares update <share-name> \
  --json '{
    "updates": [
      {
        "action": "ADD",
        "data_object": {
          "name": "<schema-full-name>",
          "data_object_type": "SCHEMA"
        }
      }
    ]
  }'
テーブルの場合、およびテーブルのみの場合は、 "data_object_type".
この例にリストされているオプションの詳細については、[SQL] タブの説明を参照してください。
追加のパラメーターについては、 databricks shares update --help を実行するか、REST API リファレンスの PATCH /api/2.1/unity-catalog/shares/ を参照してください。
共有からテーブルを削除する方法については、共有の更新を参照してください。
クラウドトークンの適格性
Databricksはクラウドトークン(一時的なパススコープのクラウド認証情報)を使用して、受信者が共有Deltaテーブルファイルに直接読み取りアクセスできるようにします。オープンな共有プロトコルでは、これは ディレクトリベースのアクセスモード とも呼ばれます。ビュー、マテリアライズドビュー、フォーリンテーブル、ストリーミングテーブル、ボリューム、ノートブック、 Python UDF、およびAIモデルはサポートされていません。 どのテーブルが対象となるかは、共有プロトコルによって異なります。
Databricks-to-Databricks共有 : クラウド VPN は、次のすべてに該当する場合に使用されます。
- テーブルは共有されています
WITH HISTORY(最初からの完全な履歴)。 - テーブルはパーティションフィルタなしで共有されます。
オープンな共有 :クラウドトークン(ディレクトリベースのアクセスモード)は、以下のすべての条件が満たされる場合に使用されます。
- 共有オブジェクトは 、管理対象または外部のDeltaテーブル です。
- テーブルは共有されています
WITH HISTORY(最初からの完全な履歴)。 - テーブルはパーティションフィルタなしで共有されます。
- このテーブルはCCv2テーブルではありません。
- このテーブルはデフォルトのストレージを使用しません。
Databricks-to-Databricks共有の場合、クラウド データベースは長寿命ベアラーなしでUnity Catalogメタストア間で直接交換され、その結果、ソース テーブルへの直接アクセスに匹敵するパフォーマンスが得られます。 オープン共有の場合、Delta Sharingサーバーは、リストとメタデータの応答にテーブルのクラウドストレージの場所とaccessModes: ["url", "dir"]含めます。受信者は、一時テーブル認証情報生成エンドポイントを呼び出すことで認証情報を取得し、クラウドストレージから直接読み取ることができます。
クラウド アクセスが使用される場合、受信者は共有Deltaテーブルのルート ディレクトリを範囲とする資格情報を受け取ります。 これにより、データファイルとDeltaの両方への読み取りアクセス権が付与されます。 Deltaログには、各テーブル バージョンのコミット履歴、コミッターに関する情報、およびvacuumれていない削除されたデータが含まれます。
共有するテーブルパーティションの指定
テーブルを共有に追加するときにテーブルの一部のみを共有するには、パーティション仕様を指定します。カタログ エクスプローラー、 Databricks Unity Catalog CLI 、またはDatabricksノートブックまたはDatabricks SQLクエリ エディターのSQLコマンドを使用して、共有にテーブルを追加するとき、または共有を更新するときにパーティションを指定します。 「共有にテーブルを追加する」および「共有を更新する」を参照してください。
例
次の SQL の例では、 inventory テーブルのデータの一部を共有し、 year、 month、 date の各カラムでパーティション化されています。
- 2021年のデータ。
- 2020年12月のデータ。
- 2019年12月25日のデータ。
ALTER SHARE share_name
ADD TABLE inventory
PARTITION (year = "2021"),
          (year = "2020", month = "Dec"),
          (year = "2019", month = "Dec", date = "2019-12-25");
受信者のプロパティを使用してパーティションフィルタリングを行います
データ受信者のプロパティに一致するテーブルパーティションを共有できます (パラメータ化されたパーティション共有とも呼ばれます)。
デフォルトのプロパティには、次のものが含まれます。
databricks.accountId:データ受信者が所属する Databricks アカウント(Databricks-to-Databricks 共有のみ)。databricks.metastoreId: データ受信者が属する Unity Catalog メタストア (Databricks間共有のみ)。databricks.name: データ受信者の名前。
受信者を作成または更新するときに、任意のカスタム プロパティを作成できます。
受信者プロパティによるフィルター処理を使用すると、複数の Databricks アカウント、ワークスペース、およびユーザー間で同じ共有を使用して同じテーブルを共有できますが、それらの間のデータ境界は維持されます。
たとえば、テーブルに Databricks アカウント ID 列が含まれている場合は、Databricks アカウント ID で定義されたテーブルパーティションを持つ 1 つの共有を作成できます。 共有すると、Delta Sharing は、各受信者に Databricks アカウントに関連付けられているデータのみを動的に配信します。
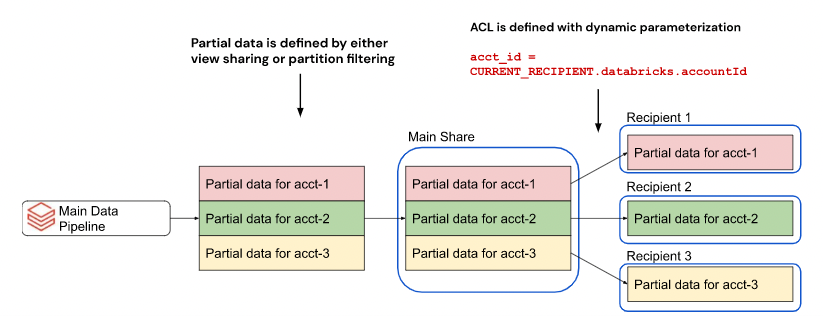
プロパティごとに動的にパーティション分割する機能がなければ、受信者ごとに個別の共有を作成する必要があります。
共有を作成または更新するときに受信者のプロパティでフィルター処理するパーティションを指定するには、カタログ エクスプローラーを使用するか、Databricks ノートブックまたは Databricks SQL クエリ エディターの CURRENT_RECIPIENT SQL 関数を使用できます。
受信者プロパティは、Databricks Runtime 12.2 以降で使用できます。
- Catalog Explorer
- SQL
-
Databricks ワークスペースで、[
カタログ] をクリックします。 -
[カタログ ] ウィンドウの上部にある [
] 歯車アイコンをクリックし、[ Delta Sharing ] を選択します。または、右上隅の 「共有」> Delta Sharing をクリックします。
-
自分が共有 タブで、更新する共有を見つけて、その名前をクリックします。
-
アセットの管理 > データ アセットの追加 をクリックします。
-
[ テーブルの追加 ] ページで、テーブルを含むカタログとデータベースを選択し、テーブルを選択します。
テーブルが含まれているカタログとデータベースがわからない場合は、ワークスペース検索を使用して、名前、列名、またはコメントでテーブルを検索できます。ワークスペースオブジェクトの検索を参照してください。
-
(オプション) パーティション 列の下の
をクリックして、パーティションを追加します。パーティションをテーブルに追加 ダイアログで、次の構文を使用してプロパティ・ベースのパーティション仕様を追加します。
(<column-name> = CURRENT_RECIPIENT().<property-key>)例えば
(country = CURRENT_RECIPIENT().country) -
[ 保存 ]をクリックします。
ノートブックまたは Databricks SQL クエリ エディターで次のコマンドを実行します。
ALTER SHARE <share-name> ADD TABLE <catalog-name>.<schema-name>.<table-name>
   PARTITION (<column-name> = CURRENT_RECIPIENT().<property-key>);
例えば
ALTER SHARE acme ADD TABLE acme.default.some_table
  PARTITION (country = CURRENT_RECIPIENT().country);
削除ベクトルまたは列マッピングを含むテーブルを共有に追加する
プレビュー
この機能は パブリック プレビュー段階です。
削除ベクトルは、Delta テーブルで有効にできるストレージ最適化機能です。Databricks の削除ベクトルを参照してください。
Databricks では、Delta テーブルの列マッピングもサポートされています。 Delta Lake 列マッピングを使用した列の名前変更と削除を参照してください。
削除ベクトルまたは列マッピングを使用してテーブルを共有するには、履歴と共有する必要があります。 共有にテーブルを追加するを参照してください。
削除ベクトルまたは列マッピングを使用してテーブルを共有すると、受信者は SQLウェアハウス、 Databricks Runtime 14.1 以降を実行しているコンピュート、またはオープンソース delta-sharing-spark 3.1 以上を実行しているコンピュートを使用してテーブルをクエリできます。 削除ベクトルまたは列マッピングが有効になっているテーブルの読み取りおよび削除ベクトルまたは列マッピングが有効になっているテーブルの読み取りを参照してください。
共有にスキーマを追加する
スキーマを共有に追加する前に、要件を満たしていることを確認してください。
スキーマ全体を共有に追加すると、受信者は共有を作成した時点のスキーマ内のすべてのデータ資産だけでなく、時間の経過とともにスキーマに追加されたすべての資産にアクセスできるようになります。これには、スキーマ内のすべてのテーブル、ビュー、ボリュームが含まれます。この方法で共有されるテーブルには、常に完全な履歴が含まれます。
受信者とスキーマを共有する
共有にスキーマを追加するには、「 共有にテーブルを追加する」の指示に従い、スキーマの追加方法を指定する内容に注意してください。
SQLを使用してスキーマを追加、更新、または削除するには、 Databricks Runtime 13.3 LTS以上を実行している SQL ウェアハウスまたはクラスターが必要です。 カタログエクスプローラ を使用して同じことを実行する場合、コンピュートの要件はありません。
制限事項
-
サポートされていないデータ アセットが含まれている場合でも、スキーマを共有できます。これらのアセットはフィルターで除外され、受信者と共有されません。サポートされていないデータ資産には次のものが含まれます。
- パーティション フィルタリングでリキッドクラスタリングを使用するテーブル
- V2 チェックポイント付きの R2 テーブル
- 照合が有効になっているテーブル
- 行フィルターまたは列マスクを含むテーブル
SHALLOW CLONEtables- 共有テーブルにおける外部キー制約
-
スキーマ全体を共有する場合、テーブル別名、パーティション、ボリューム別名は使用できません。スキーマ内のアセットにエイリアスまたはパーティションを作成した場合、スキーマ全体を共有に追加すると、それらは削除されます。
-
スキーマ内のテーブルまたはボリュームの詳細オプションを指定する場合は、SQL を使用してテーブルまたはボリュームを共有し、テーブルまたはボリュームに別のスキーマ名を持つエイリアスを付ける必要があります。
-
スキーマ レベルのエイリアシングはサポートされていません。異なるカタログからの同じ名前のスキーマを同じ共有に追加することはできません。代わりに、エイリアス化されたスキーマ名を持つ個々のテーブルを共有します。
ABAC ポリシーによって保護されたテーブルとスキーマを共有に追加する
プレビュー
この機能は パブリック プレビュー段階です。
属性ベースのアクセス制御 (ABAC)は、 Databricks全体に柔軟でスケーラブルな一元的なアクセス制御を提供するデータガバナンス モデルです。
ABACで保護されたテーブルやスキーマを共有できます 標準テーブルのように。 ABAC ポリシーをデータ資産に適用する方法については、 「ABAC ポリシーの作成と管理」を参照してください。
ただし、 特権ユーザー である必要があります。特権ユーザーは共有所有者で あり、 データ資産に適用される ABAC ポリシーから除外されるユーザーです。このポリシーは受信者のアクセスを管理するものではありません。受信者は共有アセットに完全にアクセスできます。ABAC 制限が適用されます。
ストリーミングテーブルを共有に追加する
ストリーミング テーブルは、ストリーミングまたは増分データ処理の追加サポートを備えた通常のDeltaテーブルです。 ストリーミングテーブルは、追記専用のデータソース向けに設計されており、入力データを一度だけ処理します。スタンドアロンのストリーミングテーブルの使用を参照してください。
ストリーミング テーブルを共有に追加する前に、要件を満たしていることを確認してください。
追加要件
-
ストリーミングテーブル共有を設定しているアカウントで、ワークフロー、ノートブック、 Lakeflow Spark宣言型パイプライン のサーバレスコンピュートを有効にする必要があります。 「サーバレス コンピュートへの接続」を参照してください。
-
ワークスペースでワークスペースカタログバインディングが有効になっている場合は、ストリーミングテーブルが格納されているカタログへの読み取りおよび書き込みアクセス権がワークスペースにあることを確認してください。詳細については、 「ワークスペース-カタログ バインディング」を参照してください。
-
共有可能なストリーミングテーブルは、 Delta テーブルまたはその他の共有可能なストリーミングテーブルまたはビューで定義する必要があります。
-
ストリーミングテーブルを共有に追加するときは、Databricks Runtime LTS 13.3 以上のコンピュートあるいはSQLウェアハウスを使用する必要があります。
制限事項
-
ストリーミングテーブルには、行フィルターと列マスクを含めることはできません。
- ストリーミングテーブルのベーステーブルには、行フィルターと列マスクを含めることができます。
-
ストリーミングテーブルにはパーティション フィルターを含めることはできません。 代わりに、ストリーミングテーブルの上にビューを作成します。
-
オープン共有の受信者は、ストリーミングテーブルの現在のスナップショットのみを読み取ることができます。オープンな受信者では、タイムトラベル、クエリ履歴、ストリーミング読み取り、およびCDFはサポートされていません。受信者がCDFを必要とする場合は、CDFを有効にした通常のDeltaテーブルを共有してください。
-
受信者が基となるデータに直接アクセスできない場合、
LIMIT句と述語プッシュダウンはサポートされません。システムは、クエリフィルターに関係なく、すべてのクエリ結果を完全に具体化してから受信者に返します。受信者は、共有ビュー、マテリアライズドビュー、ストリーミングテーブルの基となるデータに直接アクセスできますか?を参照してください。 -
ストリーミングテーブルに関する一般的な制限事項も適用されます。ストリーミングテーブルの制限事項を参照してください。
受信者とストリーミングテーブルを共有する
ストリーミングテーブルを共有に追加するには:
- Catalog Explorer
- SQL
- CLI
-
Databricks ワークスペースで、[
カタログ] をクリックします。 -
[カタログ ] ウィンドウの上部にある [
] 歯車アイコンをクリックし、[ Delta Sharing ] を選択します。または、右上隅の 「共有」> Delta Sharing をクリックします。
-
[ Shared by me ] タブで、ストリーミングテーブルを追加する共有を見つけて、その名前をクリックします。
-
「 アセットの管理」>「アセットの編集 」をクリックします。
-
[ アセットの編集 ] ページで、共有するストリーミングテーブルを検索または参照して選択します。
-
(オプション) [エイリアス ] 列で [
] をクリックしてエイリアスまたは代替ストリーミングテーブル名を指定し、ストリーミングテーブル名を読みやすくします。エイリアスは、受信者に表示され、クエリで使用する必要がある名前です。エイリアスが指定されている場合、受信者は実際のストリーミングテーブル名を使用できません。 -
[ 保存 ]をクリックします。
ノートブックまたはDatabricks SQLクエリーエディタで次のコマンドを実行します。
ALTER SHARE <share_name> ADD TABLE <st_name> [COMMENT <comment>] [AS <shared_st_name>];
次の Databricks CLI コマンドを実行します。
databricks shares update <share-name> \
  --json '{
    “updates”: [
      {
        “action”: “ADD”,
        “data_object”: {
          “name”: “<st-full-name>",
          “data_object_type”: “TABLE”,
          “comment”: “<comment>”
        }
      }
    ]
  }'
共有からストリーミングテーブルを削除する方法については、「 共有の更新」を参照してください。
管理された Iceberg テーブルを共有に追加する
プレビュー
この機能は パブリック プレビュー段階です。
Apache Icebergは、アナリティクス ワークロード用のオープンソース テーブル形式です。 Databricks では、Unity Catalog 内に マネージ Icebergテーブルと呼ばれる Iceberg テーブル を作成できます。
共有にマネージド Iceberg テーブルを追加する前に、要件を満たしていることを確認してください。Iceberg テーブルおよびマネージド Iceberg テーブルの制限が適用されます。制限事項を参照してください。
Databricks は、管理対象 Iceberg テーブルを外部の Iceberg クライアントと共有することをサポートしていません。
管理された Iceberg テーブルを共有に追加するには、次のようにします。
- Catalog Explorer
- SQL
- CLI
-
Databricks ワークスペースで、[
カタログ] をクリックします。 -
[カタログ ] ウィンドウの上部にある [
] 歯車アイコンをクリックし、[ Delta Sharing ] を選択します。または、右上隅の 「共有」> Delta Sharing をクリックします。
-
[ 自分が共有 ] タブで、マネージド Iceberg テーブルを追加する共有を見つけて、その名前をクリックします。
-
[ アセットの管理 ] > [ アセットの編集 ] をクリックします。
-
「 アセットの編集 」ページで、共有する管理された Iceberg テーブルを検索または参照し、それを選択します。
-
(オプション) [エイリアス ] 列で [
] をクリックしてエイリアスを指定するか、別のマネージド Iceberg テーブル名を指定すると、名前が読みやすくなります。エイリアスは、受信者に表示され、クエリで使用する必要がある名前です。エイリアスが指定されている場合、受信者は実際のマネージド Iceberg テーブル名を使用できません。 -
[ 保存 ]をクリックします。
ノートブックまたは Databricks SQL クエリ エディターで次のコマンドを実行します。必要に応じて、マネージド Iceberg テーブルを別の名前で公開する <shared_iceberg_table_name> を指定します。
ALTER SHARE <share_name> ADD TABLE <managed_iceberg_name> [COMMENT <comment>] [AS <shared_iceberg_table_name>];
次の Databricks CLI コマンドを実行します。
databricks shares update <share-name> \
  --json '{
    “updates”: [
      {
        “action”: “ADD”,
        “data_object”: {
          “name”: “<managed-iceberg-full-name>",
          “data_object_type”: “TABLE”,
          “comment”: “<comment>”
        }
      }
    ]
  }'
外部スキーマまたはテーブルを共有に追加する
ベータ版
この機能はベータ版です。ワークスペース管理者は、 プレビュー ページからこの機能へのアクセスを制御できます。「Databricks プレビューの管理」を参照してください。
レイクハウスフェデレーションを使用すると、 Databricksを使用して外部データソースに対してクエリを実行できます。 Unity Catalogでデータ ガバナンスを追加して、これらのテーブルをクエリすることで、外部システムによって管理されるデータとメタデータを含む外部スキーマとテーブルを作成できます。 外部ソースへの接続の詳細については、 「レイクハウスフェデレーションとは?」を参照してください。 。
Delta Sharing を使用すると、Databricks にデータをコピーしたり、複雑なネットワーク設定や資格情報の転送を行ったりすることなく、元の場所から外部データを安全に共有できます。
外部スキーマまたはテーブルを共有に追加する前に、要件を満たしていることを確認してください。
追加要件
-
アカウントレベルのプレビューで レイクハウスフェデレーション共有 を有効にする必要があります。 Databricksのプレビューを管理するを参照してください。
-
外部スキーマ またはフォーリンテーブル共有が設定されているアカウントでは、ワークフロー、ノートブック、およびLakeflow Spark宣言型パイプラインに対してサーバレス コンピュートを有効にする必要があります。 「サーバレス コンピュートへの接続」を参照してください。
-
外部のスキーマとテーブルを共有する場合、データはプロバイダー側でクエリされ、一時的にマテリアライズされます。デフォルトでは、具体化されたデータは、Databricks のデフォルト ストレージを使用して非表示のスキーマに保存されます。要件を満たしていることを確認し、デフォルトのストレージの制限を遵守してください。
デフォルトストレージの地域別の可用性の詳細については、 「サーバレスの可用性」を参照してください。
Databricks のデフォルト ストレージの使用をオプトアウトし、一時的な具体化に独自のストレージを使用するには、サポート ケースを開きます。
大きすぎて実体化できないフォーリンテーブルは共有できません。 具体化が制限を超えた場合、クエリは失敗します。
- デフォルトストレージの使用を選択した場合は、アカウント レベルで 「デフォルトストレージのDelta Sharing – 拡張アクセス」 プレビューを有効にする必要があります。 Databricks プレビューの管理を参照してください。
制限事項
- 共有フォーリンテーブルは、
LIMIT句または述語プッシュダウンをサポートしません。 システムは、クエリフィルターに関係なく、すべてのクエリ結果を完全に具体化してから受信者に返します。
推奨される使用パターン
クエリ結果はクエリごとにオンデマンドで生成されるため、フォーリンテーブルとスキーマの共有は、テーブルの共有やマテリアライズドビューに比べてコスト効率が低くなる可能性があります。 Databricks では、パフォーマンスを向上させるために次のことを推奨しています。
- 一般的なクエリ結果のサイズは 10 GB 未満に抑えます。
- 頻繁なデータ ダンプの代わりに、アドホックな探索的クエリを使用します。
- クラウドトークン共有を使用する場合は、コスト効率とパフォーマンスを向上させるために、フォーリンテーブルの上に作成されたマテリアライズドビューを共有することを検討してください。
外部スキーマまたはテーブルを受信者と共有する
外部スキーマまたはテーブルを共有に追加するには、カタログ エクスプローラー、 Databricks Unity Catalog CLI 、またはDatabricksノートブックまたはDatabricks SQLクエリ エディターのSQLコマンドを使用します。
- Catalog Explorer
- SQL
- CLI
-
Databricks ワークスペースで、[
カタログ] をクリックします。 -
[カタログ ] ウィンドウの上部にある [
] 歯車アイコンをクリックし、[ Delta Sharing ] を選択します。または、右上隅の 「共有」> Delta Sharing をクリックします。
-
[ 自分が共有] タブで、フォーリンテーブルまたはスキーマを追加する共有を見つけて、その名前をクリックします。
-
「 アセットの管理」>「アセットの編集 」をクリックします。
-
[アセットの編集] ページで、共有するフォーリンテーブルまたはスキーマを検索または参照して選択します。
-
(オプション)「 エイリアス」 列で、「
」をクリックしてエイリアス、または代替の外部スキーマまたは表名を指定し、外部スキーマまたは表名を読みやすくします。エイリアスは、受信者が表示し、クエリで使用する必要がある名前です。エイリアスが指定されている場合、受信者は実際の外部スキーマまたはテーブル名を使用できません。 -
[ 保存 ]をクリックします。
ALTER SHARE <share-name>
  ADD {TABLE | SCHEMA} {federated_catalog.federated_schema.federated_table | federated_catalog.federated_schema}
  [COMMENT "<comment>"]
  [AS <alias>];
オプションは次のとおりです。
AS <alias>: データ資産名を読みやすくするための代替名または別名。エイリアスは、受信者が表示し、クエリで使用する必要があるデータ資産名です。エイリアスが指定されている場合、受信者は実際の名前を使用できません。<catalog-name>.<schema-name>.<view-name>の形式を使用します。COMMENT "<comment>": コメントは、カタログ・エクスプローラーの UI と、SQL ステートメントを使用してデータ資産の詳細を一覧表示するときに表示されます。
ALTER SHAREオプションの詳細については、「ALTER SHARE」を参照してください。
databricks shares update <share-name> \
  --json '{
    “updates”: [
      {
        “action”: “ADD”,
        “data_object”: {
          “name”: “<federated-data-asset-full-name>",
          “data_object_type”: “{TABLE | SCHEMA}”,
          "shared_as": "<foreign-data-asset-alias>",
          “comment”: “<comment>”
        }
      }
    ]
  }'
共有フォルダに外部のIcebergテーブルを追加する
プレビュー
この機能は パブリック プレビュー段階です。
外国のIcebergテーブルは、レイクハウスフェデレーションを使用して外国のIcebergカタログからフェデレーションされたテーブルです。 Databricks の Apache Iceberg テーブルの詳細については、 「Databricks の Apache Iceberg とは?」を参照してください。
始める前に、一般的な要件を満たしていることを確認し、共有を作成してください。外部のIcebergクライアントを使用している受信者と、外部のIcebergテーブルを共有することもできます。詳細については、 「外部Icebergクライアントへの共有を有効にする」を参照してください。
受信者が最新のデータを受け取っていることを確認するには、外部のIcebergテーブルを定期的に更新してください。SELECTクエリまたはREFRESH TABLEコマンドは、テーブルのメタデータを更新します。
Databricks 、 Databricks上の外部IcebergテーブルがリモートのIcebergソースと同期を保つように、スケジュールされたジョブを設定することをお勧めします。 更新のスケジュール設定の詳細については、 「クエリのスケジュール設定」を参照してください。
追加要件
- アカウントレベルで レイクハウスフェデレーション共有 プレビューを有効にする必要があります。 Databricksのプレビューを管理するを参照してください。
- Icebergクライアントを使用していないオープンな受信者と外部のIcebergテーブルを共有する場合は、デフォルトのストレージを使用する必要があります。 Delta Sharing for デフォルトストレージ – 拡張アクセスの プレビューをアカウント レベルで有効にする必要があります。 Databricksのプレビューを管理するを参照してください。
- Icebergクライアントを使用していないオープンな受信者と共有する場合、共有データはまずコンピュートとストレージを使用してフィルタリングされ、具体化されます。 追加費用が発生する可能性があります。詳細については、 Delta Sharing費用はどのように発生し、どのように確認すればよいですか?」をご覧ください。 また、受信者は共有ビュー、マテリアライズドビュー、ストリーミングテーブル内の基となるデータに直接アクセスできますか?
- 外部のIcebergテーブルでは、 Deltaユニフォームが有効になっている必要があります。 Uniformが有効になっていない場合、テーブルを共有に追加することはできません。IcebergクライアントでDeltaテーブルを読み込む方法については、こちらをご覧ください。
制限事項
- パーティションはサポートされていません。
- Icebergクライアントを使用していないオープンな受信者と共有する場合、
LIMIT句と述語プッシュダウンはサポートされません。システムは、クエリフィルターに関係なく、すべてのクエリ結果を完全に具体化してから受信者に返します。
共有に外部のIcebergテーブルを追加する
外部のIcebergテーブルは、完全な履歴とともに自動的に共有されます。
共有に外部の Iceberg テーブルを追加するには:
- Catalog Explorer
- SQL
- CLI
-
Databricks ワークスペースで、[
カタログ] をクリックします。 -
[カタログ ] ウィンドウの上部にある [
] 歯車アイコンをクリックし、[ Delta Sharing ] を選択します。または、右上隅の 「共有」> Delta Sharing をクリックします。
-
「 自分によって共有された ページ」で、外部のIcebergテーブルを追加したい共有を見つけて、その名前をクリックします。
-
[ アセットの管理 ] > [ アセットの編集 ] をクリックします。
-
「アセットの編集」 ページで、共有したい外部の Iceberg テーブルを検索または参照して選択します。
-
(オプション) エイリアス 列で、
エイリアスを指定する。エイリアスとは、受信者が確認し、問い合わせ時に使用しなければならない名前のことです。 -
[ 保存 ]をクリックします。
ノートブックまたはDatabricks SQLクエリエディタで、以下のコマンドを実行してください。オプションとして、 <shared_table_name>を指定すると、外部のIcebergテーブルを別の名前で公開できます。
ALTER SHARE <share_name> ADD TABLE <foreign_iceberg_table_name> [COMMENT <comment>] [AS <shared_table_name>];
次の Databricks CLI コマンドを実行します。
databricks shares update <share-name> \
  --json '{
    "updates": [
      {
        "action": "ADD",
        "data_object": {
          "name": "<foreign-iceberg-table-full-name>",
          "data_object_type": "TABLE",
          "comment": "<comment>"
        }
      }
    ]
  }'
共有にビューを追加する
ビューは、1 つ以上のテーブルまたは他のビューから作成される読み取り専用オブジェクトです。 ビューは、Unity Catalog メタストア内の複数のスキーマとカタログに含まれるテーブルやその他のビューから作成できます。 ビューの作成と管理を参照してください。
ビューを共有する場合、データがクエリされ、一時的にマテリアライズされます。マテリアライズされたデータは、ビューの親スキーマまたはカタログの保存場所、またはメタストアのルート場所に保存されます。
共有にビューを追加する前に、要件を満たしていることを確認してください。
追加要件
-
ワークフロー、ノートブック、 Lakeflow Spark宣言型パイプライン は、ビュー共有を設定しているアカウントでサーバレスコンピュートを有効にする必要があります。 「サーバレス コンピュートへの接続」を参照してください。
-
共有可能なビューは、 Delta テーブル、その他の共有可能なビュー、またはローカルのマテリアライズドビューとストリーミングテーブルで定義する必要があります。 共有可能なビューはフォーリンテーブルで定義できません。
-
SQL共有にビューを追加するときは、Databricks Runtime 13.3LTS 以上で ウェアハウスまたはコンピュートを使用する必要があります。
-
ワークスペースでワークスペースカタログのバインディングが有効になっている場合は、ワークスペースがカタログへの読み取りおよび書き込みアクセス権を持っていることを確認してください。詳細については、 「ワークスペース-カタログ バインディング」を参照してください。
-
ビューを共有する場合、受信者のコンピュート タイプとアカウント関係に応じて、データがクエリされ、プロバイダー側で一時的に実体化される場合があります。 具体化されたデータは、ビューの親スキーマまたはカタログのストレージ場所、あるいはメタストアのルート場所に格納されます。具体化がいつ発生するか、また誰が費用を負担するかについての詳細は、 「受信者は共有ビュー、マテリアライズドビュー、ストリーミングテーブルの基となるデータに直接アクセスできますか?」を参照してください。Delta Sharing費用はどのように発生し、どのように確認すればよいですか?
-
保存場所にファイアウォールやプライベート リンクなどのカスタム ネットワーク構成がある場合は、受信者が保存場所に接続できるように許可リストに登録されていることを確認する必要があります。サーバレス コンピュートのファイアウォール ルールを構成する手順については、 「ファイアウォールを使用してワークスペースのネットワーク送信を制限する」を参照してください。
制限事項
- 共有テーブルまたは共有ビューを参照するビューは共有できません。
- 外部のIcebergテーブルを含め、フォーリンテーブルを参照するビューを共有することはできません。
- 受信者が基となるデータに直接アクセスできない場合、
LIMIT句と述語プッシュダウンはサポートされません。システムは、クエリフィルターに関係なく、すべてのクエリ結果を完全に具体化してから受信者に返します。受信者は、共有ビュー、マテリアライズドビュー、ストリーミングテーブルの基となるデータに直接アクセスできますか?を参照してください。
受信者とビューを共有する
このセクションでは、カタログ エクスプローラー、Databricks CLI、または Databricks ノートブックまたは Databricks SQL クエリ エディターの SQL コマンドを使用して、共有にビューを追加する方法について説明します。 Unity Catalog REST API を使用する場合は、REST API リファレンスの PATCH /api/2.1/unity-catalog/shares/ を参照してください。
- Catalog Explorer
- SQL
- CLI
-
Databricks ワークスペースで、[
カタログ] をクリックします。 -
[カタログ ] ウィンドウの上部にある [
] 歯車アイコンをクリックし、[ Delta Sharing ] を選択します。または、右上隅の 「共有」> Delta Sharing をクリックします。
-
[ 自分が共有] タブで、ビューを追加する共有を見つけて、その名前をクリックします。
-
アセットの管理 > データ アセットの追加 をクリックします。
-
[ テーブルの追加 ] ページで、共有するビューを検索または参照し、それを選択します。
-
(オプション)
「エイリアス 」列の下の「 」をクリックして別のビュー名を指定するか、「 エイリアス 」をクリックしてビュー名を読みやすくします。エイリアスは、受信者に表示され、クエリで使用する必要がある名前です。受信者は、エイリアスが指定されている場合、実際のビュー名を使用できません。 -
[ 保存 ]をクリックします。
ノートブックまたは Databricks SQL クエリ エディターで次のコマンドを実行します。
ALTER SHARE <share-name> ADD VIEW <catalog-name>.<schema-name>.<view-name>
   [COMMENT "<comment>"]
   [AS <alias>];
オプションは次のとおりです。
AS <alias>: ビュー名を読みやすくするための代替ビュー名またはエイリアス。エイリアスは、受信者に表示され、クエリで使用する必要があるビュー名です。受信者は、エイリアスが指定されている場合、実際のビュー名を使用できません。<schema-name>.<view-name>の形式を使用します。COMMENT "<comment>": コメントは、カタログエクスプローラ UI に表示され、SQL 文を使用してビューの詳細をリストおよび表示するときに表示されます。
ALTER SHAREオプションの詳細については、「ALTER SHARE」を参照してください。
次の Databricks CLI コマンドを実行します。
databricks shares update <share-name> \
  --json '{
    "updates": [
      {
        "action": "ADD",
        "data_object": {
          "name": "<view-full-name>",
          "data_object_type": "VIEW",
          "shared_as": "<view-alias>"
        }
      }
    ]
  }'
"shared_as": "<view-alias>" はオプションであり、ビュー名を読みやすくするための代替ビュー名またはエイリアスを提供します。エイリアスは、受信者に表示され、クエリで使用する必要があるビュー名です。受信者は、エイリアスが指定されている場合、実際のビュー名を使用できません。<schema-name>.<view-name>の形式を使用します。
追加のパラメーターについては、 databricks shares update --help を実行するか、REST API リファレンスの PATCH /api/2.1/unity-catalog/shares/ を参照してください。
共有からビューを削除する方法については、共有の更新を参照してください。
動的ビューを共有に追加して行と列をフィルター処理する
ダイナミックビューを使用して、次のようなテーブルデータへのきめ細かなアクセス制御を設定できます。
- 列または行のレベルでのセキュリティ。
- データマスキング。
CURRENT_RECIPIENT() 関数を使用する動的ビューを作成する場合は、受信者定義で指定したプロパティに従って受信者のアクセスを制限できます。
このセクションでは、動的ビューを使用して、行レベルと列レベルの両方でテーブルデータへの受信者のアクセスを制限する例を示します。
必要条件
- 共有にビューを追加するための要件を満たしていることを確認します。
- Databricks Runtime バージョン :
CURRENT_RECIPIENT関数は、Databricks Runtime 14.2 以降でサポートされています。
制限事項
- ビュー共有のすべての制限が適用されます。
- プロバイダーが
CURRENT_RECIPIENT関数を使用するビューを共有する場合、プロバイダーは共有コンテキストのためにビューに対して直接クエリを実行できません。このような動的ビューをテストするには、プロバイダーがビューを自分自身と共有し、受信者としてビューに対してクエリを実行する必要があります。 - プロバイダーは、動的ビューを参照するビューを作成できません。
受信者のプロパティを設定する
これらの例では、共有するテーブルに countryという名前の列があり、一致する country プロパティを持つ受信者のみが特定の行または列を表示できます。
受信者のプロパティは、カタログ エクスプローラーまたは Databricks ノートブックまたは SQL クエリ エディターの SQL コマンドを使用して設定できます。
- Catalog Explorer
- SQL
-
Databricks ワークスペースで、[
カタログ] をクリックします。 -
[カタログ ] ウィンドウの上部にある [
] 歯車アイコンをクリックし、[ Delta Sharing ] を選択します。または、右上隅の 「共有」> Delta Sharing をクリックします。
-
「受信者」 タブで、プロパティを追加する受信者を見つけて、その名前をクリックします。
-
ページの右下にある 「受信者のプロパティ」 の下にある
 Databricks 受信者の場合は databricks.metastoreID の横に鉛筆アイコンが表示され、オープン受信者の場合は databricks.name の横に表示されます。
 -
「 受信者のプロパティを編集 」ダイアログで、キーとして列名(この場合は
country)を入力し、値としてフィルタリングする値(CAなど)を入力します。 -
[ 保存 ]をクリックします。
受信者にプロパティを設定するには、 ALTER RECIPIENTを使用します。この例では、 country プロパティは CAに設定されています。
ALTER RECIPIENT recipient1 SET PROPERTIES ('country' = 'CA');
受信者に行レベルの権限を持つダイナミックビューを作成してください
この例では、country プロパティが一致する受信者のみが特定の行を表示できます。
CREATE VIEW my_catalog.default.view1 AS
  SELECT * FROM my_catalog.default.my_table
  WHERE country = CURRENT_RECIPIENT('country');
別のオプションとして、データ プロバイダーが、ファクト テーブル フィールドを受信者プロパティにマップする別のマッピング テーブルを保持することもできます。これにより、受信者のプロパティとファクト テーブル フィールドを分離して柔軟性を高めることができます。
受信者用に列レベルの権限を持つダイナミックビューを作成してください
この例では、country プロパティに一致する受信者だけが特定の列を表示できます。 他のユーザーには、返されたデータが次のように表示されます REDACTED。
CREATE VIEW my_catalog.default.view2 AS
  SELECT
  CASE
    WHEN CURRENT_RECIPIENT('country') = 'US' THEN pii
    ELSE 'REDACTED'
  END AS pii
  FROM my_catalog.default.my_table;
動的ビューを受信者と共有する
動的ビューを受信者と共有するには、標準ビューの場合と同じ SQL コマンドまたは UI プロシージャを使用します。 共有にビューを追加するを参照してください。
マテリアライズドビューを共有に追加する
ビューと同様に、マテリアライズドビューもクエリの結果であり、テーブルと同じようにアクセスできます。通常のビューとは異なり、マテリアライズドビューの結果は、そのマテリアライズドビューが最後に更新された時点のデータの状態を反映します。マテリアライズドビューの詳細については、 「スタンドアロンのマテリアライズドビューの使用」を参照してください。
マテリアライズドビューを共有に追加する前に、要件を満たしていることを確認してください。
追加要件
-
マテリアライズドビュー共有を設定しているアカウントで、ワークフロー、ノートブック、 Lakeflow Spark宣言型パイプライン のサーバレスコンピュートを有効にする必要があります。 「サーバレス コンピュートへの接続」を参照してください。
-
ワークスペースでワークスペースカタログのバインディングが有効になっている場合は、ワークスペースがマテリアライズドビューを含むカタログへの読み取りおよび書き込みアクセス権を持っていることを確認してください。詳細については、 「ワークスペース-カタログ バインディング」を参照してください。
-
Shareable マテリアライズドビューは、 Delta テーブルまたはその他の共有可能なストリーミングテーブル、ビュー、またはマテリアライズドビューで定義する必要があります。
-
共有にマテリアライズドビューを追加するときは 13.3 以上で SQLウェアハウスまたはコンピュートを使用する必要があります。Databricks RuntimeLTS
制限事項
- マテリアライズドビューには行フィルターを含めることはできませんが、マテリアライズドビューのベーステーブルには行フィルターと列マスクを含めることができます。
- マテリアライズドビューには、パーティションフィルタを含めることはできません。 代わりに、マテリアライズドビューの上にビューを作成します。
- オープン共有の受信者は、マテリアライズドビューの現在のスナップショットのみを読み取ることができます。オープンレシーバーではストリーミング読み取りはサポートされていません。
- 受信者が基となるデータに直接アクセスできない場合、
LIMIT句と述語プッシュダウンはサポートされません。システムは、クエリフィルターに関係なく、すべてのクエリ結果を完全に具体化してから受信者に返します。受信者は、共有ビュー、マテリアライズドビュー、ストリーミングテーブルの基となるデータに直接アクセスできますか?を参照してください。 - マテリアライズドビューに関する一般的な制限事項も適用されます。マテリアライズドビューの制限事項を参照してください。
マテリアライズドビューを受信者と共有する
このセクションでは、カタログ エクスプローラー、 Databricks CLI 、またはDatabricksノートブックまたはDatabricks SQLクエリ エディターのSQLコマンドを使用して、マテリアライズドビューを共有に追加する方法について説明します。 REST API を使用する場合は、REST API リファレンスのPATCH /api/2.1/unity-catalog/shares/ を参照してください。
- Catalog Explorer
- SQL
- CLI
-
Databricks ワークスペースで、[
カタログ] をクリックします。 -
[カタログ ] ウィンドウの上部にある [
] 歯車アイコンをクリックし、[ Delta Sharing ] を選択します。または、右上隅の 「共有」> Delta Sharing をクリックします。
-
[ 自分が共有] タブで、マテリアライズドビューを追加する共有を見つけて、その名前をクリックします。
-
「 アセットの管理」>「アセットの編集 」をクリックします。
-
[ アセットの編集 ] ページで、共有するマテリアライズドビューを検索または参照し、それを選択します。
-
(オプション) [エイリアス ] 列で [
] をクリックしてエイリアスまたは代替のマテリアライズドビュー名を指定し、マテリアライズドビューの名前を読みやすくします。エイリアスは、受信者に表示され、クエリで使用する必要がある名前です。受信者は、エイリアスが指定されている場合、実際のマテリアライズドビュー名を使用できません。 -
[ 保存 ]をクリックします。
ノートブックまたはDatabricks SQLクエリーエディタで次のコマンドを実行します。
ALTER SHARE <share_name> ADD MATERIALIZED VIEW <mv_name> [COMMENT <comment>] [AS <shared_mv_name>];
databricks shares update <share-name> \
  --json '{
    “updates”: [
      {
        “action”: “ADD”,
        “data_object”: {
          “name”: “<mat-view-full-name>”,
          “data_object_type”: “MATERIALIZED_VIEW”,
          “comment”: “<comment>”
        }
      }
    ]
  }'
共有からマテリアライズドビューを削除する方法については、共有の更新を参照してください。
共有にボリュームを追加します
ボリュームは、クラウド オブジェクト ストレージの場所にあるストレージの論理ボリュームを表す Unity Catalog オブジェクトです。 これらは主に、表形式以外のデータ資産に対するガバナンスを提供することを目的としています。 Unity Catalogボリュームとはを参照してください。
ボリュームを共有に追加する前に、要件を満たしていることを確認してください。
追加要件
- ボリューム共有は、 Databricks-to-Databricks 共有でのみサポートされます。
- 共有にボリュームを追加するときは、バージョン 2023.50 以降の SQLウェアハウス、または Databricks Runtime 14.1 以降のコンピュート リソースを使用する必要があります。
- プロバイダー側のボリューム ストレージにカスタム ネットワーク構成 (ファイアウォールやプライベート リンクなど) がある場合、プロバイダーは、ボリュームのストレージ場所に接続できるように、受信者のデータ プレーン アドレスが適切に許可リストに登録されていることを確認する必要があります。カタログ エクスプローラーでは、受信側でボリュームが正しく表示されない場合があります。
ボリュームコメントは、2024年7月25日以降に Databricks-to-Databricks 共有を使用して受信者と共有される共有に含まれます。 リリース日より前に受信者と共有された共有を通じてコメントの共有を開始する場合、コメント共有をトリガーするには、受信者のアクセス権を取り消して再付与する必要があります。
受信者とボリュームを共有する
このセクションでは、カタログエクスプローラ、Databricks CLI、または Databricks ノートブックまたは SQL クエリ エディターの SQL コマンドを使用して、共有にボリュームを追加する方法について説明します。 Unity Catalog REST APIを使用したい場合は、REST APIリファレンスのPATCH /api/2.1/unity-catalog/shares/ を参照してください。
- Catalog Explorer
- SQL
- CLI
-
Databricks ワークスペースで、[
カタログ] をクリックします。 -
[カタログ ] ウィンドウの上部にある [
] 歯車アイコンをクリックし、[ Delta Sharing ] を選択します。または、右上隅の 「共有」> Delta Sharing をクリックします。
-
[ 自分が共有] タブで、ボリュームを追加する共有を見つけて、その名前をクリックします。
-
「 アセットの管理」>「アセットの編集 」をクリックします。
-
[ アセットの編集 ] ページで、共有するボリュームを検索または参照して選択します。
または、ボリュームを含むスキーマ全体を選択することもできます。「共有へのスキーマの追加」を参照してください。
-
(オプション)
「エイリアス 」列の下の「 」をクリックして代替ボリューム名を指定するか、「 エイリアス 」をクリックしてボリューム名を読みやすくします。エイリアスは、スキーマ全体を選択した場合は使用できません。
エイリアスは、受信者に表示され、クエリで使用する必要がある名前です。エイリアスが指定されている場合、受信者は実際のボリューム名を使用できません。
-
[ 保存 ]をクリックします。
ノートブックまたは Databricks SQL クエリ エディターで次のコマンドを実行します。
ALTER SHARE <share-name> ADD VOLUME <catalog-name>.<schema-name>.<volume-name>
   [COMMENT "<comment>"]
   [AS <alias>];
オプションは次のとおりです。
AS <alias>: ボリューム名を読みやすくするための代替ボリューム名またはエイリアス。エイリアスは、受信者に表示され、クエリで使用する必要があるボリューム名です。受信者は、エイリアスが指定されている場合、実際のボリューム名を使用できません。<schema-name>.<volume-name>の形式を使用します。COMMENT "<comment>": コメントは、カタログエクスプローラ UI に表示され、SQL ステートメントを使用してボリュームの詳細をリストおよび表示するときに表示されます。
ALTER SHAREオプションの詳細については、「ALTER SHARE」を参照してください。
Databricks CLI 0.210 以降を使用して、次のコマンドを実行します。
 databricks shares update <share-name> \
   --json '{
     "updates": [
       {
         "action": "ADD",
         "data_object": {
           "name": "<volume-full-name>",
           "data_object_type": "VOLUME",
           "string_shared_as": "<volume-alias>"
         }
       }
     ]
   }'
"string_shared_as": "<volume-alias>" はオプションであり、ボリューム名を読みやすくするための代替ボリューム名 (別名) を提供します。エイリアスは、受信者に表示され、クエリで使用する必要があるボリューム名です。受信者は、エイリアスが指定されている場合、実際のボリューム名を使用できません。<schema-name>.<volume-name>の形式を使用します。
追加のパラメーターについては、 databricks shares update --help を実行するか、REST API リファレンスの PATCH /api/2.1/unity-catalog/shares/ を参照してください。
共有からのボリュームの削除に関する情報については、共有の更新を参照してください。
Python UDFを共有に追加する
ユーザー定義関数 (UDF) を使用すると、Databricks の組み込み機能を拡張するコードを再利用および共有できます。Python UDF を作成する方法については、 「ユーザー定義スカラー関数 - Python」を参照してください。
Python UDF を共有に追加する前に、要件を満たしていることを確認してください。
追加の制限
- Python UDF をオープン受信者と共有することはできません。
Python UDFを受信者と共有する
このセクションでは、カタログ エクスプローラー、Databricks CLI、または Databricks ノートブックまたは SQL クエリ エディターの SQL コマンドを使用して、Python UDF を共有に追加する方法について説明します。Unity Catalog REST API を使用する場合は、REST API リファレンスのPATCH /api/2.1/unity-catalog/shares/を参照してください。
- Catalog Explorer
- SQL
- CLI
-
Databricks ワークスペースで、[
カタログ] をクリックします。 -
[カタログ ] ウィンドウの上部にある [
] 歯車アイコンをクリックし、[ Delta Sharing ] を選択します。または、右上隅の 「共有」> Delta Sharing をクリックします。
-
「私が共有」 タブで、Python UDF を追加する共有を見つけて、その名前をクリックします。
-
「 アセットの管理」>「アセットの編集 」をクリックします。
-
「 アセットの編集」 ページで、共有する Python UDF を検索または参照して選択します。
あるいは、Python UDF を含むスキーマ全体を選択することもできます。「共有にスキーマを追加する」を参照してください。
-
(オプション)クリック
別名 列の下に、別の Python UDF 名を指定するか、 別名を 指定して Python UDF 名を読みやすくします。エイリアスは、スキーマ全体を選択した場合は使用できません。
エイリアスは受信者に表示される名前であり、クエリで使用する必要があります。エイリアスが指定されている場合、受信者は実際の Python UDF 名を使用できません。
-
[ 保存 ]をクリックします。
ノートブックまたは Databricks SQL クエリ エディターで、 ADD MODELを使用する次のコマンドを実行します。
ALTER SHARE <share-name> ADD MODEL <catalog-name>.<schema-name>.<python-udf-name>
   [AS <alias>];
オプションは次のとおりです。
AS <alias>: Python UDF 名をわかりやすくするための代替 Python UDF 名またはエイリアス。エイリアスは、受信者が確認し、クエリで使用する必要がある Python UDF 名です。エイリアスが指定されている場合、受信者は実際の Python UDF 名を使用できません。<schema-name>.<python-udf-name>形式を使用します。
ALTER SHAREオプションの詳細については、「ALTER SHARE」を参照してください。
Databricks CLI 0.210 以上を使用して、オブジェクト タイプをモデルとして指定する次のコマンドを実行します。
 databricks shares update <share-name> \
   --json '{
     "updates": [
       {
         "action": "ADD",
         "data_object": {
           "name": "<python-udf-full-name>",
           "data_object_type": "MODEL",
           "string_shared_as": "<python-udf-alias>"
         }
       }
     ]
   }'
"string_shared_as": "<python-udf-alias>" オプションであり、Python UDF 名を読みやすくするための代替 Python UDF 名またはエイリアスを提供します。エイリアスは、受信者が確認し、クエリで使用する必要がある Python UDF 名です。エイリアスが指定されている場合、受信者は実際の Python UDF 名を使用できません。<schema-name>.<python-udf-name>形式を使用します。
追加のパラメーターについては、 databricks shares update --help を実行するか、REST API リファレンスの PATCH /api/2.1/unity-catalog/shares/ を参照してください。
共有にモデルを追加する
モデルを共有に追加する前に、要件を満たしていることを確認してください。
モデル コメントとモデル バージョン コメントは、 Databricks-to-Databricks 共有を使用して共有される共有に含まれます。
追加要件
- モデル共有は、 Databricks-to-Databricks 共有でのみサポートされます。
- 共有にモデルを追加するときは、バージョン 2023.50 以降の SQLウェアハウス、または Databricks Runtime 14.0 以降のコンピュート リソースを使用する必要があります。
受信者とモデルを共有する
このセクションでは、カタログ エクスプローラー、Databricks CLI、または Databricks ノートブックまたは SQL クエリ エディターの SQL コマンドを使用して、共有にモデルを追加する方法について説明します。 Unity Catalog REST APIを使用したい場合は、REST APIリファレンスの PATCH /api/2.1/unity-catalog/shares/を参照してください。
共有にモデルを追加するには:
- Catalog Explorer
- SQL
- CLI
-
Databricks ワークスペースで、[
カタログ] をクリックします。 -
[カタログ ] ウィンドウの上部にある [
] 歯車アイコンをクリックし、[ Delta Sharing ] を選択します。または、右上隅の 「共有」> Delta Sharing をクリックします。
-
[ 自分が共有] タブで、モデルを追加する共有を見つけて、その名前をクリックします。
-
「 アセットの管理」>「アセットの編集 」をクリックします。
-
「 アセットの編集 」ページで、共有するモデルを検索または参照し、それを選択します。
または、モデルを含むスキーマ全体を選択することもできます。「共有へのスキーマの追加」を参照してください。
-
(オプション)[エイリアス]
列の下の [] をクリックして代替モデル名を指定するか、[ エイリアス] をクリックしてモデル名を読みやすくします。エイリアスは、スキーマ全体を選択した場合は使用できません。
エイリアスは、受信者に表示され、クエリで使用する必要がある名前です。受信者は、エイリアスが指定されている場合、実際のモデル名を使用できません。
-
[ 保存 ]をクリックします。
ノートブックまたは Databricks SQL クエリ エディターで次のコマンドを実行します。
ALTER SHARE <share-name> ADD MODEL <catalog-name>.<schema-name>.<model-name>
   [COMMENT "<comment>"]
   [AS <alias>];
オプションは次のとおりです。
AS <alias>: モデル名を読みやすくするための代替モデル名またはエイリアス。エイリアスは、受信者に表示され、クエリで使用する必要があるモデル名です。受信者は、エイリアスが指定されている場合、実際のモデル名を使用できません。<schema-name>.<model-name>の形式を使用します。COMMENT "<comment>": コメントは、カタログエクスプローラーの UI と、SQL ステートメントを使用してモデルの詳細をリストおよび表示するときに表示されます。
ALTER SHAREオプションの詳細については、「ALTER SHARE」を参照してください。
Databricks CLI 0.210 以降を使用して、次のコマンドを実行します。
 databricks shares update <share-name> \
   --json '{
     "updates": [
       {
         "action": "ADD",
         "data_object": {
           "name": "<model-full-name>",
           "data_object_type": "MODEL",
           "string_shared_as": "<model-alias>"
         }
       }
     ]
   }'
"string_shared_as": "<model-alias>" はオプションであり、モデル名を読みやすくするための代替モデル名 (エイリアス) を提供します。エイリアスは、受信者に表示され、クエリで使用する必要があるモデル名です。受信者は、エイリアスが指定されている場合、実際のモデル名を使用できません。<schema-name>.<model-name>の形式を使用します。
追加のパラメーターについては、 databricks shares update --help を実行するか、REST API リファレンスの PATCH /api/2.1/unity-catalog/shares/ を参照してください。
共有からモデルを削除する方法については、共有の更新を参照してください。
ノートブック ファイルを共有に追加する
ノートブック ファイルを共有に追加する前に、要件を満たしていることを確認してください。
カタログエクスプローラ を使用して、ノートブック ファイルを共有に追加します。
-
Databricks ワークスペースで、[
カタログ] をクリックします。 -
Delta Sharing >」 ボタンをクリックします。
-
[ 自分が共有] タブで、ノートブックを追加する共有を見つけて、その名前をクリックします。
-
[ アセットの管理 ] をクリックし、[ ノートブック ファイルの追加 ] を選択します。
-
[ ノートブック ファイルの追加 ] ページで、ファイル アイコンをクリックして、共有するノートブックを参照します。
- 共有したいファイルをクリックして、「 選択 」をクリックします。
- (オプション) [共有名 ] フィールド に、ファイルのユーザーフレンドリなエイリアスを指定します。これは受信者に表示される識別子です。
- [ストレージの場所 ] で、ノートブックを保存するクラウド ストレージ内の外部の場所を入力します。 定義された外部位置の下にサブパスを指定できます。 外部ロケーションを指定しない場合、ノートブックはメタストア レベルのストレージの場所 (または「メタストアのルートの場所」) に保存されます。 メタストアのルートの場所が定義されていない場合は、ここに外部の場所を入力する必要があります。 「既存のメタストアに管理対象ストレージを追加する」を参照してください。
-
[ 保存 ]をクリックします。
共有ノートブックファイルが 「アセット 」タブの ノートブックファイル リストに表示されます。
共有からノートブック ファイルを削除する
共有からノートブック ファイルを削除するには:
-
Databricks ワークスペースで、[
カタログ] をクリックします。 -
[カタログ ] ウィンドウの上部にある [
] 歯車アイコンをクリックし、[ Delta Sharing ] を選択します。または、右上隅の 「共有」> Delta Sharing をクリックします。
-
[ 自分が共有] タブで、ノートブックを含む共有を見つけ、共有名をクリックします。
-
[アセット] タブで、共有から削除するノートブック ファイルを見つけます。
-
行の右側にある
 ケバブメニューをクリックし、[ ノートブックファイルの削除 ]を選択します。
 -
確認ダイアログで、[ 削除 ] をクリックします。
共有内のノートブック ファイルを更新する
既に共有しているノートブックを更新するには、再度追加して、[ 共有者 ] フィールドに新しいエイリアスを割り当てる必要があります。Databricks では、ノートブックの改訂された状態を示す名前 ( <old-name>-update-1など) を使用することをお勧めします。変更の受取人への通知が必要な場合があります。受信者は、更新を利用するために新しいノートブックを選択して複製する必要があります。
外部のIcebergクライアントへの共有を有効にする
Deltaテーブル、外部Icebergテーブル、ビュー、マテリアライズドビュー、およびストリーミング テーブルを、 Apache Iceberg REST Catalog API使用する外部Icebergクライアントと共有できます。
共有する前に、データ資産を共有に追加するために必要なDelta Sharing の要件を満たしていることを確認してください。
この機能は、管理された Iceberg テーブルの共有とは異なります。
追加の制限
- 削除ベクトルが有効になっているテーブルはサポートされていません。
- マネージドIcebergテーブルはサポートされていません。
- デフォルトのストレージを使用するアセットは、外部の Iceberg クライアントと共有できません。Databricks のデフォルト ストレージを参照してください。
外部のIcebergクライアントと共有
データ資産を外部の Iceberg クライアントと共有するには:
-
Delta テーブルを共有する場合は、各 Delta テーブルを
IcebergCompatV3で構成して、Iceberg 互換テーブルとして公開します。これにより、標準の Delta 操作と並行して Iceberg メタデータを非同期に生成できるようになります。Delta テーブルを Iceberg クライアントと共有するための要件を満たしていることを確認し、制限事項を遵守してください。Iceberg 読み取りを有効にする方法については、 「Iceberg 読み取りを有効にする (UniForm)」を参照してください。Snowflake に共有する場合、受信者にはユニフォーム対応テーブルのみが表示されます。その他のテーブルはフィルタリングされます。
DESCRIBE HISTORYを使用して、Iceberg クライアントからテーブルをクエリする前に Iceberg メタデータの生成が完了していることを確認します。- OIDC 認証タイプはサポートされていません。
-
データ資産を共有に追加します。詳細な手順については、以下を参照してください。
ビュー、マテリアライズドビュー、またはストリーミング テーブルを共有すると、プロバイダ側のデータ マテリアライゼーションがトリガーされ、コンピュート コストの蓄積につながる可能性があります。 詳細については、 Delta Sharingコストの発生と確認方法」を参照してください。
- オープンな受信者と共有します。受信者を作成し、共有へのアクセス権を付与する方法については、 「ベアラー トークンを使用して Databricks 以外のユーザーの受信者オブジェクトを作成する (オープン共有)」を参照してください。