カスタム モデルサービング エンドポイントの作成
この記事では、 モデルサービングを使用してDatabricksカスタムモデル を提供するモデルサービングエンドポイントを作成する方法について説明します 。
モデルサービングには、サービングエンドポイントの作成に関する次のオプションがあります。
- サービングUI
- REST API
- MLflow Deployments SDK
生成AI モデルを提供するエンドポイントの作成については、「 エンドポイントを提供する基盤モデルの作成」を参照してください。
必要条件
- ワークスペースは、サポートされているリージョンにある必要があります。
- カスタムライブラリまたはプライベートミラーサーバーのライブラリをモデルで使用する場合は、モデルエンドポイントを作成する前に、 モデルサービングでカスタム Python ライブラリを使用する を参照してください。
- MLflow Deployments SDK を使用してエンドポイントを作成するには、MLflow Deployment クライアントをインストールする必要があります。 インストールするには、次のコマンドを実行します。
import mlflow.deployments

client = mlflow.deployments.get_deploy_client("databricks")
IDとアクセス
モデルサービングエンドポイントを作成または更新するには、呼び出し元とエンドポイントの記録された作成者の両方が以下を満たす必要があります。
- ワークスペースのメンバーである必要があります。
workspace-accessのエンタイトルメントを持っている必要があります。
作成者のID
エンドポイントを作成すると、Databricksは呼び出し元のIDをエンドポイントの**作成者**として記録します。このID(通常はサービスプリンシパル)は、エンドポイントに代わってUnity Catalogリソースにアクセスするために使用され、作成後に変更することはできません。
記録された作成者が必要なUnity Catalogの付与を欠いている、またはワークスペースから削除された場合、エンドポイントを削除し、必要な権限を持ち、現在のワークスペースメンバーであるサービスプリンシパルの下で再作成する必要があります。
構成および提供エンティティの更新により、記録された作成者のワークスペースメンバーシップと付与が再評価されます。記録された作成者がワークスペースのメンバーではない場合、呼び出し元が有効な権限を持っていても、更新はPERMISSION_DENIEDで失敗します。
サービングエンティティの権限
記録された作成者は、各サービングエンティティに対して以下の権限を保持している必要があります。エンドポイントの作成または更新時に検証される権限が不足している場合、リクエストは PERMISSION_DENIED で失敗します。クエリ時に必要な権限は事前に検証されません。権限が不足している場合、エンドポイントがトラフィックを処理するときにランタイムエラーが発生します。
リソースタイプ | 必要な権限 | 検証された場合 |
|---|---|---|
Unity Catalogモデル |
| エンドポイントの作成または更新 |
Unity Catalogモデルが推移的な関数依存関係を宣言する場合、記録された作成者はそれらの上流関数に対してEXECUTEも必要です。
エンドポイントアクセスの管理
モデルサービングエンドポイントのアクセスコントロールオプションを理解するには、モデルサービングエンドポイントの権限を管理するを参照してください。
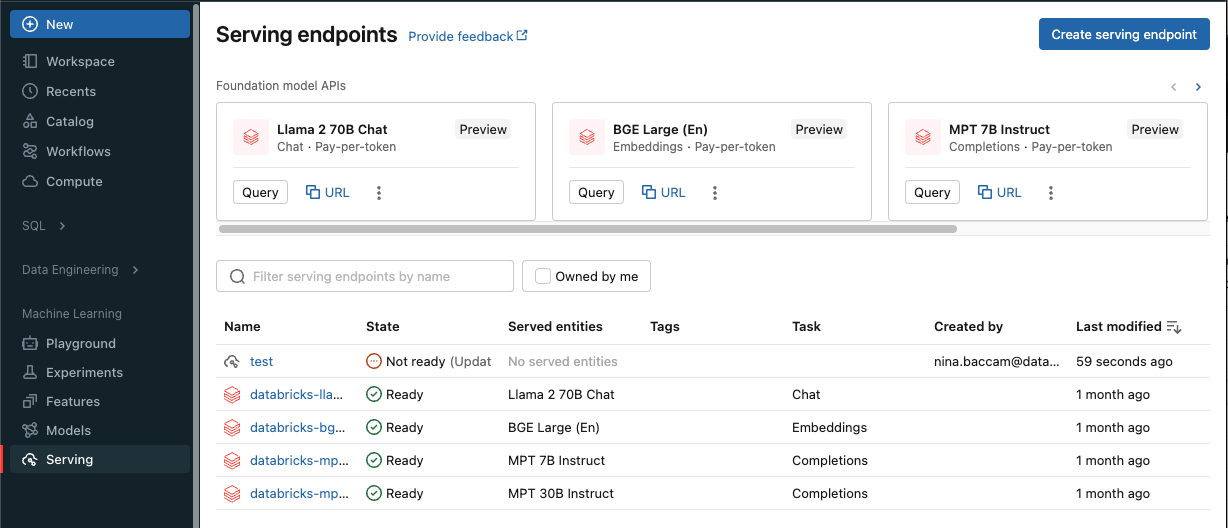
エンドポイントを作成する
- Serving UI
- REST API
- MLflow Deployments SDK
- Workspace Client
サービング UI を使用して、モデル・サービングのエンドポイントを作成できます。
-
サイドバーの 「Serving 」をクリックして、Serving UIを表示します。
-
サービングエンドポイントの作成 をクリックします。
Unity Catalog に登録されているモデルの場合:
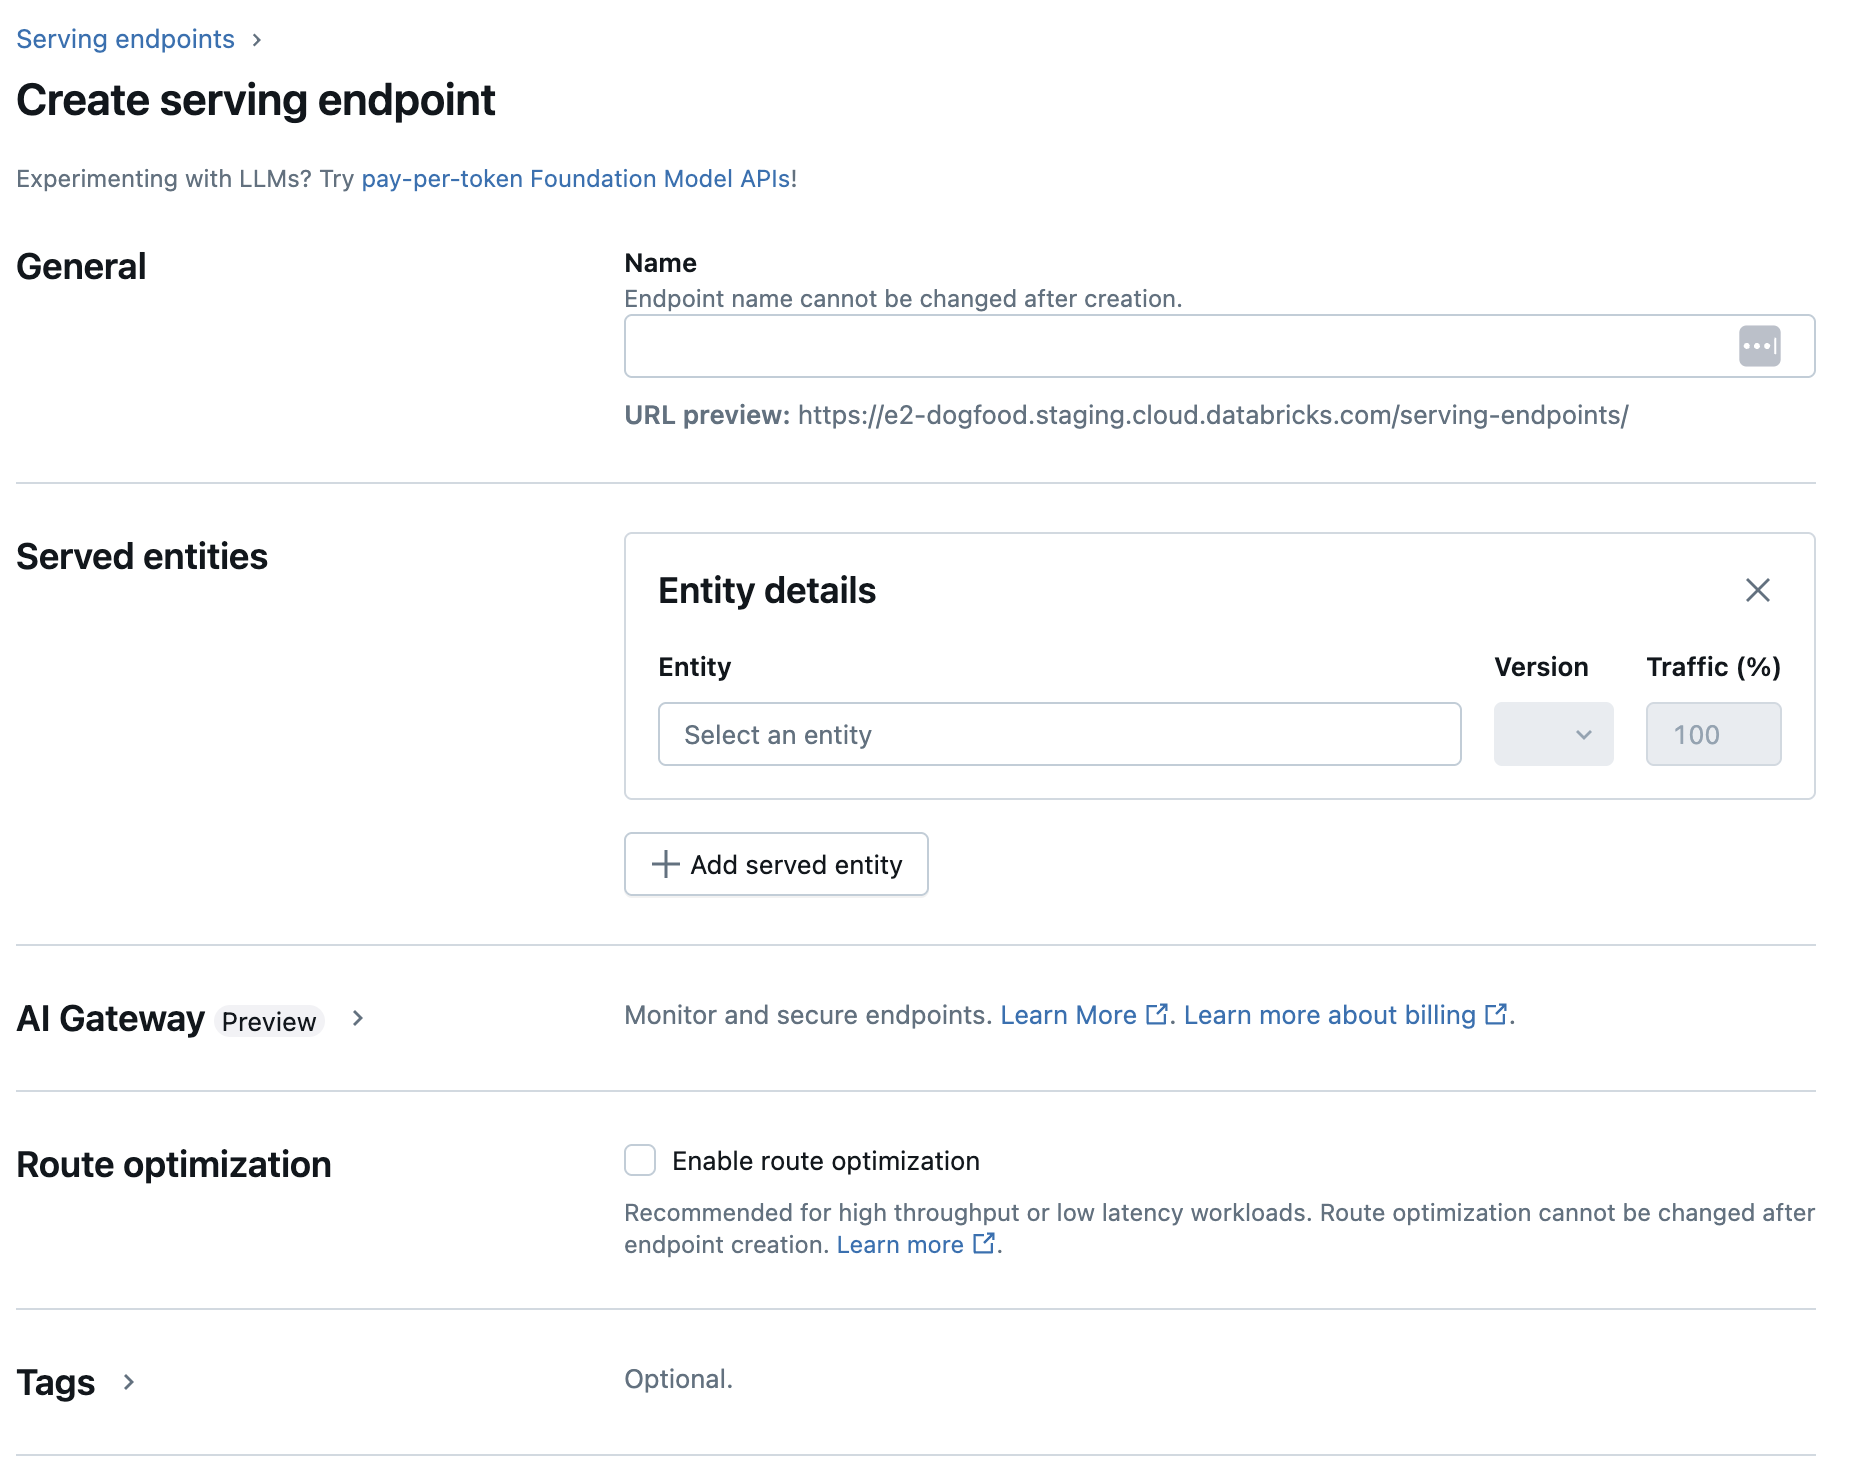
-
[ 名前 ] フィールドに、エンドポイントの名前を入力します。
- エンドポイント名には
databricks-プレフィックスを使用できません。このプレフィックスは、Databricks の事前構成されたエンドポイント用に予約されています。
- エンドポイント名には
-
[Served entities ] セクションで、[ Entity ] フィールドをクリックして [Select served entity ] フォームを開きます。
-
[マイモデル - Unity Catalog を選択します。
- すべてのモデルがカスタムモデルというわけではありません。モデルはプラットフォームモデルにすることもできます。 フォームは選択内容に応じて動的に更新されます。
-
提供するモデルとモデルバージョンを選択します。
-
配信モデルにルーティングするトラフィックの割合を選択します。
-
使用するCPUまたはGPUコンピュートのサイズを選択してください。利用可能なワークロードタイプ、および標準の
CPUタイプよりも多くのメモリを必要とするモデル向けのCPU_MEDIUMおよびCPU_LARGEオプションについては、コンピュートタイプを参照してください。GPUでは、GPU_MEDIUMコンピュートのみがサポートされています。 -
[コンピュート スケールアウト] で、このサービス対象モデルが同時に処理できるリクエストの数に対応するコンピュート スケール アウトのサイズを選択します。 この数値は、QPS x モデル実行時間とほぼ等しくなります。顧客定義のコンピュート設定については、 「モデルサービングの制限」を参照してください。 使用可能なサイズは、0 ~ 4 リクエストの場合は 小 、8 ~ 16 リクエストの 場合は中 、16 ~ 64 リクエストの場合は 大です 。
-
エンドポイントが使用されていないときにゼロにスケーリングするかどうかを指定します。ゼロにスケールすると容量が保証されないため、本番運用エンドポイントではゼロにスケールすることは推奨されません。 エンドポイントがゼロにスケールされると、エンドポイントがリクエストに対応するためにスケールアップし直すときに、コールド スタートとも呼ばれる追加のレイテンシが発生します。
-
(オプション) エンドポイントにさらにサービス提供エンティティを追加するには、 [サービス提供エンティティの追加] をクリックし、上記の構成手順を繰り返します。 単一のエンドポイントから複数のモデルまたはモデル バージョンを提供し、それらの間のトラフィックの分割を制御できます。詳細については、 「複数のモデルの提供」を参照してください。
-
-
ルート最適化 セクションでは、エンドポイントのルート最適化を有効にできます。ルート最適化は、QPS とスループットの要件が高いエンドポイントに推奨されます。サービスエンドポイントでのルート最適化を参照してください。
-
AI Gateway セクションで、エンドポイントで有効にするガバナンス機能を選択できます。Unity AI GatewayによるAIガバナンスを参照してください。
-
作成 をクリックします。[ エンドポイントの提供中 ] ページが表示され、 提供エンドポイントの状態 が [準備ができていません] と表示されます。
REST API を使用してエンドポイントを作成できます。POST /api/2.0/serving-endpoints を参照してください。エンドポイント構成パラメーターの場合。
次の例では、 Unity Catalogモデル レジストリに登録されているmy-ads-modelモデルの 3 番目のバージョンを提供するエンドポイントを作成します。 Unity Catalogからモデルを指定するには、親カタログとスキーマを含む完全なモデル名(例: catalog.schema.example-modelを指定します。 この例では、 min_provisioned_concurrencyとmax_provisioned_concurrencyを使用したカスタム定義の同時実行性を使用します。同時実行値は 4 の倍数である必要があります。
POST /api/2.0/serving-endpoints

{
  "name": "uc-model-endpoint",
  "config":
  {
    "served_entities": [
      {
        "name": "ads-entity",
        "entity_name": "catalog.schema.my-ads-model",
        "entity_version": "3",
        "min_provisioned_concurrency": 4,
        "max_provisioned_concurrency": 12,
        "scale_to_zero_enabled": false
      }
    ]
  }
}
応答の例を次に示します。エンドポイントの config_update 状態は NOT_UPDATING で、提供済みモデルは READY 状態です。
{
  "name": "uc-model-endpoint",
  "creator": "user@email.com",
  "creation_timestamp": 1700089637000,
  "last_updated_timestamp": 1700089760000,
  "state": {
    "ready": "READY",
    "config_update": "NOT_UPDATING"
  },
  "config": {
    "served_entities": [
      {
        "name": "ads-entity",
        "entity_name": "catalog.schema.my-ads-model",
        "entity_version": "3",
        "min_provisioned_concurrency": 4,
        "max_provisioned_concurrency": 12,
        "scale_to_zero_enabled": false,
        "workload_type": "CPU",
        "state": {
          "deployment": "DEPLOYMENT_READY",
          "deployment_state_message": ""
        },
        "creator": "user@email.com",
        "creation_timestamp": 1700089760000
      }
    ],
    "config_version": 1
  },
  "tags": [
    {
      "key": "team",
      "value": "data science"
    }
  ],
  "id": "e3bd3e471d6045d6b75f384279e4b6ab",
  "permission_level": "CAN_MANAGE",
  "route_optimized": false
}
MLflow デプロイ には、作成、更新、削除タスク用の API が用意されています。これらのタスクの API は、エンドポイントを提供するための REST API と同じパラメーターを受け入れます。 POST /api/2.0/serving-endpoints を参照してください。エンドポイント構成パラメーターの場合。
次の例では、 Unity Catalogモデル レジストリに登録されているmy-ads-modelモデルの 3 番目のバージョンを提供するエンドポイントを作成します。 親カタログとスキーマを含む完全なモデル名 (例: catalog.schema.example-model ) を指定する必要があります。この例では、 min_provisioned_concurrencyとmax_provisioned_concurrencyを使用したカスタム定義の同時実行性を使用します。同時実行値は 4 の倍数である必要があります。
import mlflow
from mlflow.deployments import get_deploy_client

mlflow.set_registry_uri("databricks-uc")
client = get_deploy_client("databricks")

endpoint = client.create_endpoint(
    name="unity-catalog-model-endpoint",
    config={
        "served_entities": [
            {
                "name": "ads-entity",
                "entity_name": "catalog.schema.my-ads-model",
                "entity_version": "3",
                "min_provisioned_concurrency": 4,
                "max_provisioned_concurrency": 12,
                "scale_to_zero_enabled": False
            }
        ]
    }
)
次の例は、 Databricks Workspace Client SDK使用してエンドポイントを作成する方法を示しています。
from databricks.sdk import WorkspaceClient
from databricks.sdk.service.serving import EndpointCoreConfigInput, ServedEntityInput

w = WorkspaceClient()

w.serving_endpoints.create(
    name="uc-model-endpoint",
    config=EndpointCoreConfigInput(
        served_entities=[
            ServedEntityInput(
                name="ads-entity",
                entity_name="catalog.schema.my-ads-model",
                entity_version="3",
                workload_size="Small",
                scale_to_zero_enabled=False
            )
        ]
    )
)
また、モデルサービングの認証情報を保存するために環境変数を追加することもできます。 モデルサービングエンドポイントからリソースへのアクセスを設定するを参照してください。
GPU ワークロードの種類
GPU デプロイメントは、次のパッケージバージョンと互換性があります。
- PyTorch 1.13.0 - 2.0.1
- TensorFlow 2.5.0 - 2.13.0
- MLflow 2.4.0 以降
次の例は、さまざまな方法を使用して GPU エンドポイントを作成する方法を示しています。
- Serving UI
- REST API
- MLflow Deployments SDK
- Workspace Client
Serving UI を使用して GPU ワークロード用にエンドポイントを構成するには、エンドポイントの作成時に [コンピュート タイプ] ドロップ ダウンから目的の GPU タイプを選択します。 「エンドポイントの作成」と同じ手順に従いますが、CPU ではなく GPU ワークロード タイプを選択します。
GPU を使用してモデルをデプロイするには、エンドポイント構成にworkload_typeフィールドを含めます。
POST /api/2.0/serving-endpoints

{
  "name": "gpu-model-endpoint",
  "config": {
    "served_entities": [{
      "entity_name": "catalog.schema.my-gpu-model",
      "entity_version": "1",
      "workload_type": "GPU_SMALL",
      "workload_size": "Small",
      "scale_to_zero_enabled": false
    }]
  }
}
次の例は、MLflow デプロイメント SDK を使用して GPU エンドポイントを作成する方法を示しています。
import mlflow
from mlflow.deployments import get_deploy_client

mlflow.set_registry_uri("databricks-uc")
client = get_deploy_client("databricks")

endpoint = client.create_endpoint(
    name="gpu-model-endpoint",
    config={
        "served_entities": [{
            "entity_name": "catalog.schema.my-gpu-model",
            "entity_version": "1",
            "workload_type": "GPU_SMALL",
            "workload_size": "Small",
            "scale_to_zero_enabled": False
        }]
    }
)
次の例は、 Databricks Workspace Client SDK使用して GPU エンドポイントを作成する方法を示しています。
from databricks.sdk import WorkspaceClient
from databricks.sdk.service.serving import EndpointCoreConfigInput, ServedEntityInput

w = WorkspaceClient()

w.serving_endpoints.create(
    name="gpu-model-endpoint",
    config=EndpointCoreConfigInput(
        served_entities=[
            ServedEntityInput(
                entity_name="catalog.schema.my-gpu-model",
                entity_version="1",
                workload_type="GPU_SMALL",
                workload_size="Small",
                scale_to_zero_enabled=False
            )
        ]
    )
)
利用可能なGPUワークロードのタイプは、以下の表にまとめられているように、クラウドプロバイダーによって異なります。
GPU ワークロードの種類 | GPU インスタンス | GPUメモリ |
|---|---|---|
| L4 | 24ギガバイト |
GPU エンドポイントの場合、同時実行数によって、モデルをサーブするために割り当てられるレプリカの数が決まります。レプリカの数は、同時実行値を4で割った値と等しくなります。たとえば、min_provisioned_concurrencyを12に設定すると、3つのレプリカがプロビジョニングされます。
カスタムモデルのエンドポイントを変更する
カスタムモデルエンドポイントを有効にした後、必要に応じてコンピュート設定を更新できます。 この構成は、モデルに追加のリソースが必要な場合に特に役立ちます。 ワークロードのサイズとコンピュートの設定は、モデルを提供するためにどのリソースが割り当てられるかにおいて重要な役割を果たします。
構成とサービングエンティティの更新は、エンドポイントの記録された作成者のワークスペースメンバーシップとサービングエンティティごとの権限を再検証します。更新を送信する前に両方が有効であることを確認してください。IDとアクセスを参照してください。
更新の失敗を回避するには:
- チームが所有する長期的に使用されるサービスプリンシパルをエンドポイントの作成者として使用してください。
- 後で無効化またはワークスペースから削除される可能性のある個人ユーザーアカウントは使用しないでください。
- 記録された作成者は、エンドポイントのライフサイクルを通じてワークスペースのメンバーである必要があります。
エンドポイント構成の更新が失敗する可能性があります。障害が発生した場合、更新が行われなかったかのように既存のアクティブな構成が有効なままになります。
エンドポイントのステータスを確認して、更新が正常に適用されたことを確認します。
新しい設定の準備が整うまで、古い設定は予測トラフィックを提供し続けます。 更新が進行中の間は、別の更新を行うことはできません。 ただし、進行中の更新は Serving UI からキャンセルできます。
- Serving UI
- REST API
- MLflow Deployments SDK
モデル エンドポイントを有効にした後、[ エンドポイントの編集 ] を選択して、エンドポイントのコンピュート構成を変更します。
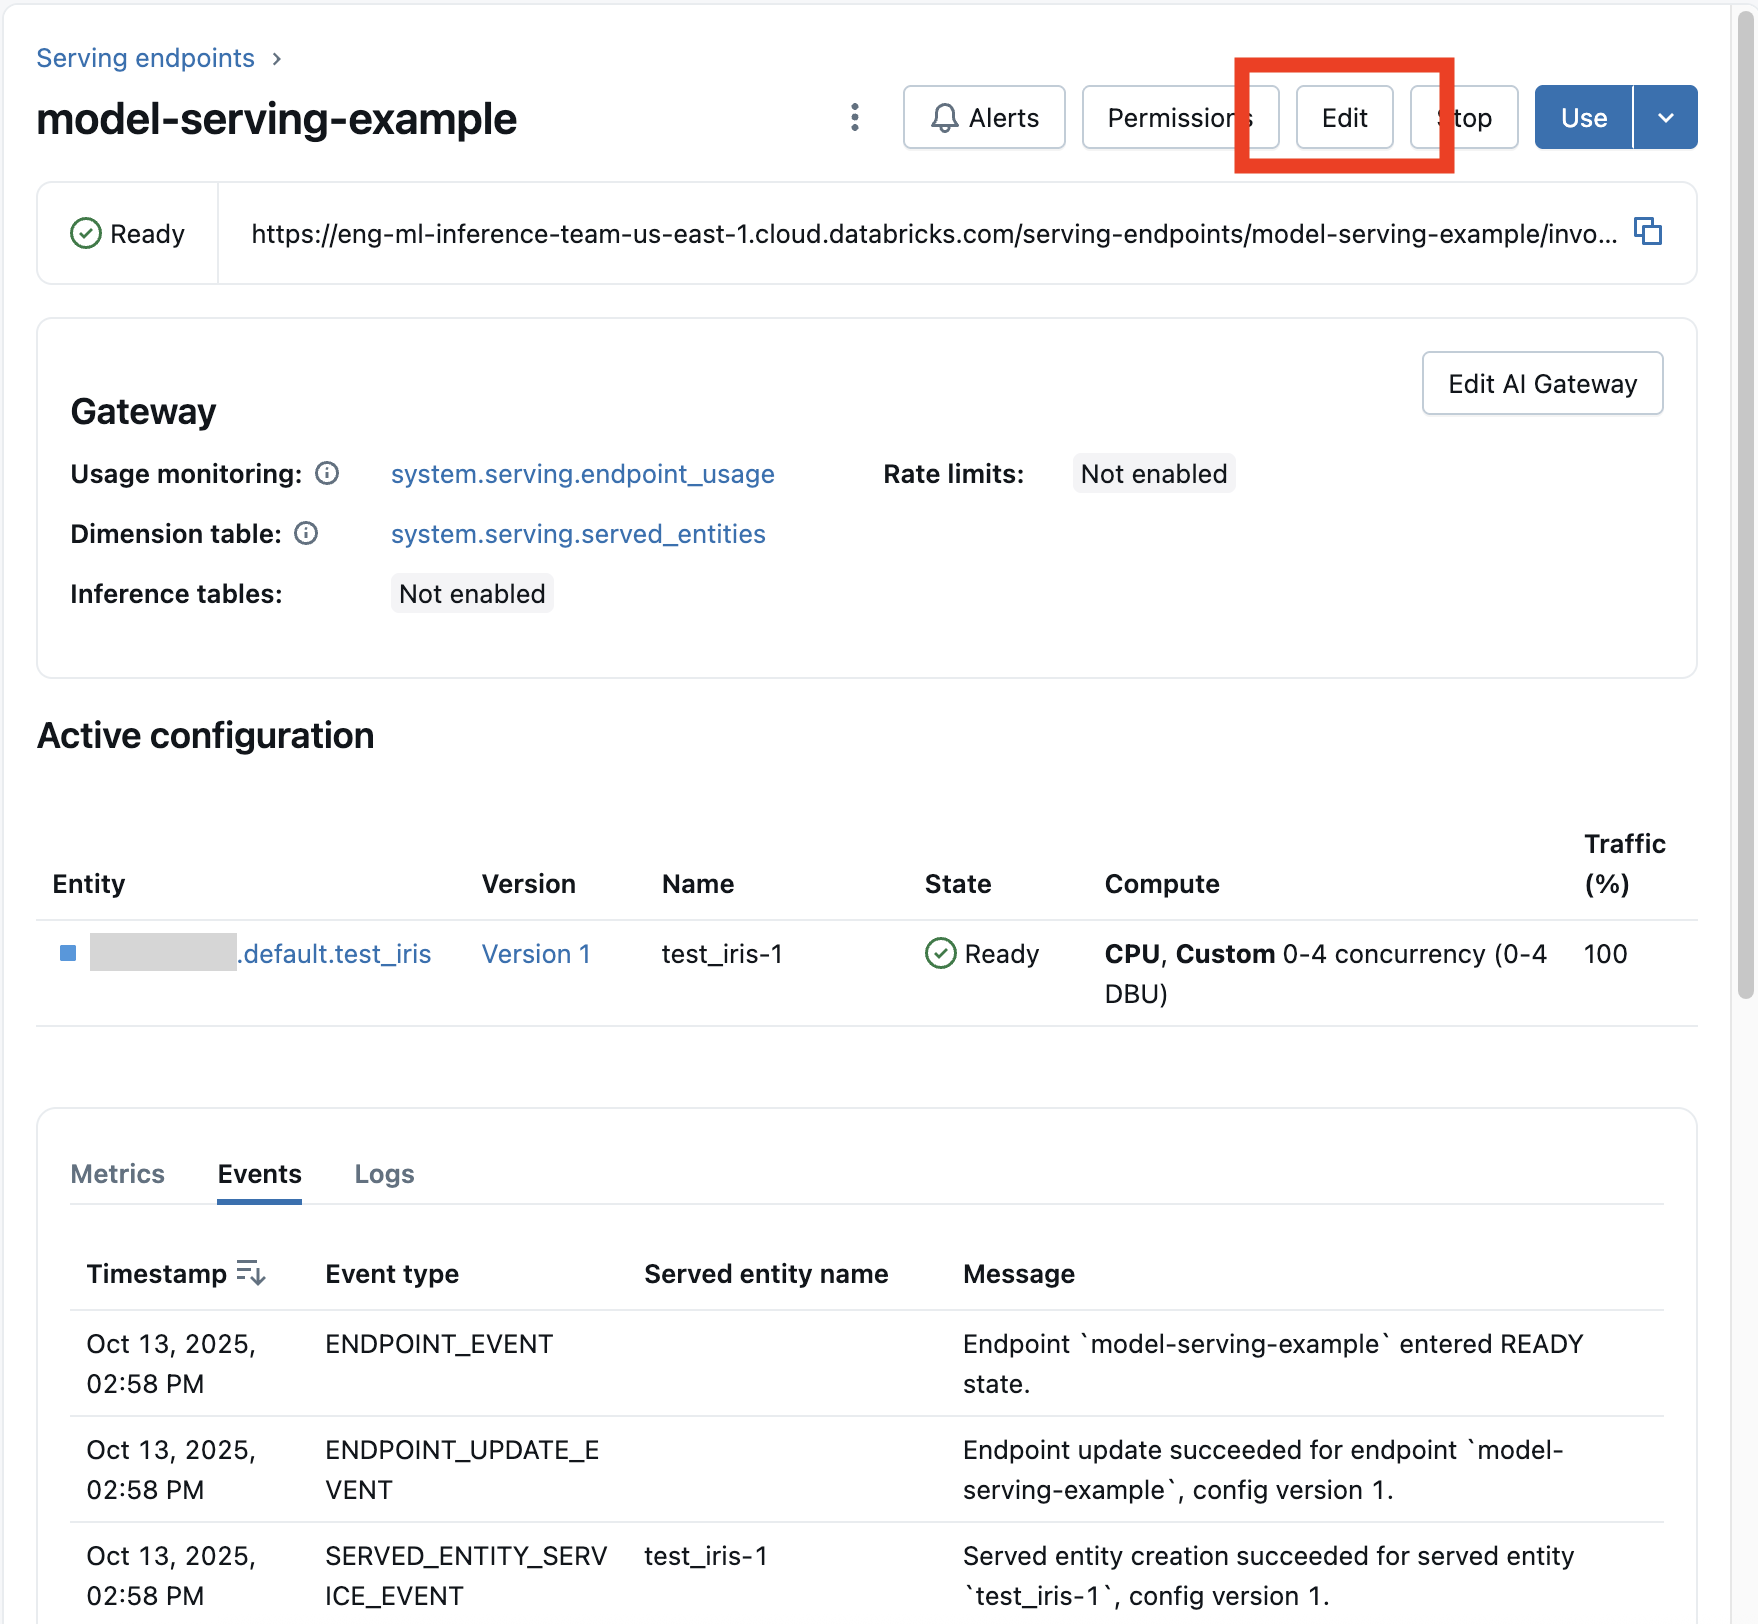
エンドポイント名と特定の不変のプロパティを除き、エンドポイント構成のほとんどの側面を変更できます。
エンドポイントの詳細ページで [更新のキャンセル] を選択すると、進行中の構成更新をキャンセルできます。
次に、REST API を使用したエンドポイント設定の更新例を示します。PUT /api/2.0/serving-endpoints/{name}/config を参照してください。
PUT /api/2.0/serving-endpoints/{name}/config

{
  "name": "unity-catalog-model-endpoint",
  "config":
  {
    "served_entities": [
      {
        "entity_name": "catalog.schema.my-ads-model",
        "entity_version": "5",
        "workload_size": "Small",
        "scale_to_zero_enabled": true
      }
    ],
    "traffic_config":
    {
      "routes": [
        {
          "served_model_name": "my-ads-model-5",
          "traffic_percentage": 100
        }
      ]
    }
  }
}
MLflow Deployments SDK では、REST API と同じパラメーターが使用されます (「PUT /api/2.0/serving-endpoints/{name}/config」を参照)。要求と応答のスキーマの詳細については、を参照してください。
次のコード サンプルでは、 Unity Catalog モデルレジストリのモデルを使用しています。
import mlflow
from mlflow.deployments import get_deploy_client

mlflow.set_registry_uri("databricks-uc")
client = get_deploy_client("databricks")

endpoint = client.update_endpoint_config(
  endpoint=f"{endpointname}",
  config={
    "served_entities": [
        {
            "entity_name": f"{catalog}.{schema}.{model_name}",
            "entity_version": "1",
            "workload_size": "Small",
            "scale_to_zero_enabled": True
        }
    ],
    "traffic_config": {
        "routes": [
            {
                "served_model_name": f"{model_name}-1",
                "traffic_percentage": 100
            }
        ]
    }
  }
)
モデルエンドポイントのスコアリング
モデルをスコアリングするには、モデルサービング エンドポイントに要求を送信します。
- 「カスタムモデルのクエリ サービング エンドポイント」を参照してください。
- 基盤モデルの使用を参照してください。
追加のリソース
- モデルサービングエンドポイントを管理します。
- モデルサービングにおける外部モデル。
- Python を使用する場合は、 Databricks のリアルタイム サービング Python SDK を使用できます。
ノートブックの例
次のノートブックには、モデルサービングエンドポイントを使用して起動して実行するために使用できる、さまざまな登録済みモデル Databricks が含まれています。 その他の例については、「 チュートリアル: カスタム モデルのデプロイとクエリ」を参照してください。
モデルの例は、「 ノートブックのインポート」の指示に従ってワークスペースにインポートできます。 いずれかの例からモデルを選択して作成したら、 Unity Catalogで登録するモデルサービングの UI ワークフロー手順に従います。