MLflow 3 deployment jobs
This feature is in Public Preview.
Deployment jobs do not need to be used with MLflow 3 clients or model tracking, and can be enabled on older, existing models in Unity Catalog. However, it is recommended to use MLflow 3.
This article describes how to use MLflow deployment jobs as part of your machine learning workflow to manage the full lifecycle of ML models.
What are deployment jobs?
Deployment jobs allow you to automate tasks like evaluation, approval, and deployment whenever a new model version is created, integrating seamlessly with Unity Catalog models and Lakeflow Jobs. These jobs simplify the setup of model deployment pipelines, incorporate human-in-the-loop approvals, and provide governed workflows with clear visibility into progress and historical context for each model version.
With deployment jobs, the process is fully automated; they trigger automatically whenever a new model version is created, displaying the deployment job run status directly on the model and model version pages. Historical information about each deployment job run is conveniently tracked in the activity log, ensuring transparency and ease of management.
Integration with MLflow 3 Model Tracking
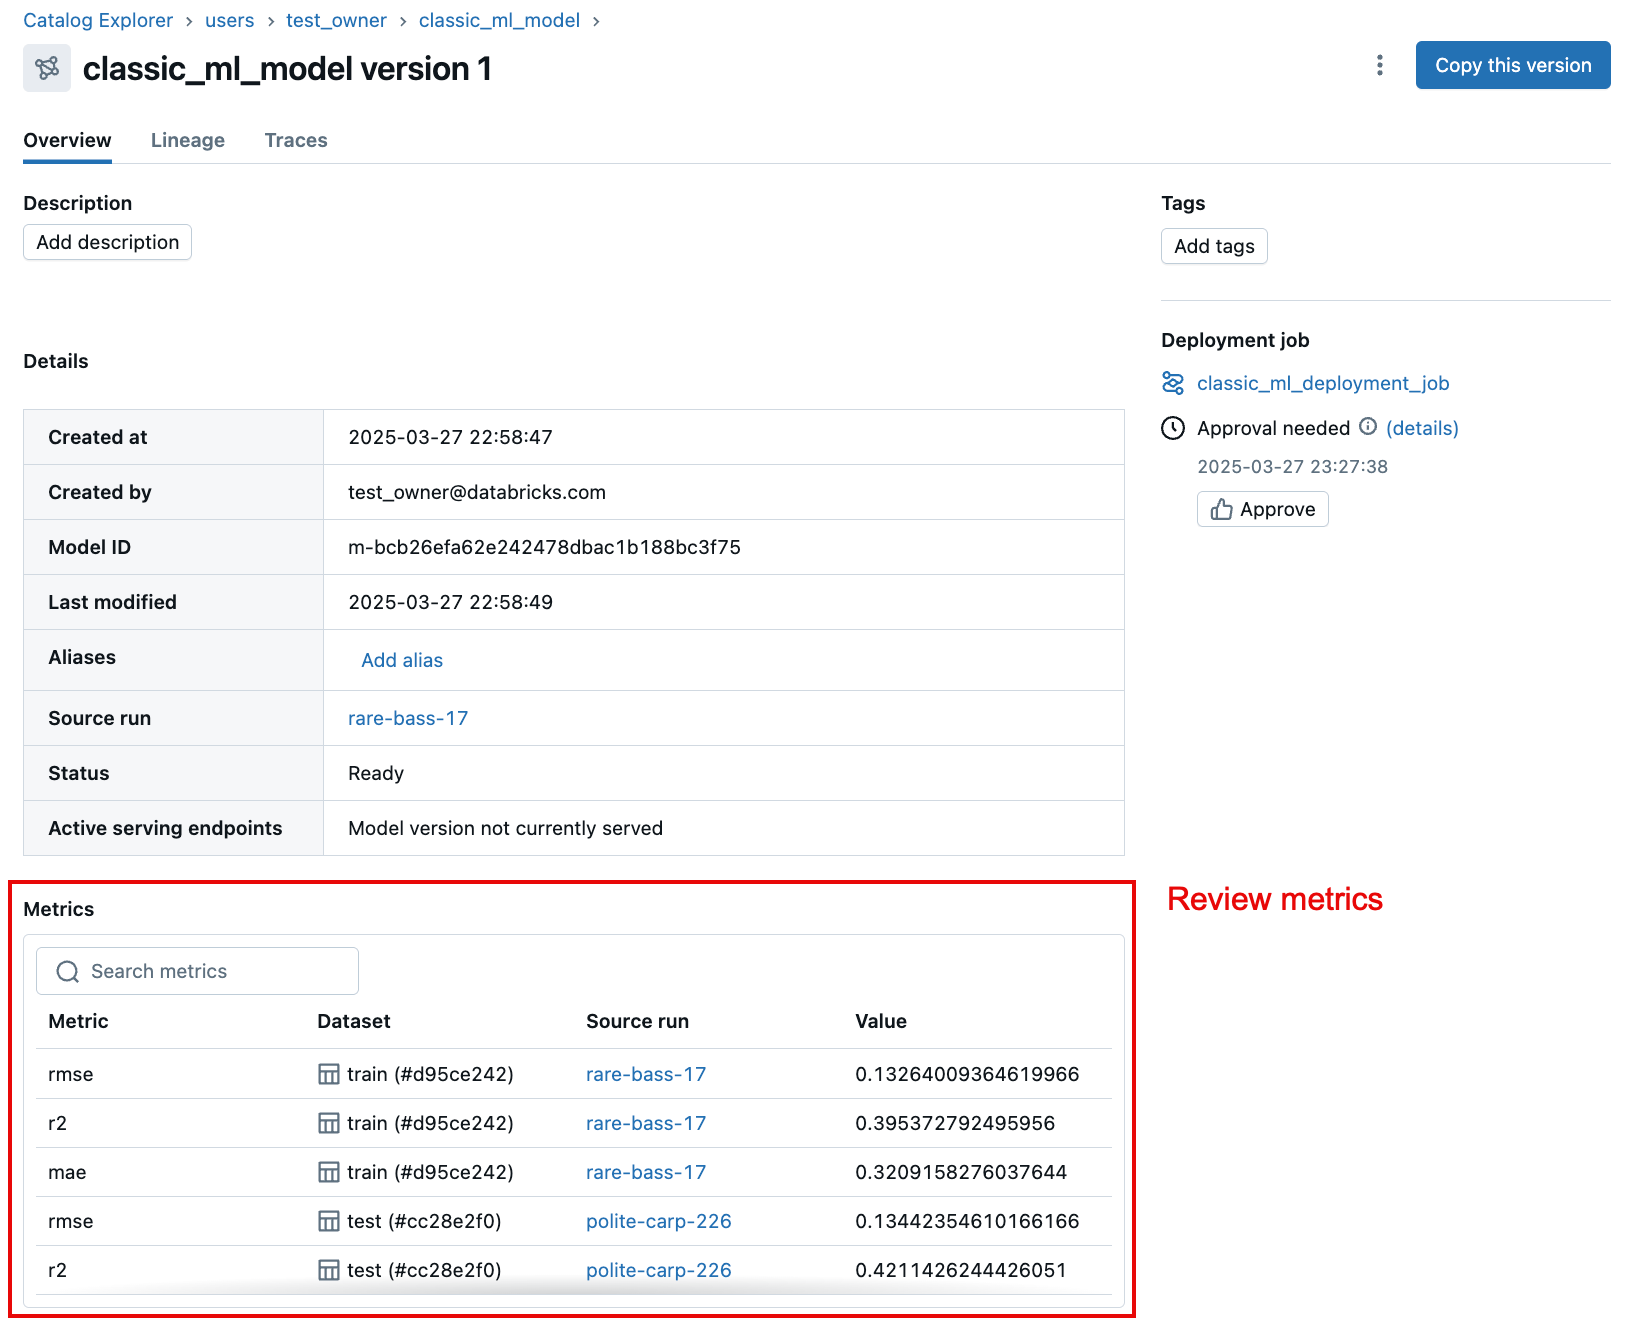
Databricks recommends using MLflow 3 Tracking to register models and perform evaluation in the deployment job. The new client will automatically log metrics from the evaluation portion of the deployment job, which will be visible in the Unity Catalog model version UI. This will allow users to use the centralized metrics, parameters, and traces on the model version page to make informed decisions about when to progress the model further in the deployment job lifecycle.
Integration with Unity Catalog CREATE MODEL VERSION ACL
Deployment jobs integrate naturally with the newly released Unity Catalog Create Model Version ACL to complete your MLOps story. Specifically, a user can be granted the CREATE MODEL VERSION ACL to register new model versions to the model. Once the user deems a model good enough for production, they will register this version to the Unity Catalog model, which will kick off the deployment job to automatically evaluate the model. At this point, an approver can manually approve this version to be deployed or reject it.
The deployment job will auto-trigger using the model owner's credentials. This means that giving a user CREATE MODEL VERSION permission on the Unity Catalog model allows the user to execute arbitrary code as part of the job. For this reason, Databricks recommends that you set up the deployment job using a service principal with minimal permissions to prevent privilege escalation.
Deployment jobs examples
Below are some examples of deployment jobs that reflect common use cases. Note that these are only examples, and can be customized as necessary.
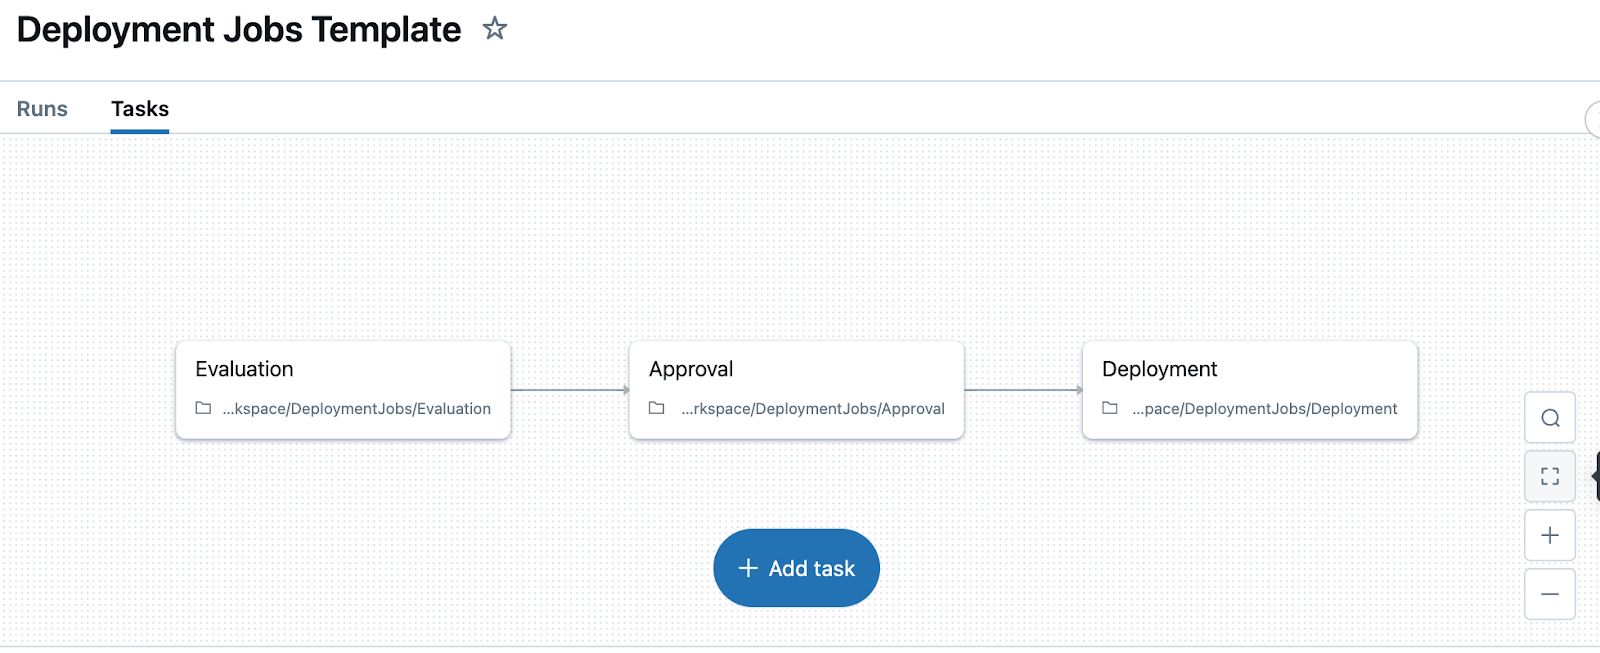
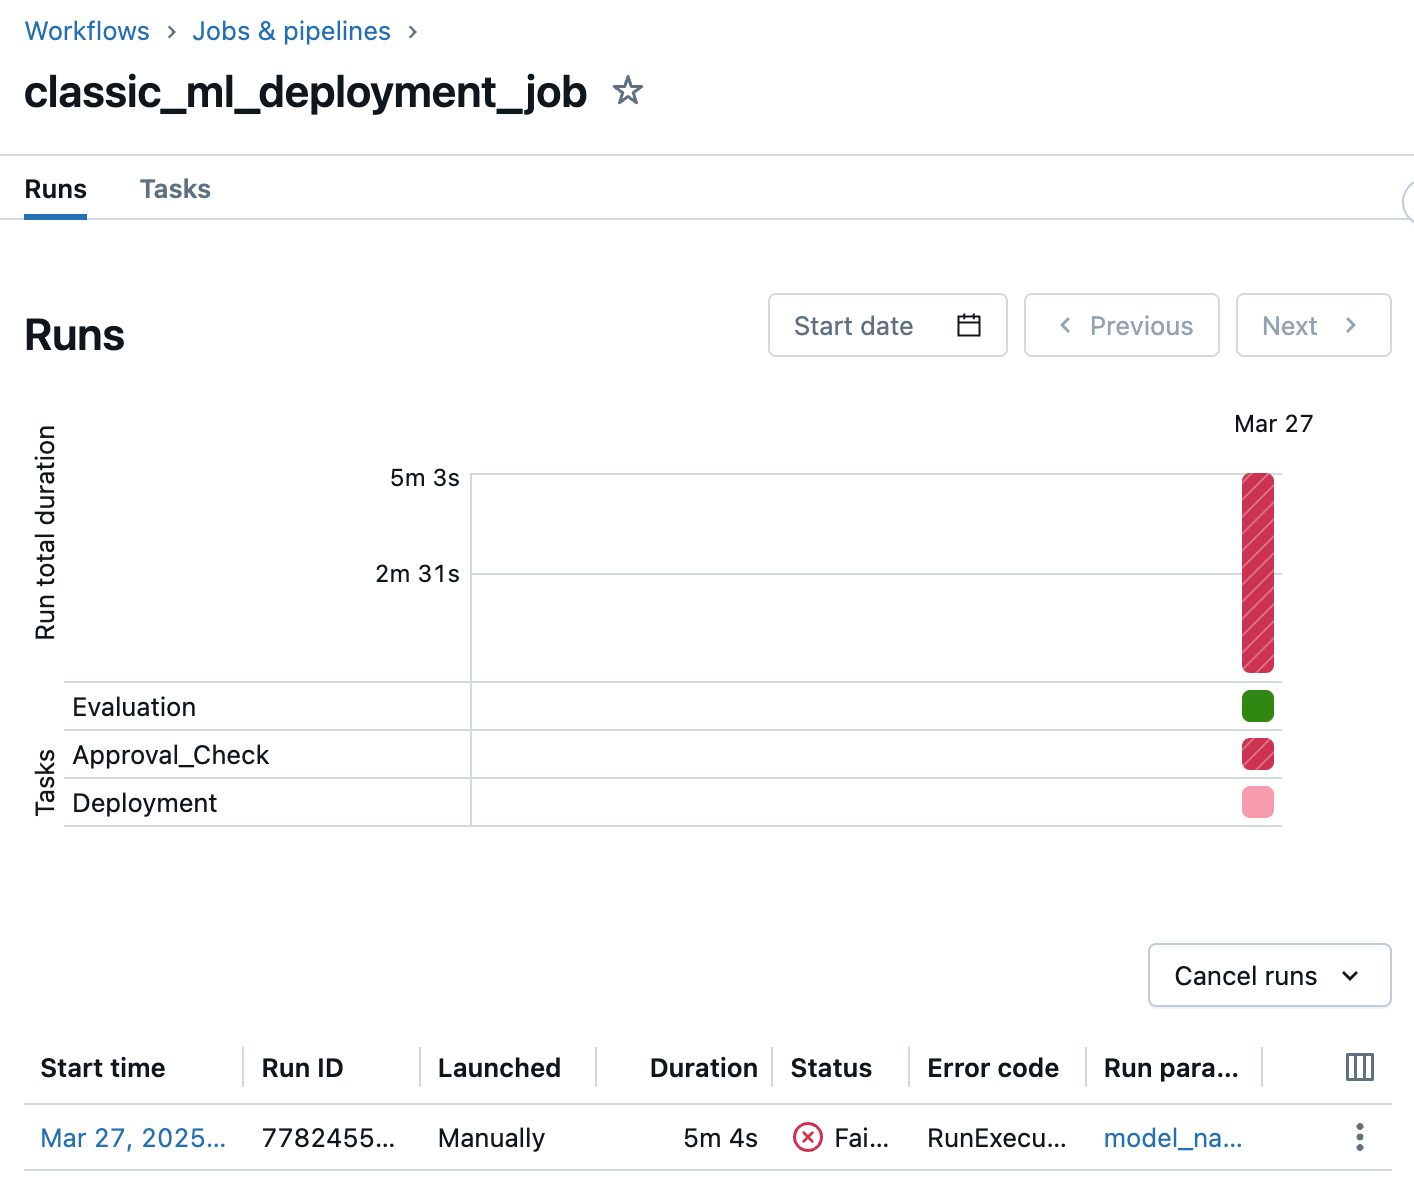
A simple example deployment job consists of 3 steps: evaluation, approval, and deployment. Evaluation calls mlflow.evaluate to produce validation metrics on the inputted model version. Approval allows a privileged user to determine if these metrics are satisfactory and if so, approve the model. Finally, Deployment deploys the model version to a Databricks Model Serving endpoint.
The image below shows the Lakeflow Jobs tasks that make up this simple deployment job consisting of evaluation, approval, and deployment tasks:
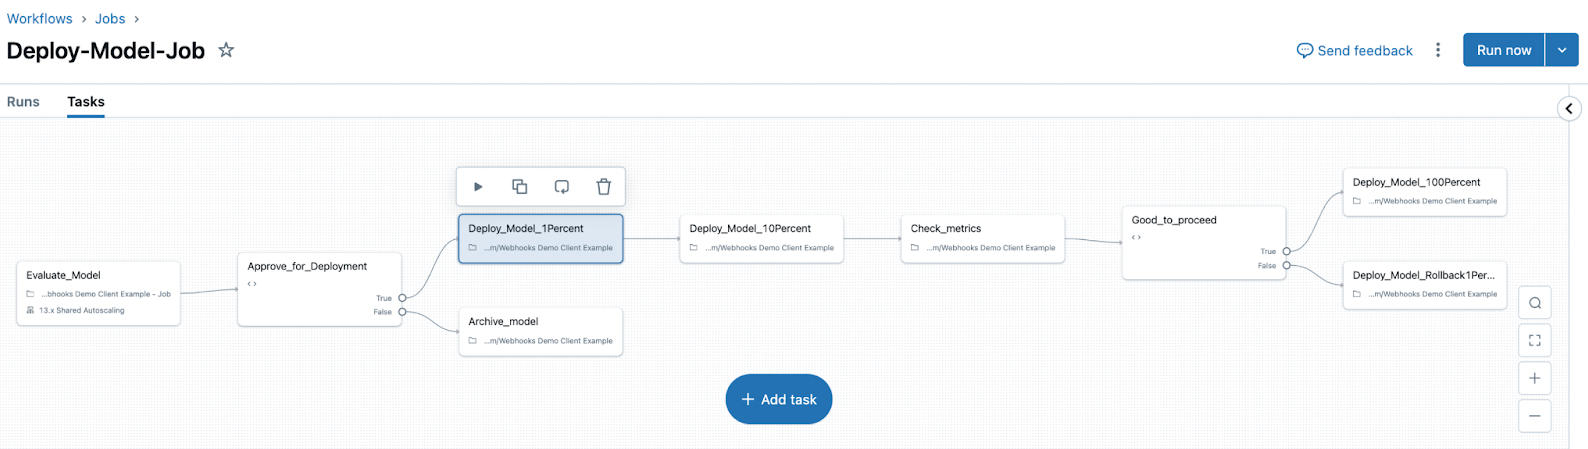
You can also create a more complex deployment job. For example, you might want to do a staged rollout with a metrics collection step as part of the workflow. To create this deployment job, you could add additional tasks after the approval task to deploy the model to 1%, deploy the model to 10%, collect and check metrics, decide whether to proceed or rollback, and finally either deploy model to 100% or rollback the model. The image below shows what this more complex deployment job might look like:
Create a deployment job
Deployment jobs allow you to manage a model version's lifecycle. To use deployment jobs, you first need model versions created in a registered model. See the MLflow 3 example notebooks for recommended approaches for training and registering models.
Databricks recommends that you set the Run As field to a service principal with minimal permissions. In addition, for the approval task, Databricks recommends that you disable retries as the task is expected to fail at first. This prevents a longer wait and multiple error logs reported.
A deployment job must have two job parameters: model_name and model_version. Databricks also recommends setting the max concurrent run limit to 1 (the default) to prevent deployment race conditions.
There are two ways to create a deployment job: programmatically using a deployment notebook, or using the UI. In both cases, you need to provide each of your job tasks as a notebook.
Create a deployment job programmatically using a notebook (recommended)
Using a deployment notebook to programmatically create the deployment job is recommended since it uses the Databricks SDK, and as such all configurations are easily set up with the source of truth being in the code. This method also allows you to easily deploy multiple jobs and other resources across multiple workspaces.
For the instructions below, a simple example template is used to set up the deployment job with basic evaluation, approval, and deployment tasks.
- Create and register a Unity Catalog Model. For example, see the MLflow 3 traditional ML workflow example.
- Create a notebook that defines the evaluation task. For example, import the evaluation notebook for classic ML to evaluate the model created from the Traditional ML example. The evaluation notebook for GenAI provides an example of evaluating a GenAI external model. Update the REQUIRED items as necessary. For other models, use this notebook as a template and customize it to evaluate your model as needed for your unique case.
- Create a notebook that defines the approval task. For example, import the approval notebook to your workspace. More details on how this notebook works can be found in the Approvals section. You can also use this notebook as a template and update it to fit your needs.
- Create a notebook that defines the deployment task. For example, import the deployment notebook below to your workspace. You can also use this notebook as a template and update it to fit your needs.
- Create a notebook that creates and orchestrates the deployment job. For example, import the deployment job notebook to your workspace. This notebook creates the Databricks Job that becomes the deployment job. Make sure to update the REQUIRED items in the notebook to correctly define your job, using your Unity Catalog model and the appropriate tasks. You can also use this notebook as a template and update it to fit your needs. For example, you may want to include more tasks if you have a more complex rollout plan.
- Run the deployment job notebook to create your deployment job.
Create a deployment job using the Jobs UI
Jobs can also be created using the UI, instead of using the SDK in the template above. For each notebook task though, notebooks must still be created manually and saved somewhere in your workspace. For the instructions model, a simple deployment workflow, with evaluation, approval, and deployment tasks, is assumed. Customize the instructions by adding more tasks if you have a more complex deployment workflow.
-
Create and register a Unity Catalog Model. For example, see the MLflow 3 traditional ML workflow example.
-
Create a notebook that defines the evaluation task. For example, import the evaluation notebook for classic ML to evaluate the model created from the Traditional ML example. The evaluation notebook for GenAI provides an example of evaluating a GenAI external model. Update the REQUIRED items as necessary. For other models, use this notebook as a template and customize it to evaluate your model as needed for your unique case.
-
Create a notebook that defines the approval task. For example, import the approval notebook to your workspace. More details on how this notebook works can be found in the Approvals section. You can also use this notebook as a template and update it to fit your needs.
-
Create a notebook that defines the deployment task. For example, import the deployment notebook below to your workspace. You can also use this notebook as a template and update it to fit your needs.
-
Create the deployment job in the Lakeflow Jobs UI:
-
From the left navigation pane, click + New > Job to create a new job.
-
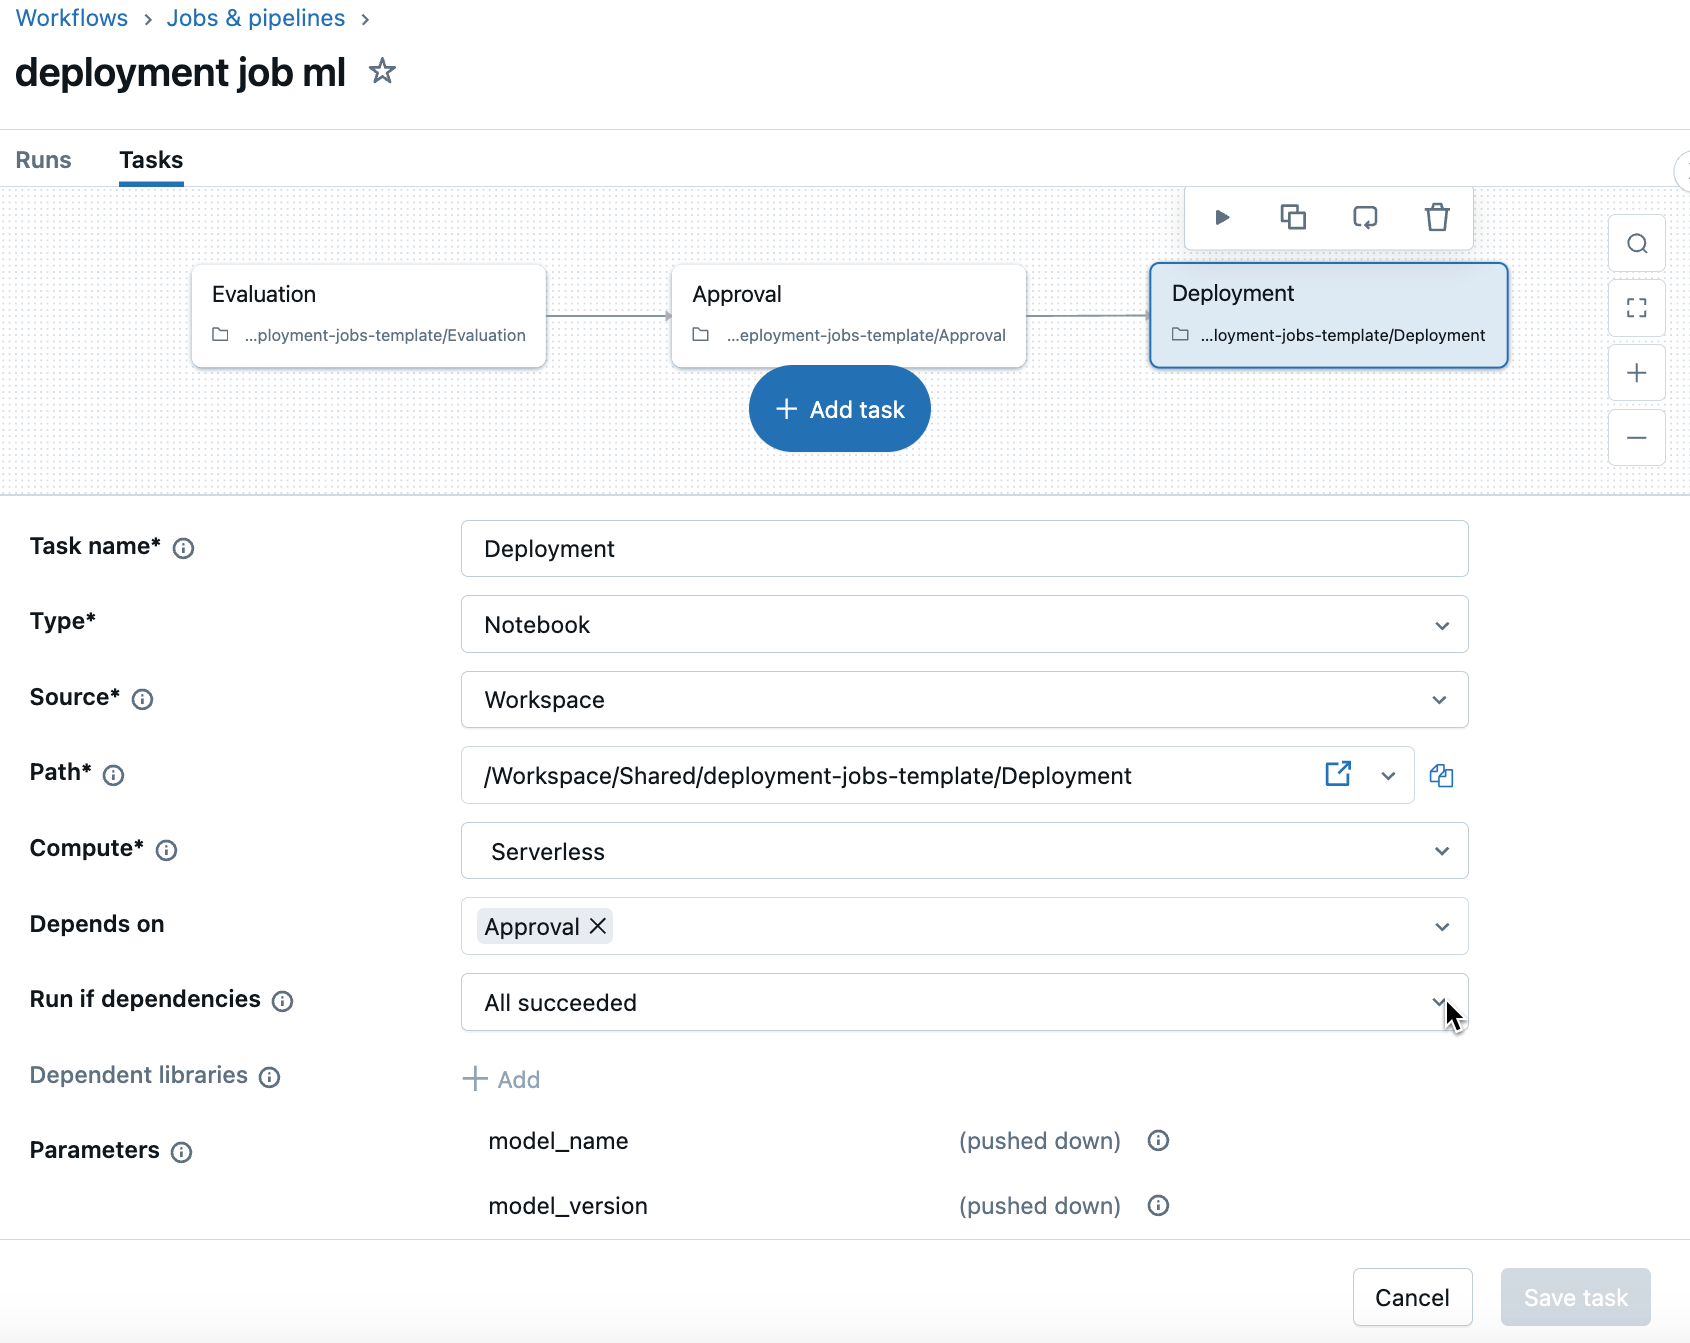
Configure each task. For example, for the deployment task:
- Task name: Deployment
- Type: Notebook
- Source: Workspace
- Path:
/Workspace/Users/<user.name@email.com>/deployment - Compute: Serverless
For more information on configuration, see Notebook tasks for jobs.
-
-
After you've finished creating each task, add your job parameters. On the right panel, click Edit parameters. Add
model_nameandmodel_version.- Note: A common mistake is to add these parameters as task-level parameters. Be sure to add them as job-level parameters using the right panel.
Below is an example of creating the above template job using the UI:
Connect the deployment job to a model
After creating the Unity Catalog model and deployment job, you need to connect the job to the model as a deployment job. You can use the UI or do it programmatically in the deployment notebook.
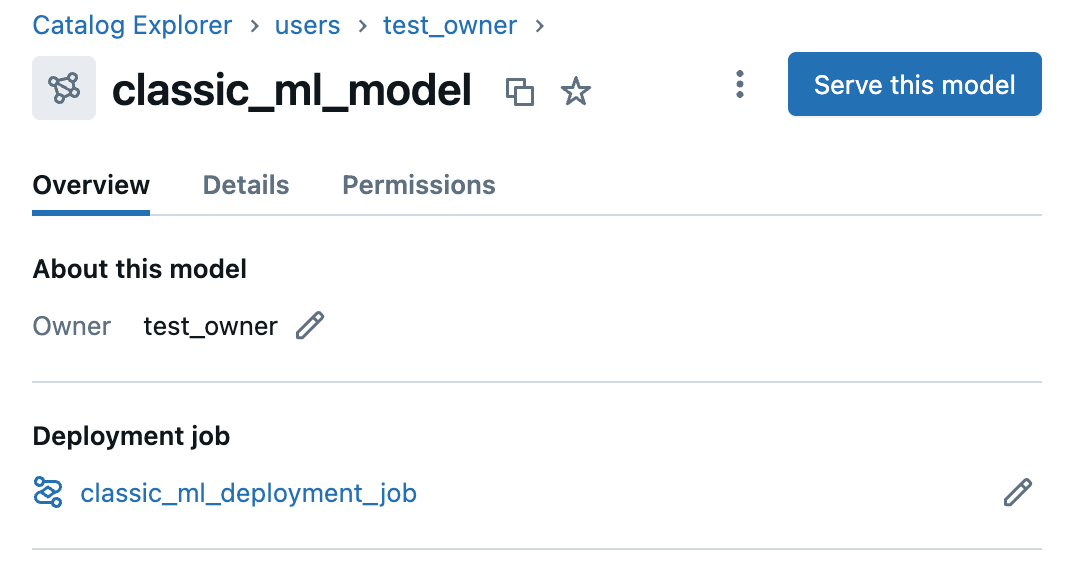
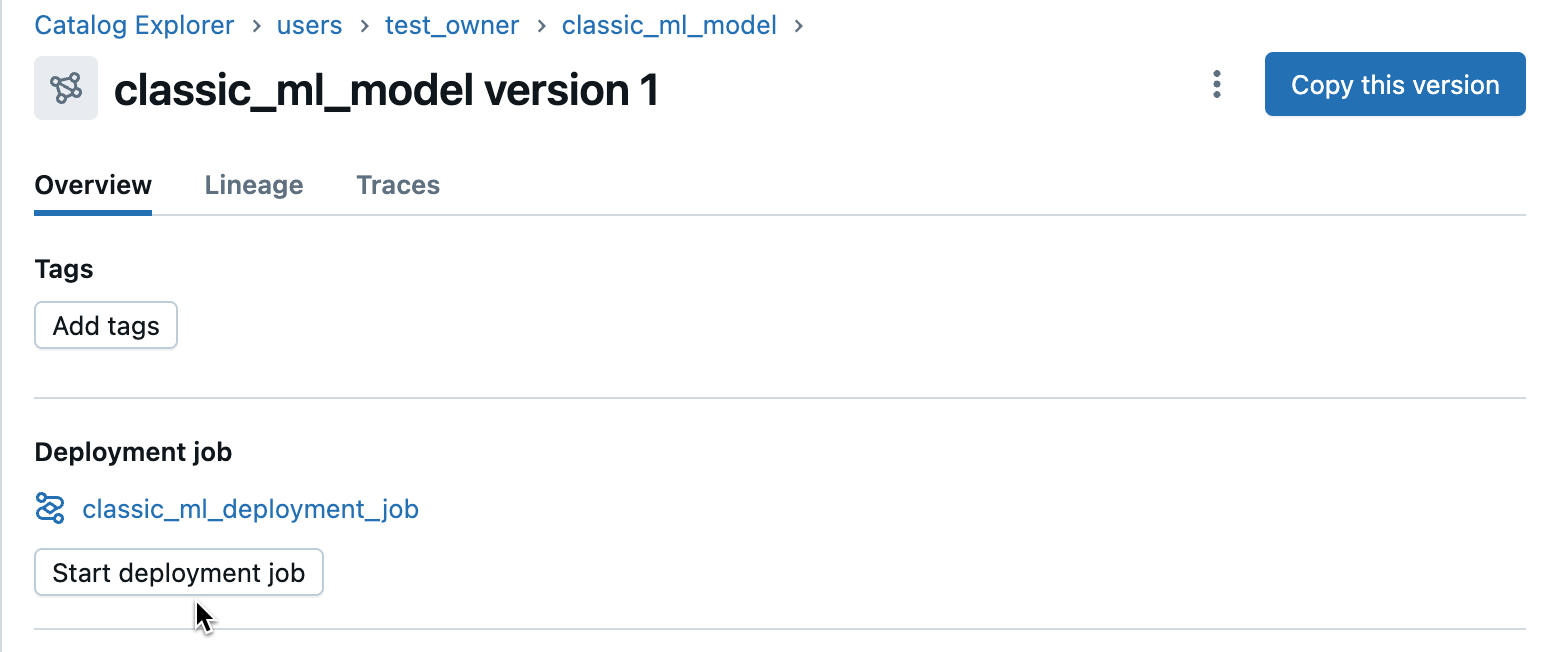
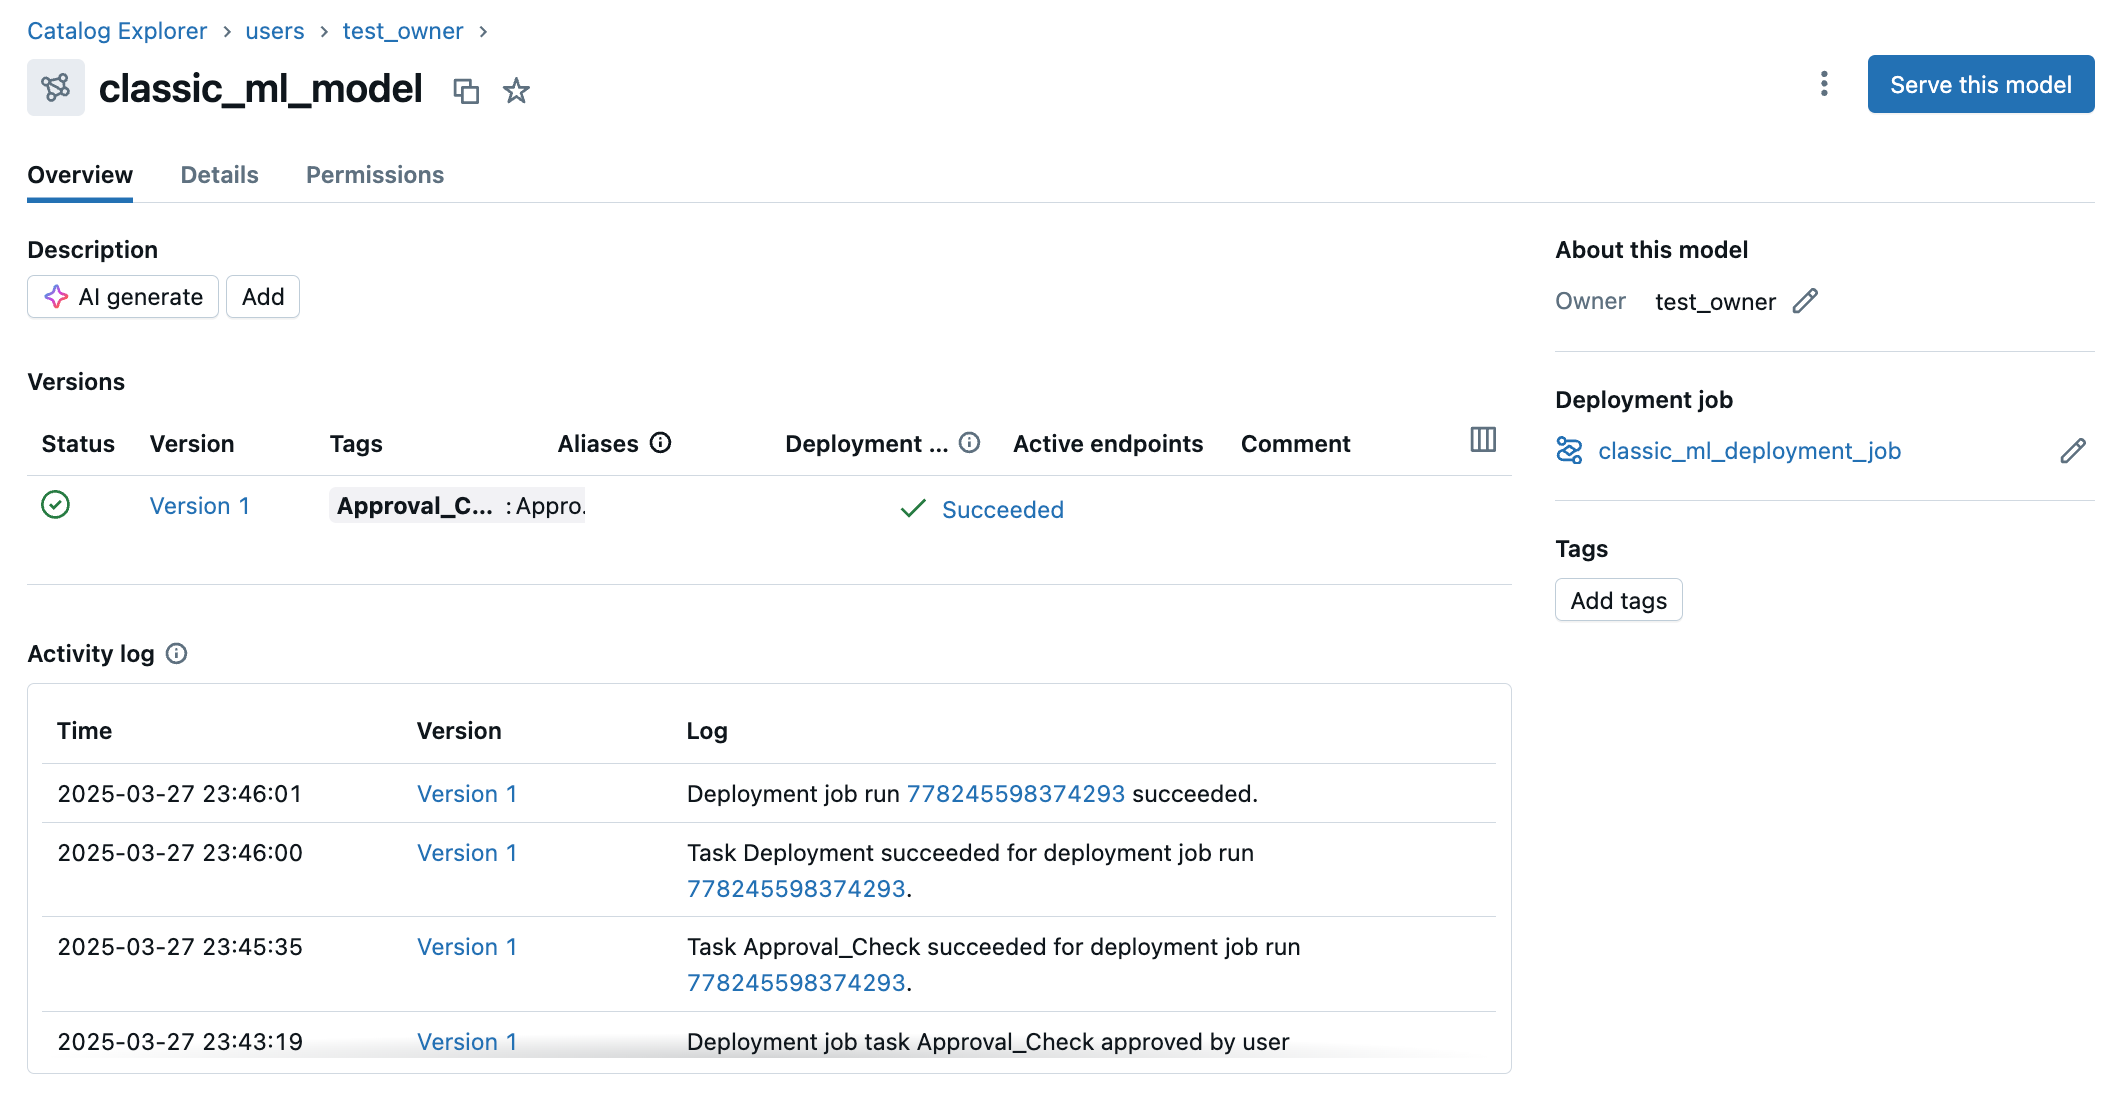
After a deployment job has been connected to a model, it is linked on the model page.
Connect the deployment job to a model using the UI
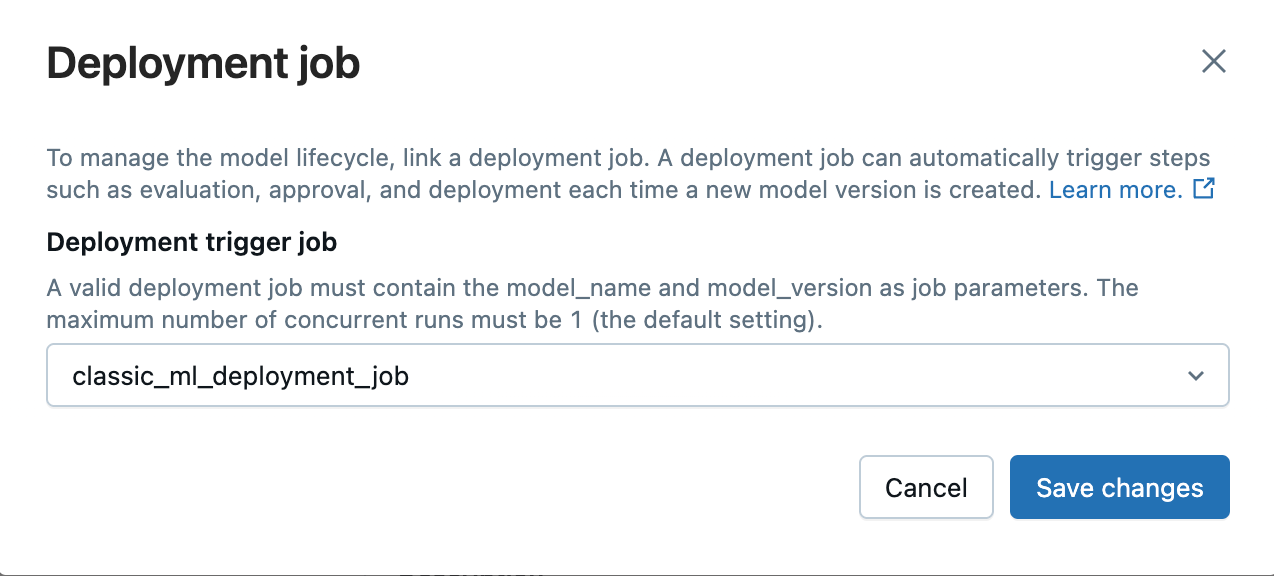
On the model's page, in the Overview tab, under Deployment job, click Connect deployment job.
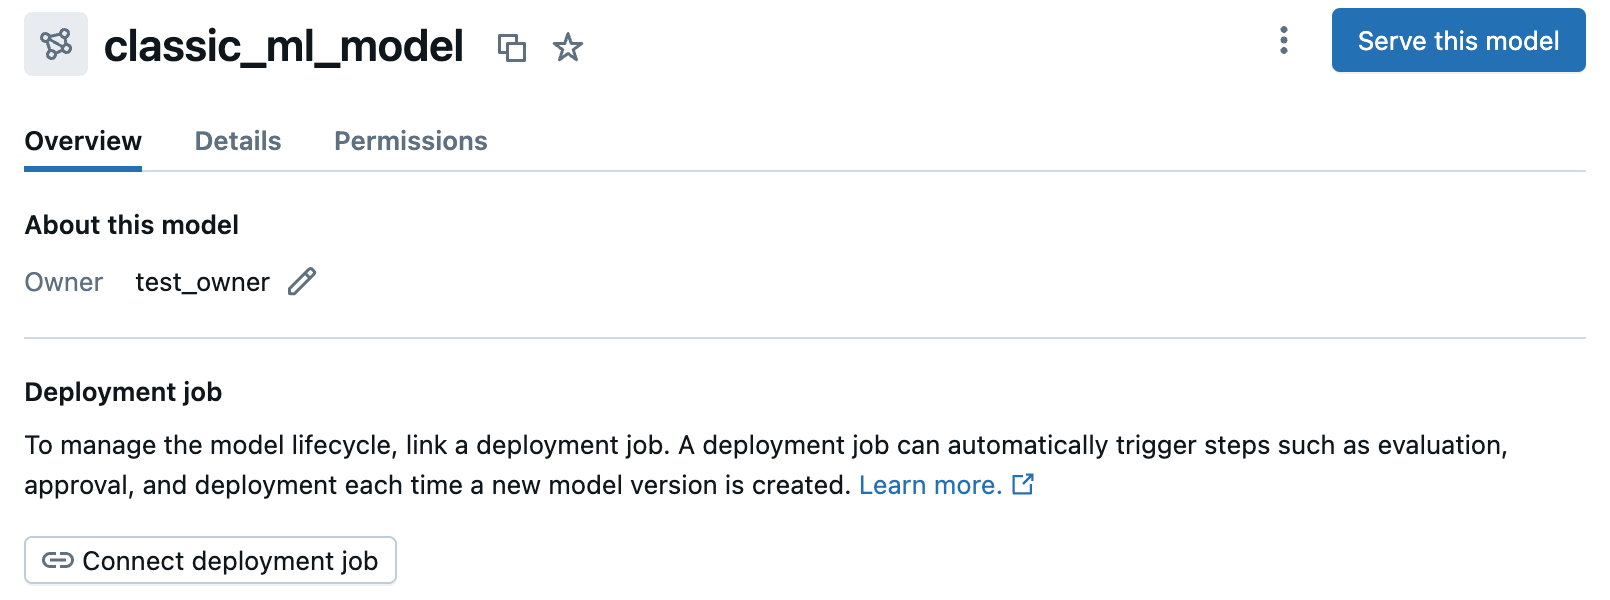
Select your deployment job from the dropdown list. You can also use the search bar to search for jobs by their name or ID. Click Save changes.
Connect the deployment job to a model using the MLflow Client
The main way to connect the deployment job programmatically is using the MLflow client. You can do this either when you create a registered model by calling client.create_registered_model(model_name, deployment_job_id=<your-created-job-id>), or when you update a registered model by calling client.update_registered_model(model_name, deployment_job_id=<your-created-job-id>).
The main way to disconnect the deployment job programatically is also using the MLflow client. You can do this by specifying an empty string "" and calling update with it (for example, client.update_registered_model(model_name, deployment_job_id="")).
Use code similar to the following in your deployment notebook:
import mlflow
from mlflow.tracking.client import MlflowClient

client = MlflowClient(registry_uri="databricks-uc")
# model_name specifies the location of a model in Unity Catalog
# model_name should be in the format <catalog>.<schema>.<model>
try:
  if client.get_registered_model(model_name):
    client.update_registered_model(model_name, deployment_job_id=created_job.job_id)
except mlflow.exceptions.RestException:
  client.create_registered_model(model_name, deployment_job_id=created_job.job_id)
Required permissions
The following permissions are required to connect and trigger deployment jobs:
- MANAGE or OWNER on the model to connect the deployment job
- The model owner will need to have CAN MANAGE RUN or higher permissions on the deployment job to connect it.
- NOTE: This deployment job field can also be updated on the model by someone with MANAGE or higher permissions. In this case, both the updater and the model owner will need to have CAN MANAGE RUN or higher permissions on the deployment job to connect it.
Trigger the deployment job
The deployment job will be automatically triggered on any new model versions that are created, and it can also be manually triggered on both existing and previously deployed versions on the model version page by clicking Start deployment job.
The job can also be triggered directly from the Jobs UI or API. The appropriate model name and version need to be specified in the job parameters.
Required permissions
The following permissions are required to trigger deployment jobs:
- To manually trigger or repair the deployment job using the model version UI, the user must have CAN MANAGE RUN or higher ACLs on the deployment job (same ACLs necessary to trigger a job using the Jobs UI).
- Because the job automatically triggers when a new version is created and uses the model owner's credentials, the model owner needs to have CAN MANAGE RUN or higher ACLs on the deployment job.
Approve the deployment job (experimental)
Databricks provides an experimental approval mechanism for deployment jobs, enabling a human-in-the-loop process for ML pipelines. After a deployment job has been triggered, metrics from the evaluation run appear on the model version page. After reviewing these metrics, an approver can approve the model version in the UI by clicking Approve. This feature uses Unity Catalog tags to determine whether the approval task should pass or fail. Approval tasks are identified by job task names that start with "approval" (case-insensitive), and will pass when the Unity Catalog tag is set to Approved (either through clicking the Approval button in the UI or when manually set).
Here's how the approval process works:
- Initial run: The first run of the deployment job will always fail on an approval task because the model version has not been approved yet and thus does not have the required Unity Catalog tag.
- Approval evaluation: The approver reviews the model version and its evaluation metrics, which are displayed on the model version page. This allows the approver to assess the quality and readiness of the model version.
- Approval action: If the approver deems the model version satisfactory, they click the Approve button in the deployment job sidebar section on the model version page.
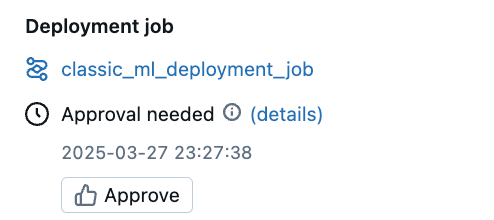
This action automatically repairs the job run and adds a Unity Catalog tag to the model version, where:
- The tag key matches the name of the approval task. For example, in the example approval notebook, this is
Approval_Check. - The tag value is set to
Approved.
- Job Continuation: The repaired deployment job run automatically resumes from the approval task. This time, it passes because the required Unity Catalog tag is now present. It then proceeds to subsequent tasks, such as deployment.
Required permissions
The following permissions are required to add Unity Catalog tags and trigger deployment jobs:
- APPLY TAG on the Unity Catalog model.
- CAN MANAGE RUN on the deployment job.
Governed tags for advanced approvals
You can also further specify who has permission to approve and apply tags using a governed tag policy for a certain tag name. When you use a governed tag policy and specify APPLY_TAG permissions for a user or group, you can:
- Have multiple independent approval groups in a deployment job.
- For example, you can have two separate tags for separate group approvals like:
Approval_LegalandApproval_Securitywhere you:- Create a governed tag policy, so only the Legal team can set the
Approval_Legaltag. - Create an additional governed tag policy, so only the Security team can set the
Approval_Securitytag. - Have two approval tasks in your deployment job corresponding to Legal and Security approvals.
- Grant both teams
APPLY_TAGon the model so they can set the tag, but they can only approve their respective checks.
- Create a governed tag policy, so only the Legal team can set the
- For example, you can have two separate tags for separate group approvals like:
- Set a tag policy to prevent the model owner from approving the job to verify that there is a second person approval.
- Standardize approval checks across the metastore, catalog, and schema with tag policies and consistent tag names.
View the deployment job status and activity log
Once deployment jobs have been triggered on model versions, the current status of those deployments can be viewed on the model page in the Overview tab. Below the status, you can see historical activity in the Activity log. The activity log is also shown on the model version page.
Required permissions
The following permissions are required to view deployment jobs and the activity log (same as viewing the model):
- EXECUTE on the Unity Catalog model.
Example deployment jobs template notebooks
The following example notebooks can be used as a template to create a simple deployment job consisting of evaluation, approval, and deployment tasks. Be sure to provide the REQUIRED values in the notebooks to configure the deployment job to your model.
Evaluation notebook for GenAI
Example evaluation notebook for GenAI
Evaluation notebook for classic ML
Example evaluation notebook for classic ML
Approval notebook
Example approval notebook
Deployment notebook
Example deployment notebook
Create deployment job notebook
Example notebook to create deployment job
Next steps
To learn more about the new features of MLflow 3 and get started, see the following article: