Delta Sharing のデータ受信者を作成および管理する
この記事では、Delta Sharing の受信者を作成および管理する方法について説明します。
受信者は、共有データを使用する現実世界のユーザーまたはユーザーグループの ID を表す名前付きオブジェクトです。 受信者の作成方法は、 受信者が Unity Catalog が有効になっている Databricks ワークスペースにアクセスできるかどうかによって異なります。
- Unity Catalogが有効になっている Databricks ワークスペースにアクセスできる受信者の場合、Databricks によって完全に管理されるセキュリティで保護された接続を使用して受信者オブジェクトを作成できます。この共有モードは 、Databricks間共有 と呼ばれます。
- Unity Catalog が有効になっている Databricks ワークスペースにアクセスできない受信者は、トークンベースの認証を使用して管理するセキュリティで保護された接続で 、オープン共有 を使用する必要があります。
これら 2 つの共有モードの詳細と、どちらを選択するかについては、「 オープン共有と Databricks-to-Databricks 共有」を参照してください。
必要条件
受取人を作成するには:
- メタストア管理者であるか、共有するデータが登録されている Unity Catalog メタストアの
CREATE_RECIPIENT
特権を持っている必要があります。 - 受信者は、その Unity Catalog メタストアがアタッチされている Databricks ワークスペースを使用して作成する必要があります。
- Databricks ノートブックを使用して受信者を作成する場合、コンピュートは Databricks Runtime 11.3 LTS 以降を使用し、標準または専用アクセス モード (以前の共有およびシングル ユーザー アクセス モード) を使用する必要があります。
その他の受信者管理操作(共有の表示、削除、更新、受信者へのアクセス権の付与など)については、この記事の操作固有のセクションに記載されている権限要件を参照してください。
Databricksへのアクセス権を持つユーザーの受信者オブジェクトを作成する(Databricks-to-Databricks共有)
データ受信者が Unity Catalog に対して有効になっている Databricks ワークスペースにアクセスできる場合は、認証の種類が DATABRICKS
の受信者オブジェクトを作成できます。
認証の種類が DATABRICKS
の受信者オブジェクトは、特定の Unity Catalog メタストア上のデータ受信者を表し、受信者オブジェクト定義では、メタストアのクラウド、リージョン、UUID で構成される 共有識別子 文字列によって識別されます。 この受信者と共有されるデータには、そのメタストアでのみアクセスできます。
ステップ1: 受取人の共有識別子をリクエストしてください
受信者のユーザーに対して、受信者のユーザーまたはユーザーのグループが共有データを操作するワークスペースにアタッチされている Unity Catalog メタストアの共有識別子を送信するように依頼します。
共有識別子は、メタストアのクラウド、リージョン、UUID (メタストアの一意の識別子) で構成される文字列で、 <cloud>:<region>:<uuid>
.
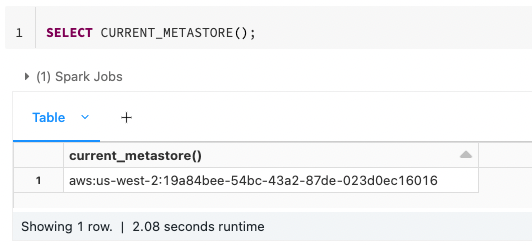
たとえば、次のスクリーンショットでは、完全な共有識別子文字列は aws:us-west-2:19a84bee-54bc-43a2-87de-023d0ec16016
です。
受信者は、使用するワークスペースの Unity-Catalog 対応コンピュートで実行される ノートブックまたは クエリの Catalog Explorer、DatabricksUnity CatalogCLI 、または デフォルトSQL 関数 を使用して識別子を見つけることができます。CURRENT_METASTORE
DatabricksDatabricks SQL
- Catalog Explorer
- SQL
- CLI
To get the sharing identifier using Catalog Explorer:
-
In your Databricks workspace, click
Catalog.
-
At the top of the Catalog pane, click the
gear icon and select Delta Sharing.
Alternatively, from the Quick access page, click the Delta Sharing > button.
-
On the Shared with me tab, click your Databricks sharing organization name in the upper right, and select Copy sharing identifier.
Run the following command in a notebook or the Databricks SQL query editor:
SELECT CURRENT_METASTORE();
Run the following command using the Databricks CLI. The sharing identifier is returned as the global_metastore_id
.
databricks metastores summary
この手順に含まれる情報を連絡先に送信することで受信者を支援するか、Databricks-to-Databricksモデルで [アクセスを取得する] に向けることができます。
ステップ 2: 受信者を作成する
Databricks-to-Databricks共有の受信者を作成するには、カタログ エクスプローラー、DatabricksUnity CatalogCLI 、またはCREATE RECIPIENT
SQL DatabricksノートブックまたはDatabricks SQL クエリ エディターの コマンドを使用できます。
必要なアクセス許可 : メタストア管理者、または共有するデータが登録されている Unity Catalog メタストアの CREATE_RECIPIENT
権限を持つユーザー。
- Catalog Explorer
- SQL
- CLI
-
In your Databricks workspace, click
Catalog.
-
At the top of the Catalog pane, click the
gear icon and select Delta Sharing.
Alternatively, from the Quick access page, click the Delta Sharing > button.
-
On the Shared by me tab, click New recipient.
-
Enter the Recipient name and Sharing identifier.
Use the entire sharing identifier string in the format
<cloud>:<region>:<uuid>
. For example,aws:us-west-2:19a84bee-54bc-43a2-87de-023d0ec16016
. -
(Optional) Enter a comment.
-
Click Create.
-
(Optional) Create custom Recipient properties.
Click Edit properties > +Add property. Then add a property name (Key) and Value. For details, see Manage recipient properties.
Run the following command in a notebook or the Databricks SQL query editor:
CREATE RECIPIENT [IF NOT EXISTS] <recipient-name>
USING ID '<sharing-identifier>'
[COMMENT "<comment>"];
Use the entire sharing identifier string in the format <cloud>:<region>:<uuid>
. For example, aws:eu-west-1:g0c979c8-3e68-4cdf-94af-d05c120ed1ef
.
You can also add custom properties for the recipient. For details, see Manage recipient properties.
Run the following command using the Databricks CLI. Replace the placeholder values:
<recipient-name>
: The name of the recipient.<sharing-identifier>
: The entire sharing identifier string in the format<cloud>:<region>:<uuid>
. For example,aws:eu-west-1:g0c979c8-3e68-4cdf-94af-d05c120ed1ef
.<authentication-type>
: Set toDATABRICKS
when a sharing identifier string in the format<cloud>:<region>:<uuid>
is provided for<sharing-identifier>
.
databricks recipients create <recipient-name> <authentication-type> --sharing-code <sharing-identifier>
You can also add custom properties for the recipient. For details, see Manage recipient properties.
受信者は DATABRICKS
のauthentication_type
で作成されます。
他のすべてのユーザーの受信者オブジェクトを作成する (オープン共有)
Databricks ワークスペースの外部のユーザーとデータを共有する場合は、そのユーザーが Databricks 自体を使用しているかどうかに関係なく、オープン Delta Sharing を使用してデータを安全に共有できます。 その仕組みは次のとおりです。
- データ プロバイダーは、 Unity Catalog メタストアに受信者オブジェクトを作成します。
- 受信者オブジェクトを作成すると、Databricks によってトークン、トークンを含む資格情報ファイル、および受信者と共有するためのアクティベーションリンクが生成されます。 受信者オブジェクトの認証の種類は
TOKEN
です。 - 受信者は、アクティベーションリンクにアクセスし、資格情報ファイルをダウンロードし、資格情報ファイルを使用して、アクセス権を付与した共有に含めるテーブルを認証し、読み取りアクセスを取得します。
ステップ 1: 受信者を作成する
オープン共有の受信者を作成するには、Catalog Explorer、Databricks Unity Catalog CLI、または Databricks ノートブックまたは Databricks SQL クエリエディターの CREATE RECIPIENT
SQL コマンドを使用できます。
必要なアクセス許可 : メタストア管理者、または共有するデータが登録されている Unity Catalog メタストアの CREATE_RECIPIENT
権限を持つユーザー。
- Catalog Explorer
- SQL
- CLI
-
In your Databricks workspace, click
Catalog.
-
At the top of the Catalog pane, click the
gear icon and select Delta Sharing.
Alternatively, from the Quick access page, click the Delta Sharing > button.
-
On the Shared by me tab, click New recipient.
-
Enter the recipient Name
-
(Optional) Enter a comment.
-
Click Create.
You do not use the sharing identifier for open sharing recipients.
-
Copy the activation link.
Alternatively, you can get the activation link later. See Step 2: Get the activation link.
-
(Optional) Create custom Recipient properties.
On the recipient Details tab, click Edit properties > +Add property. Then add a property name (Key) and Value. For details, see Manage recipient properties.
Run the following command in a notebook or the Databricks SQL query editor:
CREATE RECIPIENT [IF NOT EXISTS] <recipient-name>
[COMMENT "<comment>"];
You can also add custom properties for the recipient. For details, see Manage recipient properties.
Run the following command using the Databricks CLI.
databricks recipients create <recipient-name>
You can also add custom properties for the recipient. For details, see Manage recipient properties.
Output includes the activation_url
that you share with the recipient.
受信者は TOKEN
のauthentication_type
で作成されます。
受信者を作成するときに、受信者のアクセスを制限された IP アドレスのセットに制限するオプションがあります。 また、既存の受信者に IP アクセスリストを追加することもできます。 「IP アクセス リストを使用して Delta Sharing 受信者のアクセスを制限する (オープン共有)」を参照してください。
ステップ2: アクティベーションリンクを入手してください
新しい受信者のアクティベーションリンクを取得するには、カタログ エクスプローラー、Databricks Unity Catalog CLI、または Databricks ノートブックまたは Databricks SQL クエリー エディターの DESCRIBE RECIPIENT
SQL コマンドを使用できます。
受信者が既に資格情報ファイルをダウンロードしている場合、アクティベーションリンクは返されず、表示されません。
必要な権限 : メタストア管理者、 USE RECIPIENT
権限を持つユーザー、または受信者オブジェクトの所有者。
- Catalog Explorer
- SQL
- CLI
-
In your Databricks workspace, click
Catalog.
-
At the top of the Catalog pane, click the
gear icon and select Delta Sharing.
Alternatively, from the Quick access page, click the Delta Sharing > button.
-
On the Shared by me tab, click Recipients, and select the recipient.
-
On the recipient details page, copy the Activation link.
Run the following command in a notebook or the Databricks SQL query editor.
DESCRIBE RECIPIENT <recipient-name>;
Output includes the activation_link
.
Run the following command using the Databricks CLI.
databricks recipients get <recipient-name>
Output includes the activation_url
.
受信者に共有へのアクセス権を付与する
受信者を作成し、 共有を作成したら、その共有へのアクセス権を受信者に付与できます。
受信者に共有アクセス権を付与するには、Catalog Explorer、Databricks Unity Catalog CLI、または Databricks ノートブックまたは Databricks SQL クエリエディターの GRANT ON SHARE
SQL コマンドを使用できます。
必要な権限 : 次のいずれかです。
- メタストア管理者。
- 共有オブジェクトと受信者オブジェクト ((
USE SHARE
+SET SHARE PERMISSION
) または共有の所有者) および (USE RECIPIENT
または受信者の所有者) の両方に対する委任されたアクセス許可または所有権。
手順については、「 Delta Sharing データ共有へのアクセスを管理する (プロバイダー向け)」を参照してください。
受信者に接続情報を送信する
共有しているデータへのアクセス方法を受信者に知らせる必要があります。 受信者と共有する情報は、 Databricks-to-Databricks 共有とオープン共有のどちらを使用しているかによって異なります。
-
Databricks-to-Databricks共有の場合は 、共有しているデータにアクセスするための手順へのリンクを送信します。
利用可能な株式を一覧表示するプロバイダーオブジェクトは、受信者のメタストアに自動的に作成されます。 受信者は、使用したい共有を表示して選択する以外に何もする必要はありません。 「Databricks-to-Databricks Delta Sharingを使用して共有されたデータの読み取り (受信者向け)」を参照してください。
-
オープンシェアリングの場合は 、安全なチャンネルを使用して アクティベーションリンク とその 使用手順へのリンクを共有します。
資格情報ファイルは一度だけダウンロードできます。 受信者は、ダウンロードした資格情報をシークレットとして扱い、組織外で共有してはなりません。 資格情報が安全でない方法で処理された可能性があるという懸念がある場合は、 受信者の資格情報 をいつでもローテーションできます。 受信者の安全なアクセスを確保するための資格情報の管理の詳細については、「 トークンのセキュリティに関する考慮事項」を参照してください。
受信者を表示する
受信者のリストを表示するには、カタログ エクスプローラー、DatabricksUnity CatalogCLI 、またはSHOW RECIPIENTS
SQL DatabricksノートブックまたはDatabricks SQL クエリ エディターの コマンドを使用できます。
必要なアクセス許可 : メタストア管理者であるか、メタストア内のすべての受信者を表示するための USE RECIPIENT
特権を持っている必要があります。 他のユーザーは、自分が所有する受信者にのみアクセスできます。
- Catalog Explorer
- SQL
- CLI
-
In your Databricks workspace, click
Catalog.
-
At the top of the Catalog pane, click the
gear icon and select Delta Sharing.
Alternatively, from the Quick access page, click the Delta Sharing > button.
-
On the Shared by me tab, click Recipients.
Run the following command in a notebook or the Databricks SQL query editor. Optionally, replace <pattern>
with a LIKE
predicate.
SHOW RECIPIENTS [LIKE <pattern>];
Run the following command using the Databricks CLI.
databricks recipients list
受信者の詳細を表示する
受信者の詳細を表示するには、Catalog Explorer、Databricks Unity Catalog CLI、または Databricks ノートブックまたは Databricks SQL クエリエディターの DESCRIBE RECIPIENT
SQL コマンドを使用できます。
必要な権限 : メタストア管理者、 USE RECIPIENT
権限を持つユーザー、または受信者オブジェクトの所有者。
詳細は次のとおりです。
- 受信者の作成者、作成タイムスタンプ、コメント、および認証タイプ(
TOKEN
またはDATABRICKS
)。 - 受信者がオープン共有を使用している場合: トークンの有効期間、アクティベーション リンク、アクティベーション ステータス (資格情報がダウンロードされたかどうか)、IP アクセス リスト (割り当てられている場合)。
- 受信者が Databricks 間の共有を使用している場合: 受信者の Unity Catalog メタストアのクラウド、リージョン、メタストア ID、およびアクティベーションの状態。
- 受信者のプロパティ (カスタム プロパティを含む)。 受取人のプロパティの管理を参照してください。
- Catalog Explorer
- SQL
- CLI
-
In your Databricks workspace, click
Catalog.
-
At the top of the Catalog pane, click the
gear icon and select Delta Sharing.
Alternatively, from the Quick access page, click the Delta Sharing > button.
-
On the Shared by me tab, click Recipients, and select the recipient.
Run the following command in a notebook or the Databricks SQL query editor.
DESCRIBE RECIPIENT <recipient-name>;
Run the following command using the Databricks CLI.
databricks recipients get <recipient-name>
受信者の共有権限を表示する
受信者にアクセス権が付与されている共有の一覧を表示するには、Catalog Explorer、Databricks CLI、または Databricks ノートブックまたは Databricks SQL クエリ エディターの SHOW GRANTS TO RECIPIENT
SQL コマンドを使用できます。
必要な権限 : メタストア管理者、 USE RECIPIENT
権限を持つユーザー、または受信者オブジェクトの所有者。
- Catalog Explorer
- SQL
- CLI
-
In your Databricks workspace, click
Catalog.
-
At the top of the Catalog pane, click the
gear icon and select Delta Sharing.
Alternatively, from the Quick access page, click the Delta Sharing > button.
-
On the Shared by me tab, click Recipients, and select the recipient.
-
Go to the Shares tab to view the list of shares shared with the recipient.
Run the following command in a notebook or the Databricks SQL query editor.
SHOW GRANTS TO RECIPIENT <recipient-name>;
Run the following command using the Databricks CLI.
databricks recipients share-permissions <recipient-name>
受信者を更新する
受信者を更新するには、カタログエクスプローラー、DatabricksUnity CatalogCLI ALTER RECIPIENT
SQL、Databricks ノートブックの コマンド、またはDatabricks SQL クエリエディターを使用できます。
更新できるプロパティには、受信者名、所有者、コメント、およびカスタム プロパティが含まれます。
必要なアクセス許可 : 所有者を更新するには、受信者オブジェクトのメタストア管理者または所有者である必要があります。 名前を更新するには、メタストア管理者 (または CREATE_RECIPIENT
権限を持つユーザー) であり 、所有者である必要があります。 コメントまたはカスタムプロパティを更新するには、所有者である必要があります。
- Catalog Explorer
- SQL
- CLI
-
In your Databricks workspace, click
Catalog.
-
At the top of the Catalog pane, click the
gear icon and select Delta Sharing.
Alternatively, from the Quick access page, click the Delta Sharing > button.
-
On the Shared by me tab, click Recipients, and select the recipient.
-
On the recipient details page:
-
Update the owner.
-
Edit or add a comment.
-
Rename the recipient.
Click the
kebab menu and select Rename.
-
Edit, remove, or add custom Recipient properties.
Click Edit properties. To add a property, click +Add property and enter a property name (Key) and Value. For details, see Manage recipient properties.
-
Run one or more of the following commands in a notebook or the Databricks SQL query editor.
ALTER RECIPIENT <recipient-name> RENAME TO <new-recipient-name>;
ALTER RECIPIENT <recipient-name> OWNER TO <new-owner>;
COMMENT ON RECIPIENT <recipient-name> IS "<new-comment>";
ALTER RECIPIENT <recipient-name> SET PROPERTIES ( <property-key> = property_value [, ...] )
ALTER RECIPIENT <recipient-name> UNSET PROPERTIES ( <property-key> [, ...] )
For more information about properties, see Manage recipient properties.
Create a JSON file that includes an update to the recipient name, comment, owner, IP access list, or custom properties.
{
"name": "new-recipient-name",
"owner": "someone-else@example.com",
"comment": "something new",
"ip_access_list": {
"allowed_ip_addresses": ["8.8.8.8", "8.8.8.4/10"]
},
"property": {
"country": "us",
"id": "001"
}
}
Then run the following command using the Databricks CLI. Replace <recipient-name>
with the current recipient name and replace update-recipient-settings.json
with the filename of the JSON file.
databricks recipients update --json-file update-recipient-settings.json
For more information about properties, see Manage recipient properties.
受信者トークンの管理(オープン共有)
オープン共有を使用して受信者とデータを共有している場合は、その受信者のトークンをローテーションする必要がある場合があります。トークンのローテーションは、既存のトークンを期限切れに設定し、新しいトークンとアクティベーションURLに置き換えることで構成されます。
次の状況では、受信者のトークンをローテーションし、新しいアクティベーションURLを生成する必要があります。
- 既存の受信者トークンの有効期限が近づいたとき。
- 受信者がアクティベーションURLを紛失したり、侵害されたりした場合。
- 受信者が資格情報をダウンロードした後で、資格情報が破損、紛失、または侵害された場合。
- メタストアの受信者トークンの有効期間を変更する場合。 「受信者トークンの有効期間を変更する」を参照してください。
トークンのセキュリティに関する考慮事項
受信者は、常に最大で 2 つのトークン (アクティブなトークンとローテーションされたトークン) を持つことができます。 ローテーションされたトークンは、有効期限が切れ、アクティブなトークンに置き換えられるように設定されたトークンです。 ローテーションされたトークンの有効期限が切れるまで、トークンを再度ローテーションしようとするとエラーが発生します。
受信者のトークンをローテーションする場合、必要に応じて、既存の受信者トークン (つまり、ローテーションするトークン) の有効期限が切れるまでの秒数に --existing-token-expire-in-seconds
を設定できます。 値を 0
に設定すると、既存の受信者トークンはすぐに期限切れになります。
Databricks では、受信者が 2 つのアクティブなトークンを持つ時間を最小限に抑えながら、受信者の組織が新しいアクティブ化 URL にアクセスする時間を与える比較的短い期間に --existing-token-expire-in-seconds
を設定することをお勧めします。 既存の受信者トークンが侵害された疑いがある場合は、Databricks では、すぐに期限切れにすることを強制することをお勧めします。
受信者の既存のアクティベーション URL に一度もアクセスされていない場合、既存のトークンをローテーションすると、そのアクティベーション URL は無効になり、新しいアクティベーション URL に置き換えられます。
すべての受信者トークンの有効期限が切れている場合、トークンをローテーションすると、既存のアクティベーションURLが新しいURLに置き換えられます。 Databricks では、トークンの有効期限が切れた受信者を速やかにローテーションまたは削除することをお勧めします。
受信者のアクティベーションURLが誤って間違った人に送信されたり、安全でないチャンネルを介して送信されたりした場合は、 Databricks 次のことをお勧めします。
- 共有への受信者のアクセスを取り消します。
- 受信者を回転させ、
--existing-token-expire-in-seconds
を0
に設定します。 - 新しいアクティベーションURLを、安全なチャンネルを介して目的の受信者と共有します。
- アクティベーション URL にアクセスしたら、受信者に共有へのアクセス権を再度付与します。
極端な状況では、受信者のトークンをローテーションする代わりに、受信者 をドロップ して再作成できます。
受信者のトークンをローテーションする
受信者のトークンをローテーションするには、カタログエクスプローラーまたは Databricks Unity Catalog CLIを使用できます。
必要な権限 : 受信者オブジェクトの所有者。
- Catalog Explorer
- CLI
-
In your Databricks workspace, click
Catalog.
-
In the left pane, expand the Delta Sharing menu and select Shared by me.
-
At the top of the Catalog pane, click the
gear icon and select Delta Sharing.
Alternatively, from the Quick access page, click the Delta Sharing > button.
-
On the Shared by me tab, click Recipients, and select the recipient.
-
On the Details tab, under Token Expiration, click Rotate.
-
On the Rotate token dialog, set the token to expire either immediately or for a set period of time. For advice about when to expire existing tokens, see Security considerations for tokens.
-
Click Rotate.
-
On the Details tab, copy the new Activation link and share it with the recipient over a secure channel. See Step 2: Get the activation link.
-
Run the following command using the Databricks CLI. Replace the placeholder values:
<recipient-name>
: the name of the recipient.<expiration-seconds>
: The number of seconds until the existing recipient token should expire. During this period, the existing token will continue to work. A value of0
means the existing token expires immediately. For advice about when to expire existing tokens, see Security considerations for tokens.
Bashdatabricks recipients rotate-token \
<recipient-name> \
<expiration-seconds> -
Get the recipient’s new activation link and share it with the recipient over a secure channel. See Step 2: Get the activation link.
受信者トークンの有効期間を変更する
Unity Catalog メタストアのデフォルト受信者トークンの有効期間を変更する必要がある場合は、カタログ エクスプローラーまたは Databricks Unity Catalog CLIを使用できます。
既存の受信者の受信者トークンの有効期間は、メタストアのデフォルト受信者トークンの有効期間を変更しても自動的に更新されません。 新しいトークンの有効期間を特定の受信者に適用するには、トークンをローテーションする必要があります。 「受信者トークンの管理(オープン共有)」を参照してください。
必要な権限 : アカウント管理者。
- Catalog Explorer
- CLI
- Log in to the account console.
- In the sidebar, click
Catalog.
- Click the metastore name.
- Under Delta Sharing recipient token lifetime, click Edit.
- Enable Set expiration.
- Enter a number of seconds, minutes, hours, or days, and select the unit of measure.
- Click Save.
If you disable Set expiration, recipient tokens do not expire. Databricks recommends that you configure tokens to expire.
Run the following command using the Databricks CLI. Replace 12a345b6-7890-1cd2-3456-e789f0a12b34
with the metastore UUID, and replace 86400
with number of seconds before the recipient token expires. If you set this value to 0
, recipient tokens do not expire. Databricks recommends that you configure tokens to expire.
databricks metastores update \
12a345b6-7890-1cd2-3456-e789f0a12b34 \
--delta-sharing-recipient-token-lifetime-in-seconds 86400
(オプション)アクセスリストを使用して受信者のアクセスを制限します
受信者オブジェクトを設定するときに、受信者のアクセスを制限した IP アドレスのセットに制限できます。 「IP アクセス リストを使用して Delta Sharing 受信者のアクセスを制限する (オープン共有)」を参照してください。
受取人のプロパティを管理します
受信者オブジェクトには、データ共有アクセスを絞り込むために使用できる定義済みのプロパティが含まれています。 たとえば、これらを使用して次の操作を実行できます。
- 異なるテーブルパーティションを異なる受信者と共有することで、複数の受信者と同じ共有を使用しながら、それらの受信者間のデータ境界を維持できます。
- 受信者のプロパティに基づいて、受信者がテーブルデータにアクセスするのを行または列レベルで制限する動的ビューを共有します。
カスタムプロパティを作成することもできます。
定義済みのプロパティは databricks.
で始まり、次のものが含まれます。
databricks.accountId
:データ受信者が所属する Databricks アカウント(Databricks-to-Databricks 共有のみ)。databricks.metastoreId
: データ受信者が属する Unity Catalog メタストア (Databricks間共有のみ)。databricks.name
: データ受信者の名前。
価値がある可能性のあるカスタム プロパティには、たとえば、 country
などがあります。 たとえば、カスタムプロパティ [ 'country' = 'us'
] を受信者にアタッチすると、テーブルデータを国ごとにパーティション分割し、米国のデータを含む行のみを、そのプロパティが割り当てられている受信者と共有できます。 また、受信者のプロパティに基づいて行または列へのアクセスを制限する動的ビューを共有することもできます。 詳細な例については、「 受信者のプロパティを使用してパーティションのフィルター処理を行う 」および「 共有に動的ビューを追加して行と列をフィルター処理する」を参照してください。
必要条件
受信者のプロパティは、Databricks Runtime 12.2 以降でサポートされています。
受信者を作成または更新するときにプロパティを追加する
受信者を作成するとき、または既存の受信者に対してプロパティを更新するときに、プロパティを追加できます。 カタログ エクスプローラ、 Databricks Unity Catalog CLI、または SQL コマンドは、 Databricks ノートブックまたは Databricks SQL クエリ エディタで使用できます。
必要なアクセス許可 : メタストア管理者、または Unity Catalog メタストアの CREATE RECIPIENT
権限を持つユーザー。
- Catalog Explorer
- SQL
- CLI
When you create or update a recipient using Catalog Explorer, add or update custom properties by doing the following:
-
Go to the Recipient details page.
If you are creating a new recipient, you land on this page after you click Create. If you are updating an existing recipient, go to this page by clicking the
gear icon > Delta Sharing > Shared by me > Recipients and selecting the recipient.
-
Click Edit properties > +Add property.
-
Enter a property name (Key) and Value.
For example, if you want to filter shared data by country and share only US data with this recipient, you can create a key named “country” with a value of “US.”
-
Click Save.
To add a custom property when you create a recipient, run the following command in a notebook or the Databricks SQL query editor:
CREATE RECIPIENT [IF NOT EXISTS] <recipient-name>
[USING ID '<sharing-identifier>'] /* Skip this if you are using open sharing */
[COMMENT "<comment>"]
PROPERTIES ( '<property-key>' = '<property-value>' [, ...] );
<property-key>
can be a string literal or identifier. <property-value>
must be a string literal.
For example:
CREATE RECIPIENT acme PROPERTIES ('country' = 'us', 'partner_id' = '001');
To add, edit, or delete custom properties for an existing recipient, run one of the following:
ALTER RECIPIENT <recipient-name> SET PROPERTIES ( '<property-key>' = '<property-value>' [, ...] );
ALTER RECIPIENT <recipient-name> UNSET PROPERTIES ( '<property-key>' );
To add custom properties when you create a recipient, run the following command using the Databricks CLI. Replace the placeholder values:
<recipient-name>
: The name of the recipient.<property-key>
can be a string literal or identifier.<property-value>
must be a string literal.
databricks recipients create \
--json='{
"name": "<recipient-name>",
"properties_kvpairs": {
"properties": {
"<property-key>": "<property-value>",
}
}
}'
For example:
databricks recipients create \
--json='{
"name": "<recipient-name>",
"properties_kvpairs": {
"properties": {
"country": "us",
"partner_id":"001"
}
}
}'
To add or edit custom properties for an existing recipient, use update
instead of create
:
databricks recipients update \
--json='{
"name": "<recipient-name>",
"properties_kvpairs": {
"properties": {
"country": "us",
"partner_id":"001"
}
}
}'
受信者のプロパティを表示する
受取人のプロパティを表示するには、「受取人の詳細を表示する」の指示に従ってください。
受取人を削除する
受信者を削除するには、カタログ エクスプローラー、DatabricksUnity CatalogCLI 、またはDROP RECIPIENT
SQL DatabricksノートブックまたはDatabricks SQL クエリ エディターの コマンドを使用できます。受信者を削除するには、受信者オブジェクトの所有者である必要があります。
受信者を削除すると、受信者が代表するユーザーは共有データにアクセスできなくなります。 受信者がオープン共有シナリオで使用するトークンは無効になります。
必要な権限 : 受信者オブジェクトの所有者。
- Catalog Explorer
- SQL
- CLI
-
In your Databricks workspace, click
Catalog.
-
At the top of the Catalog pane, click the
gear icon and select Delta Sharing.
Alternatively, from the Quick access page, click the Delta Sharing > button.
-
On the Shared by me tab, click Recipients, and select the recipient.
-
On the Recipients tab, find and select the recipient.
-
Click the
kebab menu and select Delete.
-
On the confirmation dialog, click Delete.
Run the following command in a notebook or the Databricks SQL query editor.
DROP RECIPIENT [IF EXISTS] <recipient-name>;
Run the following command using the Databricks CLI.
databricks recipients delete <recipient-name>