Use Information Extraction (legacy)
This feature is in Beta. Workspace admins can control access to this feature from the Previews page. See Manage Databricks previews.
This page covers the old version of Information Extraction. Databricks recommends using the latest version. See Information Extraction.
This page describes how to create a generative AI agent for information extraction using Information Extraction.
What is Information Extraction?
Information Extraction supports information extraction and simplifies the process of transforming a large volume of unlabeled text documents into a structured table with extracted information for each document.
Examples of information extraction include:
- Extracting prices and lease information from contracts.
- Organizing data from customer notes.
- Getting important details from news articles.
Information Extraction leverages automated evaluation capabilities, including MLflow and Agent Evaluation, to enable rapid assessment of the cost-quality tradeoff for your specific extraction task. This assessment allows you to make informed decisions about the balance between accuracy and resource investment.
Information Extraction uses default storage to store temporary data transformations, model checkpoints, and internal metadata that power each agent. On agent deletion, all data associated with the agent is removed from default storage.
Requirements
- A workspace that includes the following:
- Serverless compute available (enabled by default in workspaces with Unity Catalog).
- Unity Catalog enabled. See Enable a workspace for Unity Catalog.
- Access to foundation models in Unity Catalog through the
system.aischema. - Access to a serverless usage policy with a nonzero budget.
- A workspace in one of the supported regions.
- Ability to use the
ai_querySQL function. - Files that you want to extract data from. The files must be in a Unity Catalog volume or table.
- If you want to use PDFs, convert them to a Unity Catalog table first. See Use PDFs in Information Extraction.
- To build your agent, you need at least 1 unlabeled document in your Unity Catalog volume or 1 row in your table.
Create an information extraction agent
Go to ![]() Agents in the left navigation pane of your workspace. From the Information Extraction tile, click Build.
Agents in the left navigation pane of your workspace. From the Information Extraction tile, click Build.
Step 1: Configure your agent
Configure your agent:
-
In the Name field, enter a name for your agent.
-
Select the type of data you want to provide. You can choose either Unlabeled dataset or Labeled dataset.
-
Select the dataset to provide.
- Unlabeled dataset
- Labeled dataset
If you select Unlabeled dataset:
-
In the Dataset location field, select the folder or table you want to use from your Unity Catalog volume. If you select a folder, the folder must contain documents in a supported document format.
The following is an example volume:
/Volumes/main/info-extraction/bbc_articles/ -
If you're providing a table, select the column containing your text data from the dropdown. The table column must contain data in a supported data format.
If you want to use PDFs, convert them to a Unity Catalog table first. See Use PDFs in Information Extraction.
-
Information Extraction automatically infers and generates a sample JSON output containing data extracted from your dataset in the Sample JSON output field. You can accept the sample output, edit it, or replace it with an example of your desired JSON output. The agent returns extracted information using this format.
If you select Labeled dataset:
- In the Ground truths dataset field, select the Unity Catalog table containing your ground truth data.
- In the Input column field, select the column containing the text you want the agent to process. The data in this column must be in
strformat. - In the Ground truth response column field, select the column containing the expected ideal responses. The data in this column must be a JSON string. Each row in this column must follow the same JSON format. Rows containing additional or missing keys are not acceptable.
- In the Sample JSON output field, Information Extraction automatically generates a sample JSON output using the first row of data from the ground truth response column. Verify this JSON output matches the expected format.
-
Verify that the Sample JSON output field matches your desired response format. Edit as needed.
For example, the following sample JSON output might be used to extract information from a set of news articles:
JSON{
"title": "Economy Slides to Recession",
"category": "Politics",
"paragraphs": [
{
"summary": "GDP fell by 0.1% in the last three months of 2004.",
"word_count": 38
},
{
"summary": "Consumer spending had been depressed by one-off factors such as the unseasonably mild winter.",
"word_count": 42
}
],
"tags": ["Recession", "Economy", "Consumer Spending"],
"estimate_time_to_read_min": 1,
"published_date": "2005-01-15",
"needs_review": false
} -
Under Model choice, select the best model for your information extraction agent:
- Optimize for Scale (default): Choose this option if you're processing large volumes of data or prefer a cost-effective agent. This model is designed for high throughput and faster turnaround time and is suitable for most information extraction tasks.
- Optimize for Complexity: Choose this option if you need complex reasoning and prioritize accuracy over speed and cost. This model offers higher reasoning capabilities for longer documents (such as financial filings) and can handle more complex extractions (such as extracting 40+ schema fields).
-
Click Create agent.
Supported document formats
The following table shows the supported document file types for your source documents if you provide a Unity Catalog volume.
Code files | Document files | Log files |
|---|---|---|
|
|
|
Supported data formats
Information Extraction supports the following data types and schemas for your source documents if you provide a Unity Catalog table. Information Extraction can also extract these data types from each document.
strintfloatbooleanenum(used for classification tasks where the agent should only select from predefined categories)- Object
- Arrays
enum (suited for classification tasks where we want the agent to output only from a set of predefined categories) object (in place of "custom nested fields") array
Step 2: Improve your agent
In the Build tab, review sample outputs to help you refine your schema definition and add instructions for better results.
-
On the left, review sample responses and provide feedback to tune your agent. These samples are based on your current agent configuration.
- Click on a row to review the full input and response.
- At the bottom, next to Is this response correct?, provide feedback by selecting either
 Yes or
  Fix it. For Fix it feedback, provide additional details on how the agent should change its response, and then click
  Save.
Save. - After you've finished reviewing all responses, click Yes, update agent. Or, you can click Save feedback and update after reviewing at least three responses.
-
On the right, under Output fields, refine the descriptions for your extraction schema fields. These descriptions are what the agent relies on to understand what you want to extract. Use the sample responses on the left to help you refine the schema definition.
- For each field, review and edit the schema definition as needed. Use the sample responses on the left to help you refine these descriptions.
- To edit the field name and type, click
 Edit field.
 - To add a new field, click
 Add new field. Enter the name, type, and description, and click Confirm.
 - To remove a field, click
 Remove field.
 - Click Save and update to update your agent configuration.
-
(Optional) On the right, under Instructions, enter any global instructions for your agent. These instructions apply to all extracted elements. Click Save and update to apply the instructions.
-
New sample responses are generated on the left side. Review these updated responses and continue to refine your agent configuration until the responses are satisfactory.
Step 3: Use your agent
You can use your agent in workflows across Databricks.
To start using your agent, click Use. You can choose to use your agent in several ways:
- Extract data for all documents: Click Start extraction to open the SQL editor and use
ai_queryto send requests to your new information extraction agent. - Create ETL pipeline: Click Create pipeline to deploy a pipeline that runs at scheduled intervals to use your agent on new data. See Spark Declarative Pipelines for more information about pipelines.
- Test your agent: Click Open in Playground to try out your Agent in a test environment to see how it works. See Chat with LLMs and prototype generative AI apps using AI Playground to learn more about AI Playground.
(Optional) Step 4: Evaluate your agent
To ensure you've built a high-quality agent, run an evaluation and review the resulting quality report.
-
Switch to the Quality tab.
-
Click
Run evaluation. -
On the New Evaluation pane that slides out, configure the evaluation:
- Select the evaluation run name. You can choose to use a generated name or to provide a custom name.
- Select the evaluation dataset. You can choose to use the same source dataset used to build your agent or provide a custom evaluation dataset using labeled or unlabelled data.
-
Click Start evaluation.
-
After your evaluation run completes, review the quality report:
-
A Summary view is shown by default. Review the overall quality, cost, throughput, and summary report of the evaluation metrics. Click
 next to the schema field to see how that field is evaluated.
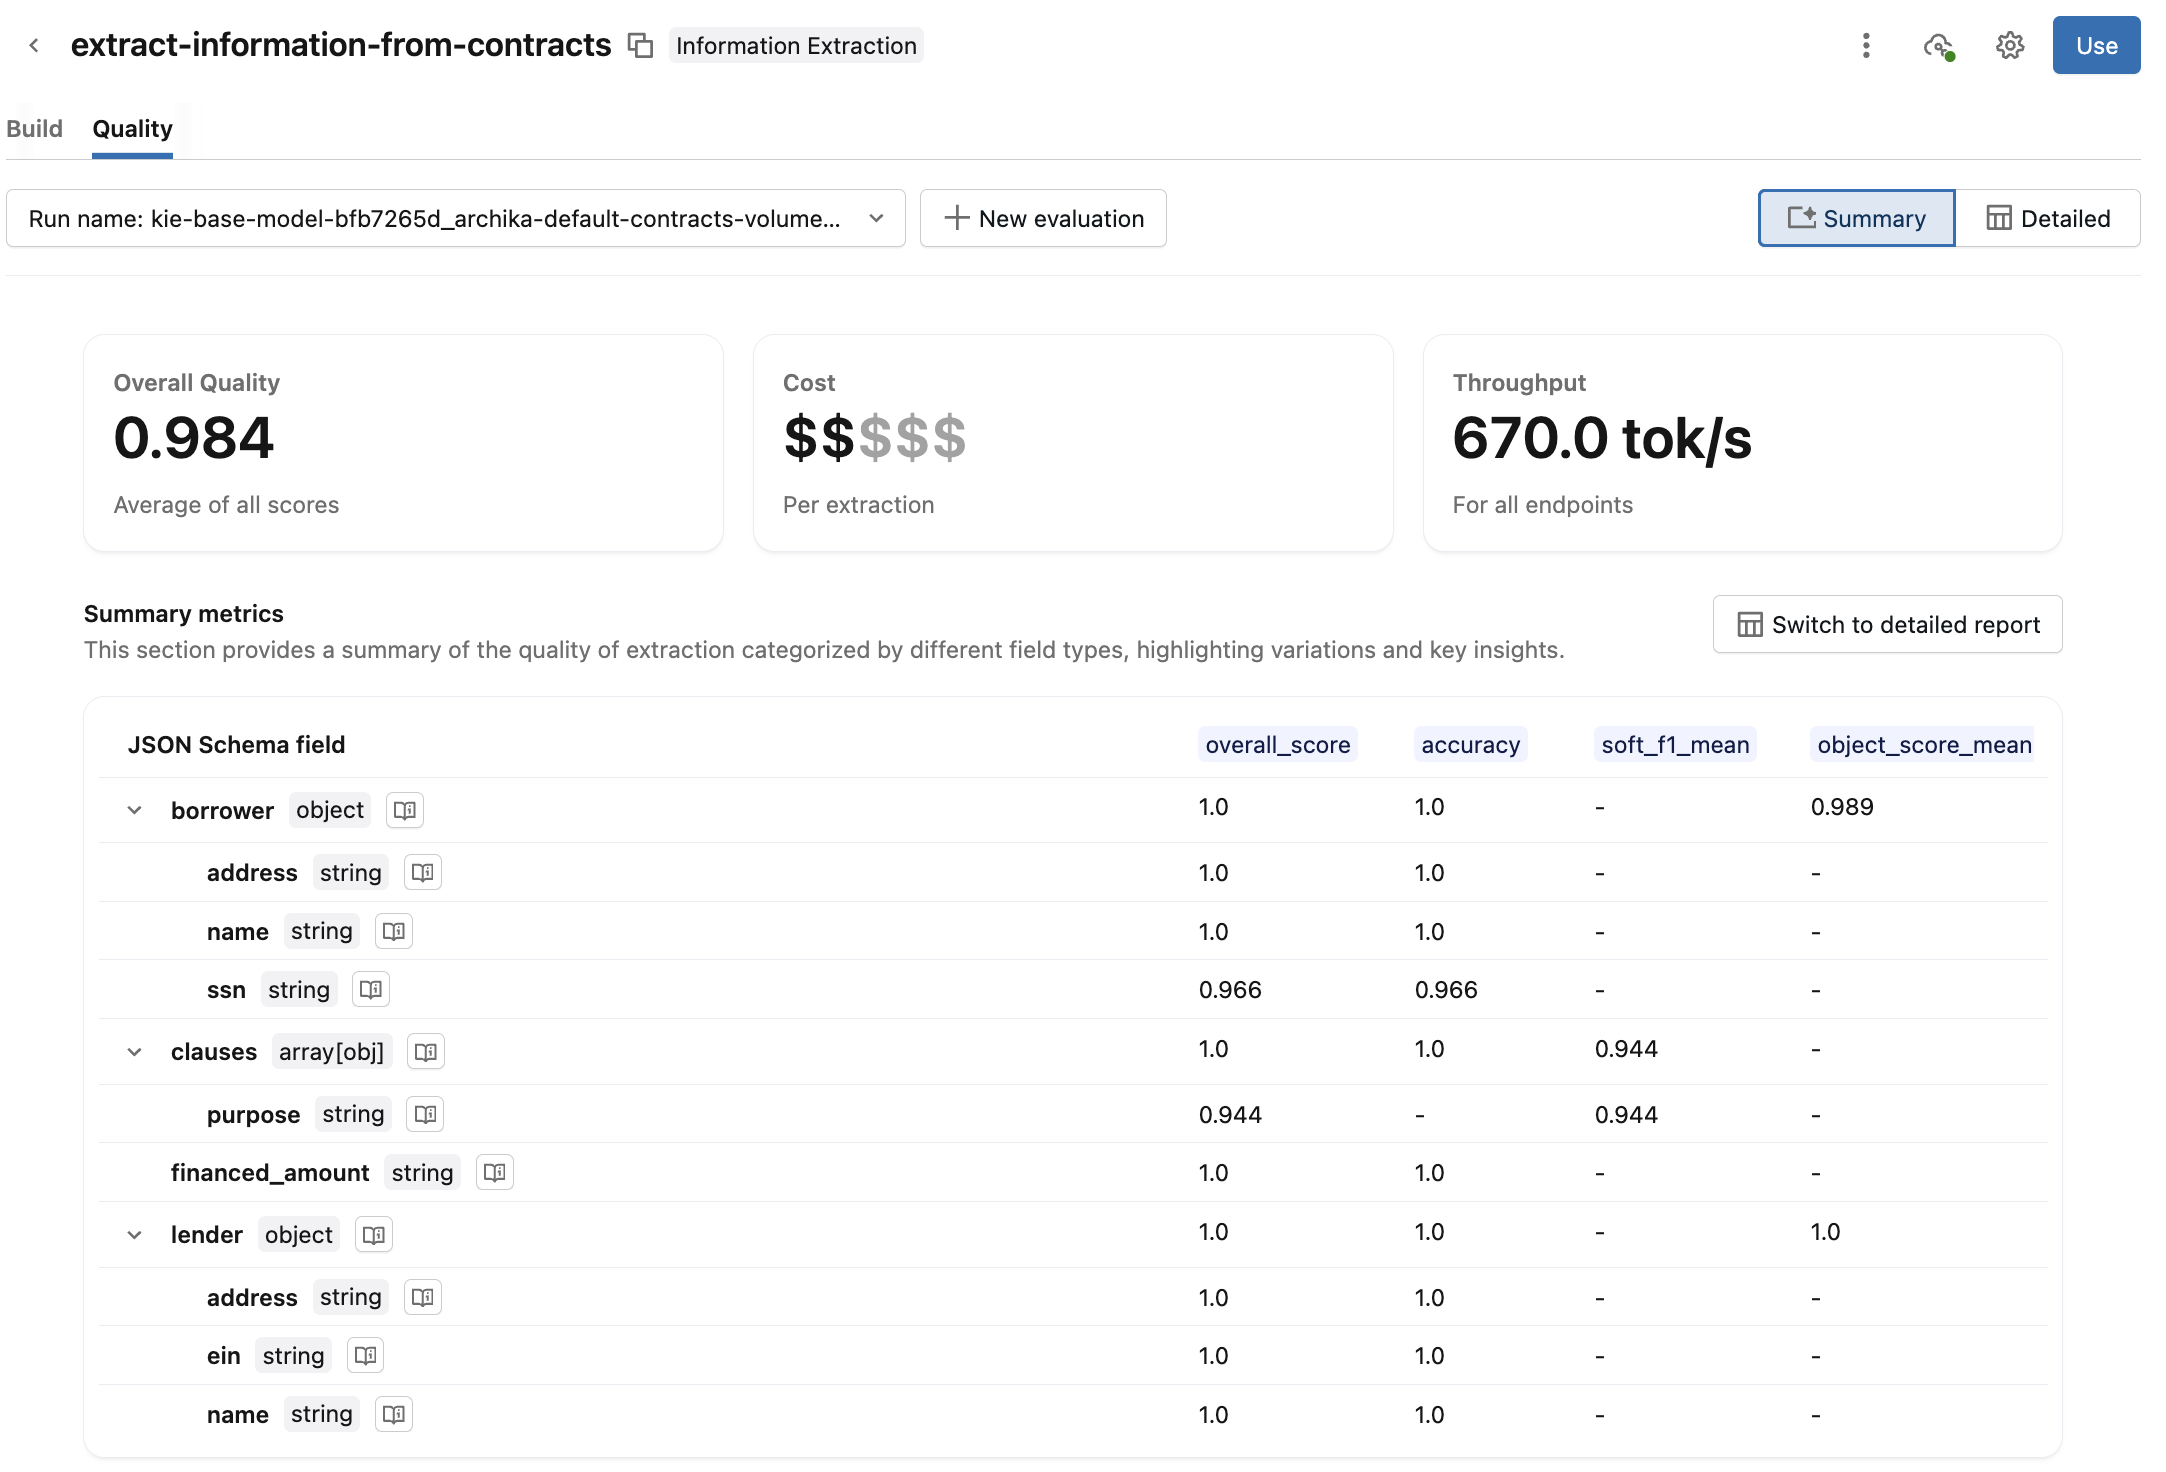
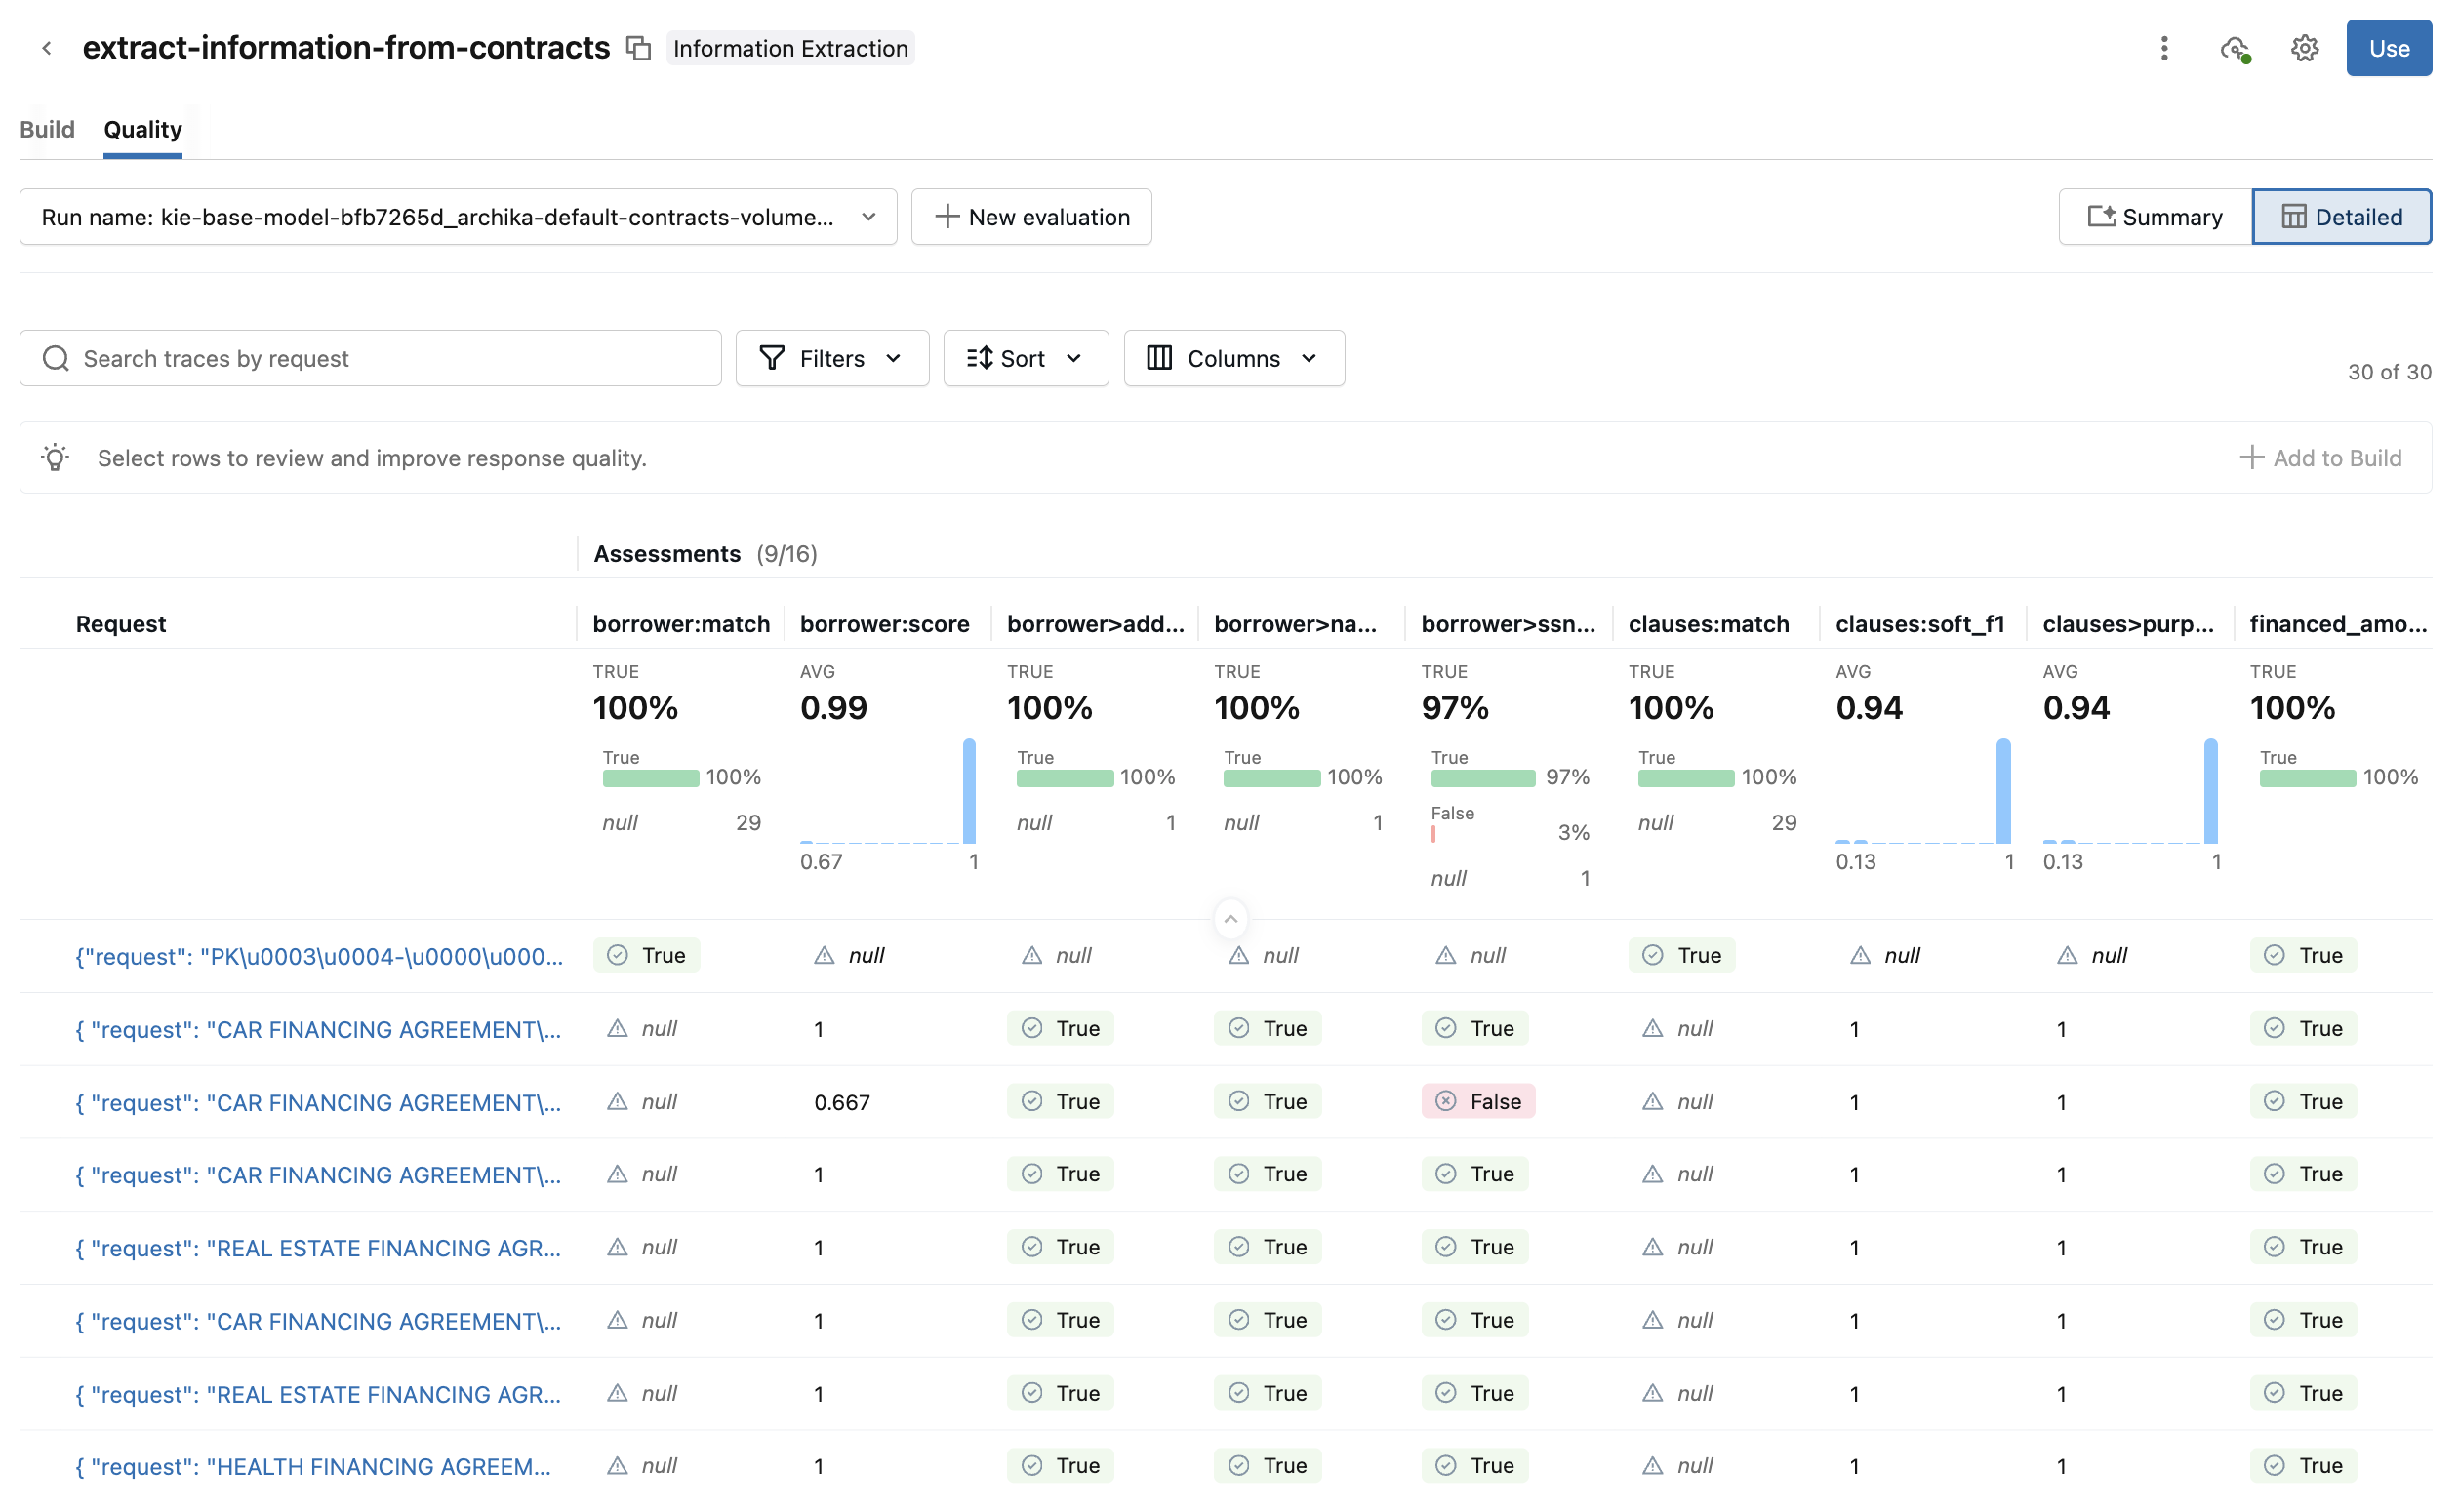
-
Switch to the Detailed view for additional details. This view shows each request and the evaluation score for each metric. Click into a request to see additional details, such as the input, output, assessments, traces, and linked prompts. You can also edit the request's assessments and provide additional feedback.
-
Query the agent endpoint
On the agent page, click ![]() See Agent status in the upper-right to get your deployed agent endpoint and see endpoint details.
See Agent status in the upper-right to get your deployed agent endpoint and see endpoint details.
There are multiple ways to query the created agent endpoint. Use the code examples provided in AI Playground as a starting point:
- On the agent page, click Use.
- Click Open in playground.
- From Playground, click Get code.
- Choose how you want to use the endpoint:
- Select Apply on data to create a SQL query that applies the agent to a specific table column.
- Select Curl API for a code example to query the endpoint using curl.
- Select Python API for a code example to interact with the endpoint using Python.
Manage permissions
By default, only agent authors and workspace admins have permissions to the agent. To allow other users to edit or query your agent, you need to explicitly grant them permission.
To manage permissions on your agent:
- Open your agent on the Agents page.
- At the top, click the
 kebab menu.
 - Click Manage permissions.
- In the Permission Settings window, select the user, group, or service principal.
- Select the permission to grant:
- Can Manage: Allows managing the agent, including setting permissions, editing the agent configuration, and improving its quality.
- Can Query: Allows querying the agent endpoint in AI Playground and through the API. Users with only this permission cannot view or edit the agent on the Agents page.
- Click Add.
- Click Save.
For agent endpoints created before September 16, 2025, you can grant Can Query permissions to the endpoint from the Serving endpoints page.
Use PDFs in Information Extraction
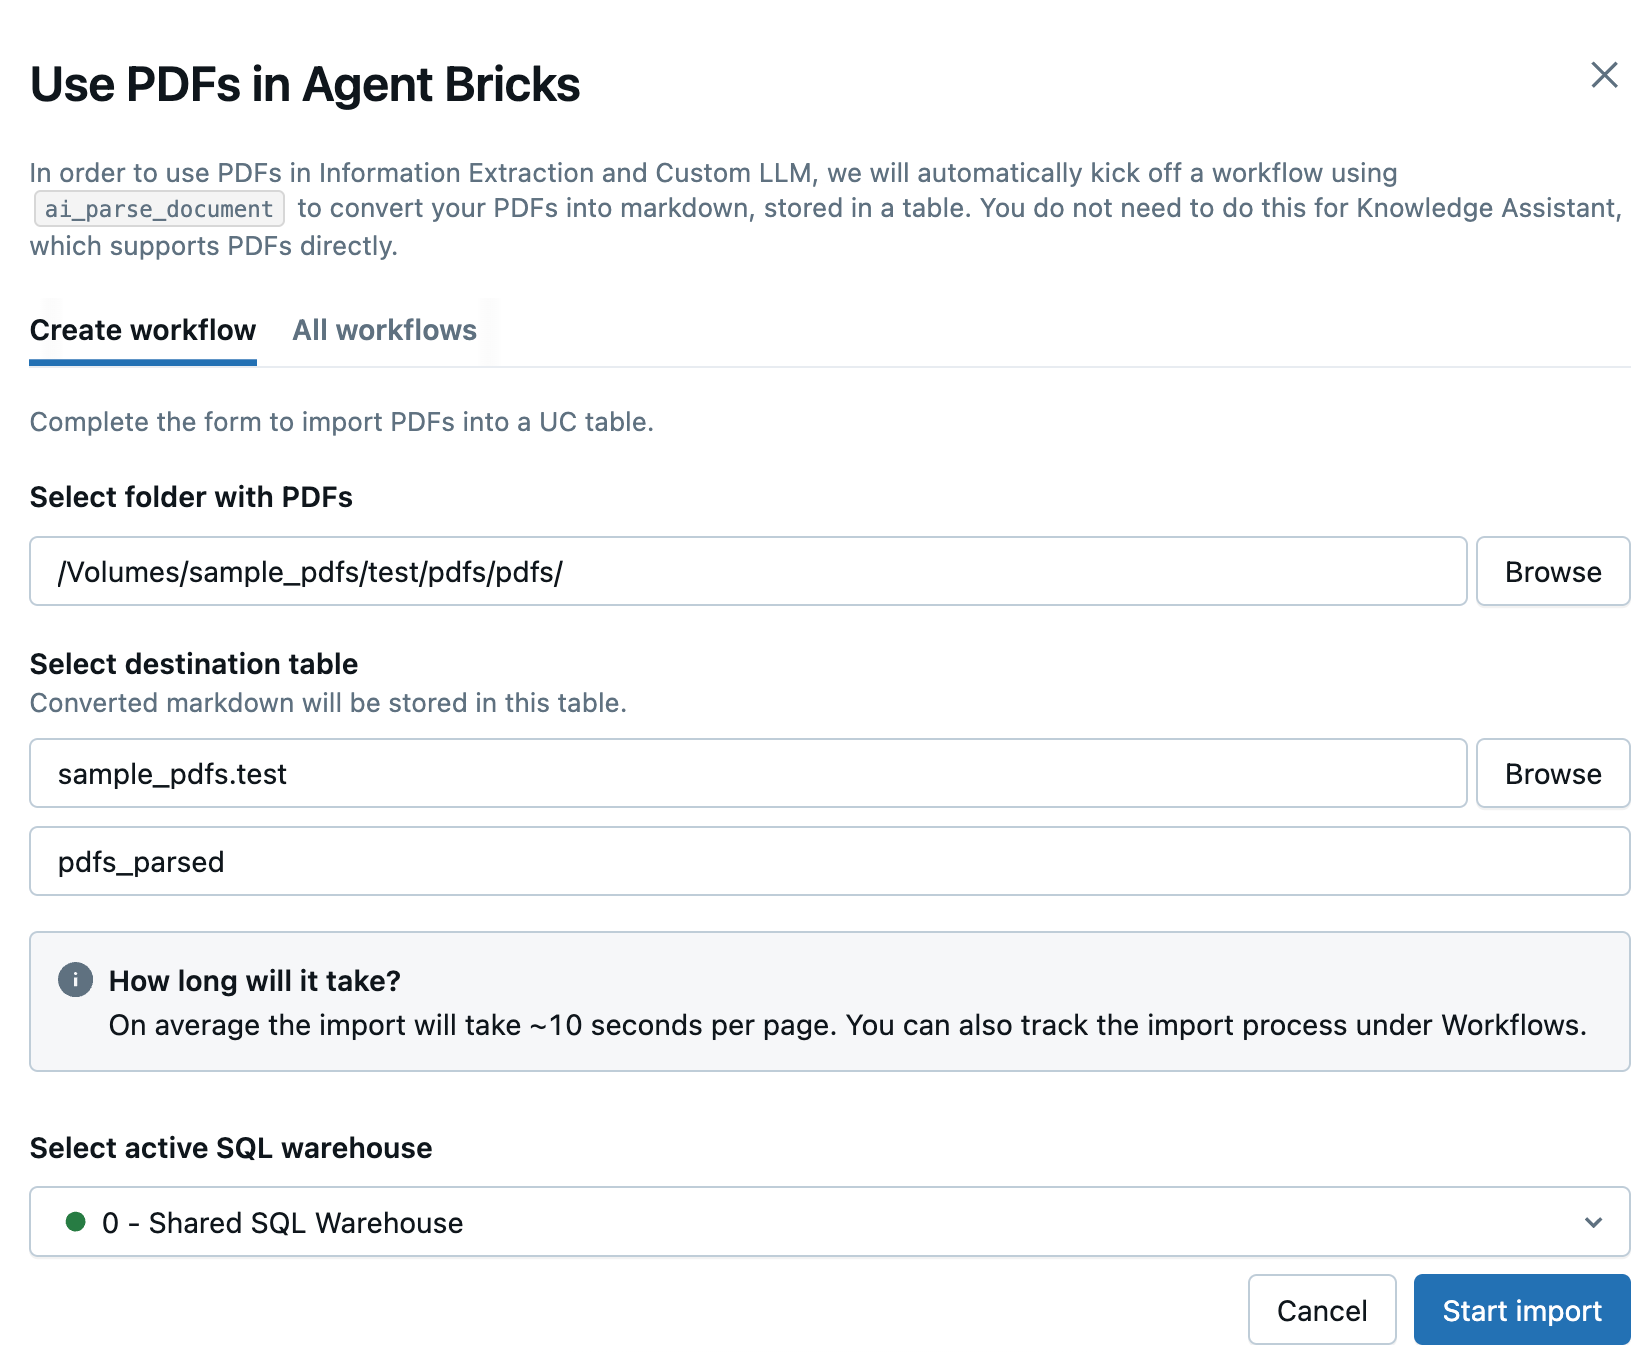
PDFs are not yet supported natively in Information Extraction and Custom LLM. However, you can use UI workflow to convert a folder of PDF files into markdown, then use the resulting Unity Catalog table as input when building your agent. This workflow uses ai_parse_document for the conversion. Follow these steps:
-
Click Agents in the left navigation pane.
-
In the Information Extraction or Custom LLM use cases, click Use PDFs.
-
In the side panel that opens, enter the following fields to create a new workflow to convert your PDFs:
- Select folder with PDFs or images: Select the Unity Catalog folder containing the PDFs you want to use.
- Select destination table: Select the destination schema for the converted markdown table and, optionally, adjust the table name in the field below.
- Select active SQL warehouse: Select the SQL warehouse to run the workflow.
-
Click Start import.
-
You will be redirected to the All workflows tab, which lists all of your PDF workflows. Use this tab to monitor the status of your jobs.
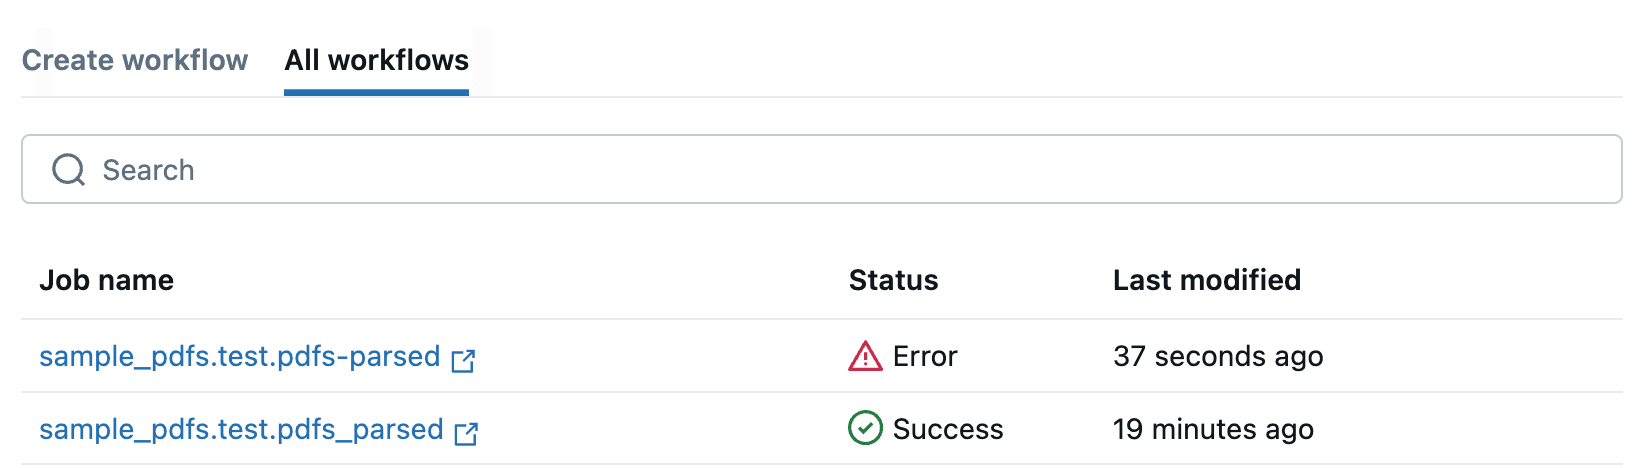
If your workflow fails, click on the job name to open it and view error messages to help you debug.
-
When your workflow has completed successfully, click on the job name to open the table in Catalog Explorer to explore and understand the columns.
-
Use the Unity Catalog table as input data when configuring your agent.
Limitations
- Information Extraction agents have a 128k token max context length.
- Workspaces that have Enhanced Security and Compliance enabled are not supported.
- Union schema types are not supported.