プロンプトの作成と編集
ベータ版
この機能はベータ版です。ワークスペース管理者は、 プレビュー ページからこの機能へのアクセスを制御できます。「Databricks プレビューの管理」を参照してください。
このページでは、MLflow Python SDK を使用して、MLflow プロンプト レジストリで新しいプロンプトを作成し、そのバージョンを管理する方法について説明します。これには、MLflow Python SDK と Databricks MLflow UI を使用する手順が含まれています。このページのコードはすべて、 サンプル ノートブックに含まれています。
前提 条件
-
MLflow と必要なパッケージをインストールする
Bashpip install --upgrade "mlflow[databricks]>=3.1.0" openai -
環境のセットアップのクイックスタートに従って、MLflowエクスペリメントを作成します。
-
プロンプトを格納するための Unity Catalog スキーマを作成または識別します。Unity Catalog スキーマに対する
CREATE FUNCTION、EXECUTE、およびMANAGEの権限が必要です。
プロンプトを表示または作成するには、 CREATE FUNCTION、 EXECUTE、および MANAGE のアクセス許可を持つ Unity Catalog スキーマが必要です。Databricks 試用版アカウントを使用している場合は、Unity Catalog スキーマ main.defaultに対する必要なアクセス許可があります。
ステップ1.新しいプロンプトを作成する
プロンプトは、Databricks MLflow UI で作成することも、MLflow Python SDK を使用してプログラムで作成することもできます。
Databricks MLflow UI を使用する
UI でプロンプトを作成するには:
-
MLflowエクスペリメントに移動します。
-
[ プロンプト] タブをクリックします。
![MLflow エクスペリメント ページに [プロンプト] タブが表示されます。](/aws/ja/assets/images/prompts-tab-63c6562246d66c015db8116a9df262f4.png)
-
 をクリックします。 ダイアログが表示されます。
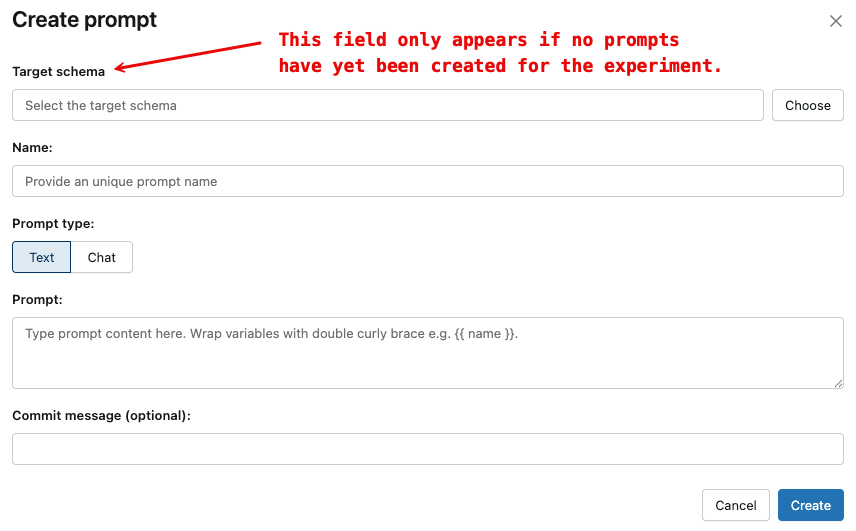
-
この拡張機能のスキーマをまだ選択していない場合、ダイアログに 「ターゲットスキーマ」 フィールドが表示されます。 スキーマを選択するには:
- 「ターゲットスキーマ」 フィールドの横にある 「選択」 をクリックして、スキーマ選択ツールを開きます。
- 選択画面で、使用したいスキーマを選択し、 「確認」 をクリックします。スキーマに対して、
CREATE FUNCTION、EXECUTE、MANAGEの権限が必要です。
-
「名前」 欄に、プロンプトの名前を入力します。プロンプト名には、文字、数字、ハイフン、アンダースコア、ドットのみを使用できます。
-
「プロンプトの種類」 には、以下のいずれかを選択してください。
- テキスト :単一のテキストテンプレート。入力式プロンプトに使用してください。
- チャット :役割に基づいたメッセージのリスト(例:
systemとuser)。会話モデルを対象としたチャット形式のプロンプトに使用してください。
-
「プロンプト」 欄に、プロンプトの内容を入力してください。
{{variable_name}}構文を使用して、ランタイム時に入力する変数を定義します。 -
(任意) コミットメッセージ 欄に、このバージョンの簡単な説明を入力してください。コミットメッセージはプロンプトバージョンと共に保存され、バージョン間の変更を追跡するのに役立ちます。
-
作成 をクリックします。
プロンプトが UI に表示されます。
Python SDK を使用する
-
mlflow.set_experiment_tagsエクスペリメント タグを設定することで、MLflowエクスペリメントをデフォルトのプロンプト・レジストリの場所にリンクします。これにより、SDK とツールは Unity Catalog プロンプト スキーマを自動的に推測できます。mlflow.promptRegistryLocationタグを値catalog.schemaで使用します。Pythonimport mlflow
# Link the current MLflow experiment to a UC schema for prompts
mlflow.set_experiment_tags({
"mlflow.promptRegistryLocation": "main.default"
}) -
mlflow.genai.register_prompt()を使用してプロンプトを作成します。プロンプトでは、テンプレート変数に二重中括弧構文 ({{variable}}) を使用します。Python# Replace with a Unity Catalog schema where you have CREATE FUNCTION, EXECUTE, and MANAGE privileges
uc_schema = "main.default"
# This table is created in the UC schema specified in the previous line
prompt_name = "summarization_prompt"
# Define the prompt template with variables
initial_template = """\
Summarize content you are provided with in {{num_sentences}} sentences.
Content: {{content}}
"""
# Register a new prompt
prompt = mlflow.genai.register_prompt(
name=f"{uc_schema}.{prompt_name}",
template=initial_template,
# all following parameters are optional
commit_message="Initial version of summarization prompt",
tags={
"author": "data-science-team@company.com",
"use_case": "document_summarization",
"task": "summarization",
"language": "en",
"model_compatibility": "gpt-4"
}
)
print(f"Created prompt '{prompt.name}' (version {prompt.version})")
ステップ 2: アプリケーションでプロンプトを使用する
次のステップでは、 Python SDK使用してプロンプト テンプレートを使用する簡単なアプリケーションを作成します。
レジストリからプロンプトを読み込む
# Load a specific version using URI syntax
prompt = mlflow.genai.load_prompt(name_or_uri=f"prompts:/{uc_schema}.{prompt_name}/1")

# Alternative syntax without URI
prompt = mlflow.genai.load_prompt(name_or_uri=f"{uc_schema}.{prompt_name}", version="1")
アプリケーションでプロンプトを使用する
- OpenAI クライアントを初期化して、Databricks でホストされている LLM または OpenAI でホストされている LLM に接続します。
- Databricks-hosted LLMs
- OpenAI-hosted LLMs
databricks-openaiを使用して、Databricks がホストする LLM に接続する OpenAI クライアントを取得します。利用可能なプラットフォームモデルからモデルを選択します。
import mlflow
from databricks_openai import DatabricksOpenAI

# Enable MLflow's autologging to instrument your application with Tracing
mlflow.openai.autolog()

# Set up MLflow tracking to Databricks
mlflow.set_tracking_uri("databricks")
mlflow.set_experiment("/Shared/docs-demo")

# Create an OpenAI client that is connected to Databricks-hosted LLMs
client = DatabricksOpenAI()

# Select an LLM
model_name = "databricks-claude-sonnet-4"
ネイティブの OpenAI SDK を使用して、OpenAI でホストされるモデルに接続します。利用可能なOpenAIモデルからモデルを選択します。
import mlflow
import os
import openai

# Ensure your OPENAI_API_KEY is set in your environment
# os.environ["OPENAI_API_KEY"] = "<YOUR_API_KEY>" # Uncomment and set if not globally configured

# Enable auto-tracing for OpenAI
mlflow.openai.autolog()

# Set up MLflow tracking to Databricks
mlflow.set_tracking_uri("databricks")
mlflow.set_experiment("/Shared/docs-demo")

# Create an OpenAI client connected to OpenAI SDKs
client = openai.OpenAI()

# Select an LLM
model_name = "gpt-4o-mini"
-
アプリケーションを定義します。
Python# Use the trace decorator to capture the application's entry point
@mlflow.trace
def my_app(content: str, num_sentences: int):
# Format with variables
formatted_prompt = prompt.format(
content=content,
num_sentences=num_sentences
)
response = client.chat.completions.create(
model=model_name, # This example uses a Databricks hosted LLM. You can replace this with any AI Gateway or Model Serving endpoint, or with a valid OpenAI model like gpt-4o.
messages=[
{
"role": "system",
"content": "You are a helpful assistant.",
},
{
"role": "user",
"content": formatted_prompt,
},
],
)
return response.choices[0].message.content
result = my_app(content="This guide shows you how to integrate prompts from the MLflow Prompt Registry into your GenAI applications. You'll learn to load prompts, format them with dynamic data, and ensure complete lineage by linking prompt versions to your MLflow Models.", num_sentences=1)
print(result)
ステップ3.プロンプトの編集
プロンプト バージョンは、作成後に不変になります。プロンプトを編集するには、新しいバージョンを作成する必要があります。このGitのようなバージョン管理により、完全な履歴が維持され、ロールバックが可能になります。
Databricks MLflow UI を使用する
新しいバージョンを作成するには:
-
「 プロンプト」 タブで、
 編集したいプロンプトの横にある をクリックします。
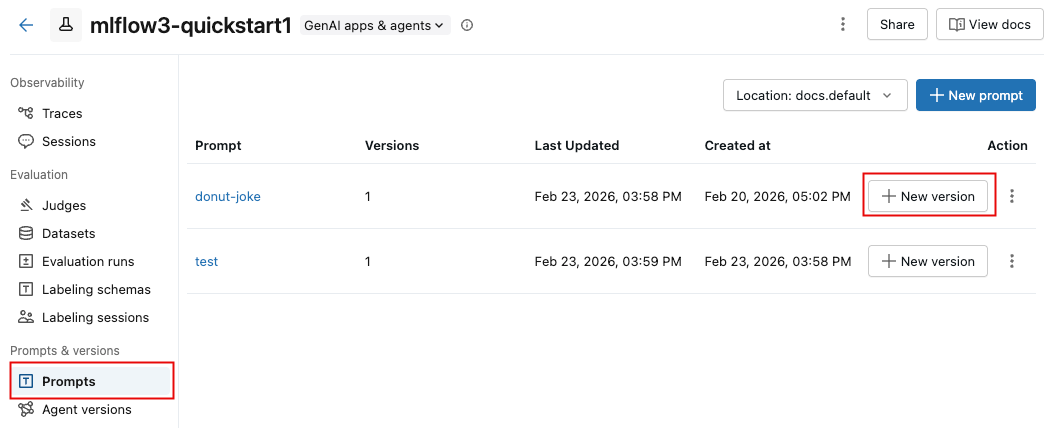
-
プロンプトを入力し、 「保存」 をクリックします。
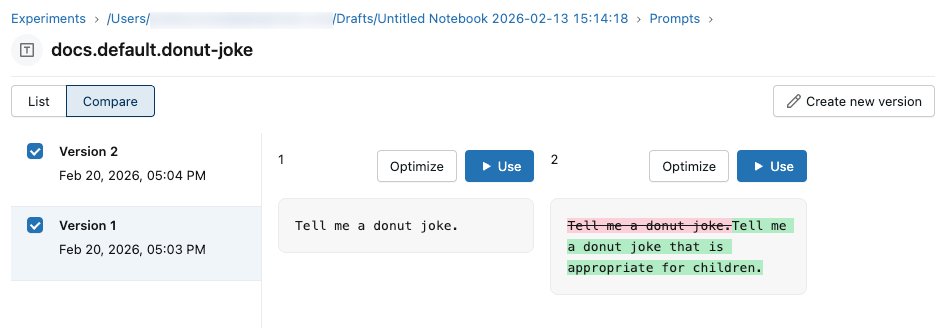
プロンプトバージョンを比較する
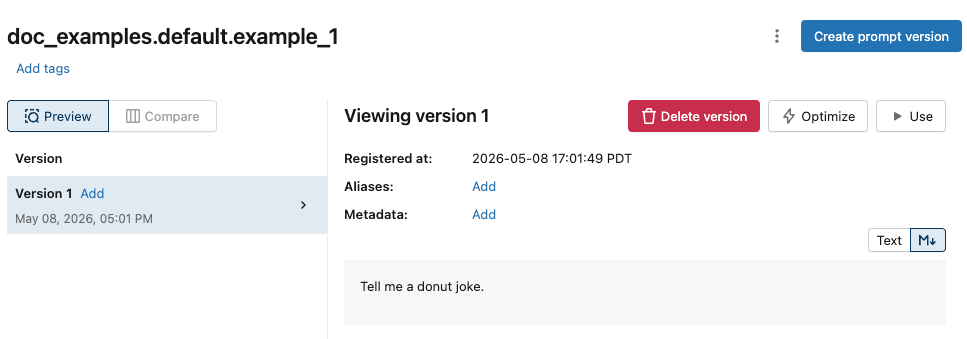
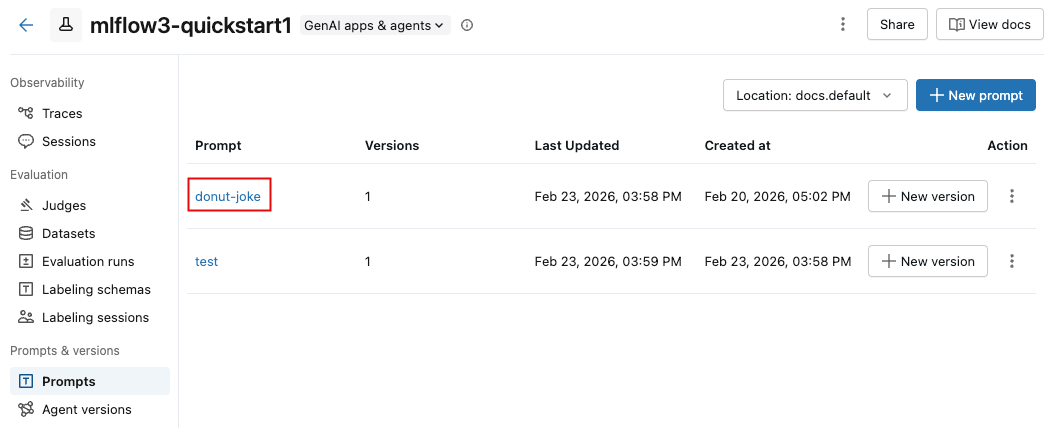
プロンプトのバージョンを比較するには:
-
[プロンプト] タブで、プロンプトの名前をクリックします。
-
左上の 「比較」 をクリックし、比較するバージョンを選択します。
Python SDK を使用する
既存のプロンプト名で mlflow.genai.register_prompt() を呼び出して、新しいバージョンを作成します。
import mlflow

# Define the improved template
new_template = """\
You are an expert summarizer. Condense the following content into exactly {{ num_sentences }} clear and informative sentences that capture the key points.

Content: {{content}}

Your summary should:
- Contain exactly {{num_sentences}} sentences
- Include only the most important information
- Be written in a neutral, objective tone
- Maintain the same level of formality as the original text
"""

# Register a new version
updated_prompt = mlflow.genai.register_prompt(
    name=f"{uc_schema}.{prompt_name}",
    template=new_template,
    commit_message="Added detailed instructions for better output quality",
    tags={
        "author": "data-science-team@company.com",
        "improvement": "Added specific guidelines for summary quality"
    }
)

print(f"Created version {updated_prompt.version} of '{updated_prompt.name}'")
ステップ4.新しいプロンプトを使用する
次のコードは、プロンプトの使用方法を示しています。
# Load a specific version using URI syntax
prompt = mlflow.genai.load_prompt(name_or_uri=f"prompts:/{uc_schema}.{prompt_name}/2")

# Or load from specific version
prompt = mlflow.genai.load_prompt(name_or_uri=f"{uc_schema}.{prompt_name}", version="2")
ステップ5.プロンプトの検索と検出
Unity Catalog スキーマでプロンプトを検索するには、次のようにします。
# REQUIRED format for Unity Catalog - specify catalog and schema
results = mlflow.genai.search_prompts("catalog = 'main' AND schema = 'default'")

# Using variables for your schema
catalog_name = uc_schema.split('.')[0]  # 'main'
schema_name = uc_schema.split('.')[1]   # 'default'
results = mlflow.genai.search_prompts(f"catalog = '{catalog_name}' AND schema = '{schema_name}'")

# Limit results
results = mlflow.genai.search_prompts(
    filter_string=f"catalog = '{catalog_name}' AND schema = '{schema_name}'",
    max_results=50
)
ノートブックの例
プロンプトの作成と編集のサンプル ノートブック
その他のリソース
- プロンプト・バージョンの評価 - 異なるプロンプト・バージョンを比較して、最適なパフォーマンスを特定します。
- アプリのバージョンでプロンプトを追跡する - プロンプトのバージョンをアプリケーションのバージョンにリンクします。
- デプロイされたアプリでプロンプトを使用する - エイリアスを使用して、プロンプトを本番運用にデプロイします。