Connect MCPs to AI assistants and coding agents
The Databricks MCPs you can connect to are in different release stages. See managed MCP servers, MCP Services, and Databricks-hosted MCP servers for each feature's current stage.
Connect clients, AI assistants, and IDEs that support Model Context Protocol (MCP) to Databricks MCPs. This provides access to Databricks data and tools directly in your development environment.
By connecting clients to Databricks MCPs, you can:
- Access Unity Catalog functions, tables, and vector indexes from your IDE or AI assistant
- Query Databricks data directly from Claude, Claude Code, Cursor, Replit, or other MCP-enabled tools
How it works
Every client connects to Databricks MCPs the same way: add the server URL to the client's MCP configuration, authenticate with OAuth or a personal access token, and the client calls tools over Streamable HTTP. The URL determines which MCP you reach—a managed MCP server for Unity Catalog data and tools, an MCP Service for external tools, or your own Databricks-hosted MCP server:

Prerequisites
- Server URLs: Get the appropriate server URLs for the Databricks MCP server you want to use:
- Managed MCP servers for Databricks data and code
- MCP Services for third-party apps like Slack, GitHub, and Google Drive
- Databricks-hosted MCP servers for your own MCP server on Databricks Apps
- Resource access: Verify that you have access to the MCP servers you want to use and any underlying resources. For example, if you use the Genie managed MCP server, you need access to the underlying Genie Space.
- Network access: If your Databricks workspace has IP access restrictions, add your client's outbound IP addresses to the allowlist to enable it to connect to your workspace:
- Follow the documentation for workspace IP access lists and account IP access lists to check whether you have any restrictions in place
- If IP access lists are enabled, identify your client's outbound IPs. This information is usually available in client documentation; for example, Claude documents its outbound IP addresses here.
- Ensure that your client's outbound IPs are added to the list.
Authentication methods
Choose the authentication method that best fits your security requirements:
Method | Managed MCP servers and MCP Services | Databricks-hosted MCP server | Security level | Best for |
|---|---|---|---|---|
OAuth (recommended) | Supported | Supported | High - scoped permissions, automatic token refresh | Production use, team environments, long-term access |
Personal access tokens | Supported | Not supported | Medium - token-based access with expiration | Individual development, testing, short-term access |
Connect clients using OAuth authentication
OAuth provides secure authentication with scoped permissions and automatic token refresh.
Databricks MCP servers support both client types per the MCP Authorization specification:
- Public clients: No client secret required
- Confidential clients: Include client secret
Get your client's OAuth redirect URL
Each MCP client requires specific OAuth redirect URLs for authentication callbacks. Common redirect URL patterns include:
- Web-based clients:
https://<domain>/oauth/callbackorhttps://<domain>/api/mcp/auth_callback - Local development tools:
http://localhost:<port>/oauth/callback
Check your client's documentation to find the exact redirect URLs required.
Create the Databricks OAuth application
Have an account admin create a Databricks OAuth application. Retrieve its client ID, and if your client requires it, the client secret.
- UI-based (Account Console)
- CLI
Create a Databricks OAuth application using the account console:
- In the Databricks account console, go to Settings > App Connections > Add connection.
- Configure the application settings:
- Name: Enter a descriptive name for your OAuth application (for example,
claude-mcp-client,mcp-inspector) - Redirect URLs: Add the redirect URLs required by your external client
- Client type: For public clients (browser-based, mobile), uncheck Generate a client secret. For confidential clients (server-side), keep it checked.
- Scopes: Configure the API scopes (see the Databricks OAuth scopes reference for available scopes)
- Token expiration: Set appropriate token access and refresh times
- Name: Enter a descriptive name for your OAuth application (for example,
Create a Databricks OAuth application using the Databricks CLI. Use the Use granular scopes: For more restrictive access following the principle of least privilege To specify more restrictive access, use granular scopes instead of On success, the CLI returns a response containing your client credentials: Replace all-apis scopecustom-app-integration is an account-level command, so it doesn't work with workspace credentials. Authenticate against the account console as an account admin first with databricks auth login --host <account-console-url> --account-id <account-id>.databricks account custom-app-integration create --json '{
"name": "mcp-oauth-client",
"redirect_urls": ["https://<your-client-redirect-url>"],
"confidential": false,
"scopes": ["all-apis"],
"token_access_policy": {
"access_token_ttl_in_minutes": 60,
"refresh_token_ttl_in_minutes": 10080
}
}'all-apis. This example creates a public OAuth app with scopes for Genie and Unity Catalog:databricks account custom-app-integration create --json '{
"name": "mcp-public-oauth-app",
"redirect_urls": ["https://<your-client-redirect-url>"],
"confidential": false,
"scopes": ["genie", "unity-catalog", "offline_access"],
"token_access_policy": {
"access_token_ttl_in_minutes": 60,
"refresh_token_ttl_in_minutes": 10080
}
}'{
"client_id": "<your-client-id>",
"client_secret": "",
"integration_id": "<your-integration-id>"
}<your-client-redirect-url> with your client's actual redirect URL. See the Databricks OAuth scopes reference for a list of available scopes.
Configure network access (optional)
If your Databricks workspace has IP access restrictions, add your client's outbound IP addresses to the workspace allowlist. Otherwise, the workspace blocks authentication requests from your client. See Manage IP access lists.
Configure your client
After creating the OAuth application in Databricks, configure your specific MCP client with the OAuth credentials. Each client has its own configuration method. See the following platform-specific examples for detailed instructions for popular MCP clients.
OAuth examples
The following examples show how to configure specific MCP clients with OAuth authentication. Follow the generic OAuth setup steps in the previous section first, then use these examples to configure your specific client.
- MCP Inspector
- Claude Connectors
- Claude Code
- ChatGPT apps
- Cursor/Windsurf
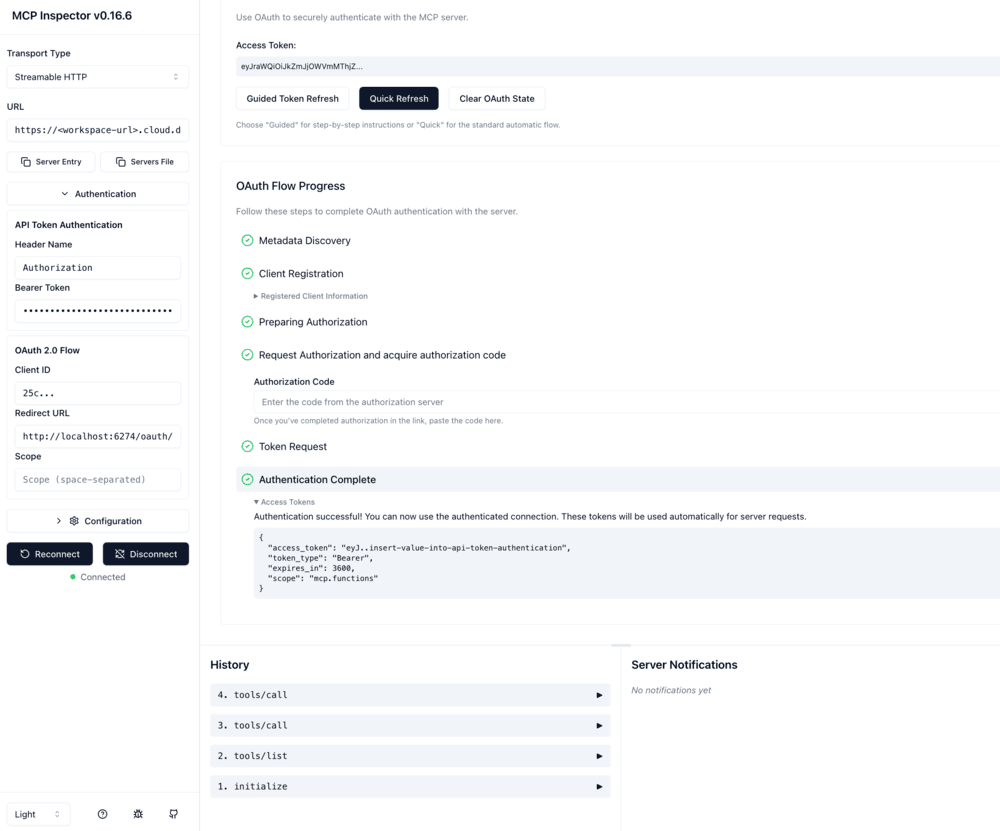
The MCP Inspector is a developer tool for testing and debugging MCP servers.

Follow the OAuth authentication setup above with these Inspector-specific settings:
- Redirect URLs:
http://localhost:6274/oauth/callbackhttp://localhost:6274/oauth/callback/debug
- Client type: Public (uncheck Generate a client secret)
Configure MCP Inspector:
- Run the inspector:
npx @modelcontextprotocol/inspector. - Set Transport Type to
Streamable HTTP. - Enter your Databricks MCP server URL.
- In the Authentication section, add your OAuth client ID.
- Click Open Auth Settings and choose Guided or Quick flow.
- After successful authentication, paste the access token in Bearer Token under the API Token Authentication section.
- Click Connect.
Connect Claude to Databricks managed MCP servers and MCP Services using Claude Connectors with Remote MCP.
Follow the OAuth authentication setup above with these Claude-specific settings:
- Redirect URL:
https://claude.ai/api/mcp/auth_callbackandhttps://claude.com/api/mcp/auth_callback - IP allowlist (if needed): Add Claude's outbound IP addresses
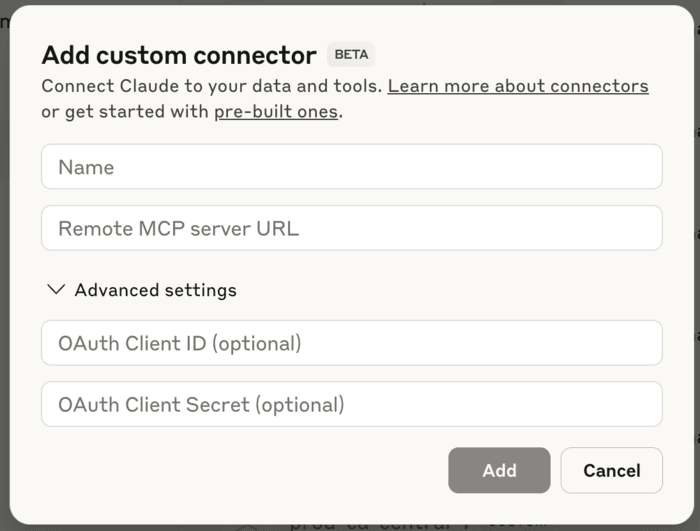
Configure Claude:
- Go to Settings > Connectors in Claude.
- Click Add custom connector.
- Enter your Databricks MCP server URL.
- Enter your OAuth application's client ID (and client secret if your Databricks OAuth app connection is a confidential client).
- Click Add to finish.
Connect Claude Code to Databricks MCP servers using a static OAuth client configuration.
Follow the OAuth authentication setup above with these Claude Code-specific settings:
- Redirect URL:
http://localhost:8080/callback(match the callback port value in your Claude Code configuration)
Configure Claude Code:
-
Run the following command in your terminal, replacing the placeholder values:
Bashclaude mcp add-json databricks-mcp-server \
'{"type":"http","url":"https://<your-workspace-hostname>/api/2.0/mcp/functions/{catalog_name}/{schema_name}","oauth":{"clientId":"<your-client-id>","callbackPort":8080}}' \
--client-secret <your-client-secret> -
Replace
<your-workspace-hostname>with your Databricks workspace hostname. -
Replace
<your-client-id>with your OAuth application's client ID. -
Replace
<your-client-secret>with your OAuth application's client secret (if using a confidential client). -
Adapt the URL path for your chosen MCP server.
Connect ChatGPT to Databricks managed MCP servers and MCP Services using Custom ChatGPT apps with Developer Mode and Full MCP apps.
Adding custom ChatGPT apps requires:
- Developer Mode turned on
- A ChatGPT Business, Enterprise, or Edu workspace
Follow the OAuth authentication setup above with these ChatGPT-specific settings:
- Redirect URL:
https://chatgpt.com/connector_platform_oauth_redirect - IP allowlist: Add ChatGPT's outbound IP addresses
Configure ChatGPT:
- In ChatGPT, go to Settings > Apps > Create App.
- Enter your Databricks MCP server URL.
- Use OAuth as the Authentication method.
- Enter your OAuth application's client ID and secret (if applicable).
- Complete the configuration and save your app.
To connect a local IDE like Cursor or Windsurf to a Databricks MCP server, add your MCP server to your MCP configuration file.
-
Locate your MCP configuration file:
- Cursor:
~/.cursor/mcp.json - Windsurf:
~/.codeium/windsurf/mcp_config.json
- Cursor:
-
Add one of the following configurations. If you already use the Databricks CLI, use the CLI authentication option. Otherwise, use the OAuth option that matches your client type.
Databricks CLI authentication — recommended if you don't want to setup the OAuth app
You already have the Databricks CLI installed and configured. Use uc-mcp-proxy, a lightweight stdio proxy that uses your existing Databricks CLI credentials instead of the standard MCP OAuth flow, bypassing the need for OAuth redirect URLs.
Prerequisites:
- Databricks CLI installed and authenticated (
databricks auth login) - uv installed
{
  "mcpServers": {
    "databricks-mcp-server": {
      "type": "stdio",
      "command": "uvx",
      "args": [
        "uc-mcp-proxy",
        "--url",
        "https://<your-workspace-hostname>/api/2.0/mcp/functions/system/ai",
        "--auth-type",
        "databricks-cli",
        "--profile",
        "${DATABRICKS_CONFIG_PROFILE:-DEFAULT}"
      ]
    }
  }
}
Replace <your-workspace-hostname> with your Databricks workspace hostname. The proxy retrieves and refreshes tokens from the Databricks CLI's credential store and forwards them as Bearer tokens to the MCP endpoint.
See the Claude Marketplace Databricks MCP plugin for an example configuration using uc-mcp-proxy.
Confidential OAuth client (with client secret) — recommended for server-side or automated use
You have a registered OAuth app with a client secret (typically provisioned by an admin). Use mcp-remote with OAuth. Follow the mcp-remote repo instructions to set up mcp-remote, then follow the OAuth authentication setup to configure your credentials.
{
  "mcpServers": {
    "databricks-mcp-server": {
      "command": "npx",
      "args": [
        "mcp-remote",
        "https://<your-workspace-hostname>/api/2.0/mcp/functions/system/ai",
        "--static-oauth-client-info",
        "{ \"client_id\": \"$MCP_REMOTE_CLIENT_ID\" }",
        "--client-secret"
      ]
    }
  }
}
Replace <your-workspace-hostname> with your Databricks workspace hostname. Set the environment variables MCP_REMOTE_CLIENT_ID with your OAuth client ID and MCP_REMOTE_CLIENT_SECRET with your client secret.
Public OAuth client (without client secret) — recommended for personal or interactive use
You want to use OAuth but don't have (or don't want to manage) a client secret. Use mcp-remote with OAuth. Follow the mcp-remote repo instructions to set up mcp-remote, then follow the OAuth authentication setup to configure your credentials.
{
  "mcpServers": {
    "databricks-mcp-server": {
      "command": "npx",
      "args": [
        "mcp-remote",
        "https://<your-workspace-hostname>/api/2.0/mcp/functions/system/ai",
        "--static-oauth-client-info",
        "{ \"client_id\": \"$MCP_REMOTE_CLIENT_ID\" }"
      ]
    }
  }
}
Replace <your-workspace-hostname> with your Databricks workspace hostname. Set the environment variable MCP_REMOTE_CLIENT_ID with your OAuth client ID.
Connect clients using personal access token (PAT) authentication
Personal access tokens provide a simpler authentication method suitable for individual development, testing, and short-term access to Databricks MCP servers.
Personal access tokens are only supported for managed MCP servers and MCP Services. Databricks-hosted MCP servers require OAuth authentication.
For MCP Services, generate a token from the service detail page:
- In your workspace, open the MCP Service in Catalog Explorer, or go to AI Gateway > MCPs and select the service.
- In Get started, click Generate Access Token.
- Copy the generated
export DATABRICKS_TOKEN=...command into your terminal. The token is also added to the request examples on the page.
Use this token for local testing and choose the shortest lifetime that fits your workflow. Don't commit tokens to source control or share them in client configuration files. For production or team-wide client connections, use OAuth instead of a PAT.
-
Generate a personal access token in your Databricks workspace. See Authenticate with Databricks personal access tokens (legacy).
-
Configure network access (optional).
If your Databricks workspace has IP access restrictions, add your client's outbound IP addresses to the allowlist. Consult your client's documentation or your deployment environment's network configuration to obtain the required IP addresses.
-
Configure your client.
After generating the PAT, configure your MCP client to use it for authentication. Each client has its own configuration method. See the platform-specific examples below for detailed instructions for popular MCP clients.
When a client asks for custom headers, pass the token as a bearer token in the
Authorizationheader:Authorization: Bearer <YOUR_TOKEN>.
PAT examples
The following examples show how to configure specific MCP clients with personal access token authentication. Follow the PAT authentication setup above first, then use these examples to configure your specific client.
- Cursor
- Claude Desktop
- Replit
Cursor supports MCP through its settings configuration.
-
Open your Cursor settings.
-
Add the following configuration (adapt the URL for your chosen MCP server):
JSON{
"mcpServers": {
"uc-function-mcp": {
"type": "streamable-http",
"url": "https://<your-workspace-hostname>/api/2.0/mcp/functions/{catalog_name}/{schema_name}",
"headers": {
"Authorization": "Bearer <YOUR_TOKEN>"
},
"note": "Databricks UC function"
}
}
} -
Replace
<your-workspace-hostname>with your Databricks workspace hostname. -
Replace
<YOUR_TOKEN>with your personal access token.
Claude Desktop can connect to Databricks MCP servers using mcp-remote.
-
Locate your
claude_desktop_config.jsonfile:- macOS:
~/Library/Application Support/Claude/claude_desktop_config.json - Windows:
%APPDATA%\Claude\claude_desktop_config.json
- macOS:
-
Add the following configuration (adapt the URL for your chosen MCP server):
JSON{
"mcpServers": {
"uc-function-mcp": {
"command": "npx",
"args": [
"mcp-remote",
"https://<your-workspace-hostname>/api/2.0/mcp/functions/{catalog_name}/{schema_name}",
"--header",
"Authorization: Bearer <YOUR_TOKEN>"
]
}
}
} -
Replace
<your-workspace-hostname>with your Databricks workspace hostname. -
Replace
<YOUR_TOKEN>with your personal access token. -
Restart Claude Desktop for the changes to take effect.
Replit supports connecting to Databricks MCP servers through custom MCP server configuration.
-
In your Replit workspace, click Add MCP Server.
-
Enter your Databricks MCP server URL, for example:
https://<your-workspace-hostname>/api/2.0/mcp/genie/{genie_space_id} -
Add a custom header:
- Key:
Authorization - Value:
Bearer <YOUR_TOKEN>
- Key:
Troubleshoot connection issues
Follow these troubleshooting steps to diagnose and resolve common connection problems.
Validate authentication
Verify that your authentication credentials are configured correctly before testing the connection.
- OAuth user-to-machine (U2M)
- Service principal (M2M)
For OAuth user-to-machine (U2M) authentication, test the connection with MCP Inspector. The OAuth flow validates credentials during the connection process.
For service principal authentication with machine-to-machine (M2M) OAuth, test your credentials using the Databricks CLI.
DATABRICKS_CLIENT_ID=<your-client-id> DATABRICKS_CLIENT_SECRET=<your-client-secret> databricks auth describe
This command validates your service principal configuration and displays information about the authenticated identity. If the command returns an error, review your service principal setup and ensure:
- The service principal has been created in your Databricks account
- Client ID and client secret are correctly configured
- The service principal has appropriate permissions to access the required resources
Verify network configuration
Network restrictions can prevent external clients from connecting to your Databricks workspace. Ensure that any Databricks IP access list policies are configured to allow your client to connect to your Databricks account and workspace. See Prerequisites.
Identify client-specific connection issues
Try connecting with a different MCP client to see if the problem persists. Databricks recommends testing with the MCP Inspector. If your connection works with MCP inspector but fails with your client, the issue is likely with your client setup. Contact the client provider for more support.
Report issues to Databricks support
If you continue to experience connection issues after completing these troubleshooting steps:
-
Review the logs from your MCP client, such as Claude, Cursor, or MCP Inspector, for error messages and stack traces.
-
Gather the following diagnostic information:
- Authentication method used (OAuth or PAT)
- MCP server URL
- Error messages from the client
- Network configuration details (IP restrictions, firewall rules)
-
Contact support and share the diagnostic information to resolve the issue.
Limitations
- Dynamic client registration: Databricks does not support dynamic client registration OAuth flows for managed MCP servers, MCP Services, or Databricks-hosted MCP servers. External clients and IDEs that mandate Dynamic Client Registration are not supported using OAuth authentication.
- Personal access token support for Databricks-hosted MCP servers: MCP servers you host on Databricks Apps do not support personal access tokens for authentication.
Additional resources
- Use managed MCP servers to connect agents to Unity Catalog data
- Connect agents to third-party tools with MCP Services to access third-party services
- Host your own MCP server for organization-specific tools