Use Databricks Asset Bundles with version 2 of the extension

Note

The Databricks extension for Visual Studio Code, version 2 is in Private Preview.

The Databricks extension for Visual Studio Code, version 2 enables you to use Visual Studio Code to define, deploy, and run Databricks Asset Bundles by applying CI/CD patterns and best practices to your Databricks jobs, Delta Live Tables pipelines, and MLOps Stacks. See What are Databricks Asset Bundles?.

Databricks Asset Bundles support in projects

The Databricks extension for Visual Studio Code, version 2, adds the following support for Databricks Asset Bundles to your code projects:

  • A databricks.yml file describes your Databricks Asset Bundle’s settings in YAML format. You can use the Visual Studio Code editor to edit this YAML. For information about the YAML syntax, see Databricks Asset Bundle configurations.

  • A DABs Resource Explorer pane appears in the Databricks extension view, which enables you to browse your Databricks Asset Bundle’s resources visually, deploy your local Databricks Asset Bundle’s resources to your remote Databricks workspace with a single click, and go directly to your deployed resources in your workspace from Visual Studio Code. See Use the DABs Resource Explorer.

DABs Resource Explorer

Do one of the following:

Open an existing Databricks Asset Bundles project

If you have an existing Databricks Asset Bundles project, you can open it with Databricks extension for Visual Studio Code, version 2 as follows:

Note

The project must have a databricks.yml file in the project’s root folder. See Databricks Asset Bundle configurations.

  1. Install and set up the Databricks extension for Visual Studio Code, version 2. See Install and open the Databricks extension for Visual Studio Code, version 2.

  2. With the version 2 extension active, open your existing Databricks Asset Bundles project: on the main menu, click File > Open Folder and follow the on-screen instructions.

  3. The extension scans the project’s databricks.yml file and uses it to try to find a matching Databricks authentication configuration profile on your local development machine to use (which is typically in a .databrickscfg file in ~ on Linux or macOS or in %USERPROFILE% on Windows).

    • If the extension finds a matching profile, then skip ahead to step 12 where you will add cluster information to the extension.

    • If the extension cannot find a matching profile, continue with the following steps.

  4. In the Configuration pane, click Login to Databricks.

    Login to Databricks
  5. In the Command Palette, if you already have an authentication configuration profile in this list that has the label Authenticate using OAuth (User to Machine) label and that you know corresponds to the target Databricks host, select it from the list, and then do the following:

    1. If prompted, complete any on-screen instructions in your web browser to finish authenticating with Databricks.

    2. If also prompted, allow all-apis access.

    3. After you have successfully logged in, return to Visual Studio Code.

    4. Skip ahead to step 12 where you will add cluster information to the extension.

    Note

    Databricks recommends that you use OAuth user-to-machine (U2M) authentication to get started quickly. To use other authentication types, see Authentication setup for the Databricks extension for VS Code.

  6. For Select authentication method, select OAuth (user to machine). To use other authentication types, see Authentication setup for the Databricks extension for VS Code.

  7. Enter some name for the associated Databricks authentication profile.

  8. In the Configuration pane, click Login to Databricks.

    Login to Databricks
  9. In the Command Palette, for Select authentication method, select the name of the authentication configuration profile that you just created.

  10. If prompted, complete any on-screen instructions in your web browser to finish authenticating with Databricks. If also prompted, allow all-apis access.

  11. After you have successfully logged in, return to Visual Studio Code.

  12. Click Select a cluster, and then click the gear (Configure cluster) icon.

    Configure cluster
  13. In the Command Palette, select an existing cluster, or click Create New Cluster and follow the on-screen directions.

  14. Continue with Use the DABs Resource Explorer.

Add Databricks Asset Bundles support to a project

The following procedure adds basic support for Databricks Asset Bundles to an existing code project. Support is limited to a single databricks.yml file that specifies a deployment target but no resources such as Databricks jobs, Delta Live Tables pipelines, Python packages, or MLOps Stacks. To specify resources, in addition to a deployment target, skip ahead to Create a new Databricks Asset Bundles project.

  1. Install and set up the Databricks extension for Visual Studio Code, version 2. See Install and open the Databricks extension for Visual Studio Code, version 2.

  2. With the extension active, open your existing code project: on the main menu, click File > Open Folder and follow the on-screen instructions. The extension adds the databricks.yml file to the project’s root folder.

  3. The extension scans the project to try to find a matching Databricks authentication configuration profile on your local development machine to use (which is typically in a .databrickscfg file in ~ on Linux or macOS or in %USERPROFILE% on Windows).

    • If the extension finds a matching profile, then skip ahead to step 13 where you will add cluster information to the extension.

    • If the extension cannot find a matching profile, continue with the following steps.

    Note

    If a Login to Databricks entry appears in the Configuration pane, click it, and skip ahead to step 10 where you will log in.

    Login to Databricks
  4. In the Configuration pane, click Initialize Project.

    Initialize project
  5. In the Command Palette, for Databricks Host, enter your workspace instance URL, for example https://dbc-a1b2345c-d6e7.cloud.databricks.com. Then press Enter.

  6. If you already have an authentication configuration profile in this list that has the label Authenticate using OAuth (User to Machine) label and that you know corresponds to the target Databricks host, select it from the list, and then do the following:

    1. If prompted, complete any on-screen instructions in your web browser to finish authenticating with Databricks.

    2. If also prompted, allow all-apis access.

    3. After you have successfully logged in, return to Visual Studio Code.

    4. Skip ahead to step 13 where you will add cluster information to the extension.

    Note

    Databricks recommends that you use OAuth user-to-machine (U2M) authentication to get started quickly. To use other authentication types, see Authentication setup for the Databricks extension for VS Code.

  7. For Select authentication method, select OAuth (user to machine).

  8. Enter some name for the associated Databricks authentication profile.

  9. In the Configuration pane, click Login to Databricks.

    Login to Databricks
  10. In the Command Palette, for Select authentication method, select the name of the authentication configuration profile that you just created.

  11. If prompted, complete any on-screen instructions in your web browser to finish authenticating with Databricks. If also prompted, allow all-apis access.

  12. After you have successfully logged in, return to Visual Studio Code.

  13. Click Select a cluster, and then click the gear (Configure cluster) icon.

    Configure cluster
  14. In the Command Palette, select an existing cluster, or click Create New Cluster and follow the on-screen directions.

  15. Continue with Use the DABs Resource Explorer.

Create a new Databricks Asset Bundles project

  1. Install and set up the Databricks extension for Visual Studio Code, version 2. See Install and open the Databricks extension for Visual Studio Code, version 2.

  2. With the extension active, do one of the following:

    • With no folders open in Visual Studio Code, in the Configuration pane, click Initialize Project, and select a parent folder for the new project.

      Initialize project
    • With a folder already open in Visual Studio Code, in the Configuration pane, click the folder (Initialize new project) icon.

      Initialize new project
  3. In the Command Palette, choose to use your current authentication configuration profile or create a new profile. If you choose to use your current profile, complete any on-screen instructions, and then skip ahead to step 8 where you will select the path on your local development machine to create the project in.

  4. For Databricks Host, enter your workspace instance URL, for example https://dbc-a1b2345c-d6e7.cloud.databricks.com. Then press Enter.

  5. If you already have an authentication configuration profile in this list that has the label Authenticate using OAuth (User to Machine) label and that you know corresponds to the target Databricks host, select it from the list, and then do the following:

    1. If prompted, complete any on-screen instructions in your web browser to finish authenticating with Databricks.

    2. If also prompted, allow all-apis access.

    3. Skip ahead to step 8 where you will select the path on your local development machine to create the project in.

    Note

    Databricks recommends that you use OAuth user-to-machine (U2M) authentication to get started quickly. To use other authentication types, see Authentication setup for the Databricks extension for VS Code.

  6. For Select authentication method, select OAuth (user to machine).

  7. For Enter a name for the new profile, type some name for this new authentication configuration profile that’s easy for you to remember, and then press Enter.

  8. If Provide a path to a folder where you would want your new project to be appears, enter the path to a folder on your local development computer where you want to create the project, or click Open folder selection dialog and select the path to the project folder.

  9. In the Databricks Project Init editor tab, for Template to use, use Up Arrow or Down Arrow to select one of the available Databricks Asset Bundle project templates to use, and then press Enter. This procedure uses the default-python project template. For information about these templates, see the following:

    For information about this template…

    See…

    default-python

    Develop a job on Databricks by using Databricks Asset Bundles, Develop Delta Live Tables pipelines with Databricks Asset Bundles, and Develop a Python wheel file using Databricks Asset Bundles

    mlops-stacks

    Databricks Asset Bundles for MLOps Stacks

  10. For Unique name for this project, type some name for this project and then press Enter, or leave the default project name of my_project by pressing Enter.

  11. Choose whether to add a stub (sample) notebook, a stub (sample) Delta Live Tables pipeline, or a stub (sample) Python package to the project, or any combination of these stubs (samples).

  12. Press any key to close the Databricks Project Init editor tab.

  13. For Select the project you want to open, choose the path to the folder that you specified in step 8.

  14. Continue with Use the DABs Resource Explorer.

Use the DABs Resource Explorer

The DABs Resource Explorer pane in the Databricks extension for Visual Studio Code, version 2 uses the databricks.yml file in the root of your code project to show your Databricks Asset Bundle’s resources visually and allows you to deploy and go to resources in your remote Databricks workspace.

DABs Resource Explorer

Note

The following information describes a simple databricks.yml file. If you followed the steps in Create a new Databricks Asset Bundles project, the databricks.yml might have additional content, and your databricks.yml file might depend on additional files as specified in its include mapping.

For example, a simple Databricks Asset Bundle definition might look like the following in a single databricks.yml file. In this file, note the following placeholders:

  • <bundle-name> is the name of the Databricks Asset Bundle, which by default matches the code project’s root folder name. It should already be filled in.

  • <cluster-id> is the ID of the cluster that you selected earlier in this article. You must manually replace this placeholder with that cluster’s ID.

  • <workspace-host-url> is the URL to your Databricks workspace, which by default matches the URL that you entered when you added Databricks Asset Bundles support to your project earlier in this article. It should already be filled in.

bundle:
  name: <bundle-name>

resources:
  jobs:
    my-notebook-job:
      name: "My Notebook Job"
      tasks:
        - task_key: my-notebook-task
          existing_cluster_id: <cluster-id>
          notebook_task:
            notebook_path: notebooks/my-notebook.py
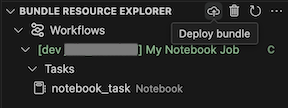
targets:
  dev:
    mode: development
    default: true
    workspace:
      host: <workspace-host-url>

For information about the YAML syntax, see Databricks Asset Bundle configurations.

For this Databricks Asset Bundle to work correctly, you must add a file named my-notebook.py to a folder named notebooks. This notebooks folder must be in the same folder as your databricks.yaml file, as defined by the relative path in notebook_path. The my-notebook.py file can be as simple as the following, which is a notebook that just prints the string Hello, World!:

# Databricks notebook source
print("Hello, World!")

After you save the my-notebook.py and databricks.yml files in your code project, the DABs Resource Explorer pane in the extension should now show a graphical representation of your Databricks Asset Bundle’s resources.

DABs Resource Explorer

To deploy the Databricks Asset Bundle, in the DABs Resource Explorer pane, click the cloud (Deploy bundle) icon.

Deploy bundle

To run the job, in the DABs Resource Explorer pane, click My Notebook Job, and then click the play (Deploy the bundle and run the resource) icon.
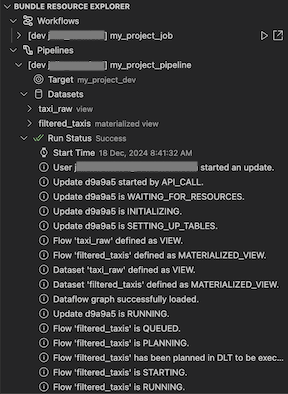
Deploy the bundle and run the resource

To view the running job, in the DABs Resource Explorer pane, expand My Notebook Job, click Run Status, and then click the links (Open link externally) icon.

Open job link externally

To switch to a different deployment target (for example, to switch from a dev target to a prod target), in the Configuration pane, click the target icon, and click the gear (Select a Databricks Asset Bundle target) icon. Then, in the Command Palette, select the desired deployment target.

Select a Databricks Asset Bundle target