Okta (レガシ) を使用してワークスペースレベルの SCIM プロビジョニングを構成する
このドキュメントは廃止されており、更新されない可能性があります。 ワークスペース レベルの SCIM プロビジョニングはレガシです。 Databricks では、アカウント レベルの SCIM プロビジョニングを使用することをお勧めします (「 SCIM を使用して ID プロバイダーからユーザーとグループを同期する」を参照してください)。
プレビュー
この機能は パブリック プレビュー段階です。
このセクションでは、Okta から Databricks ワークスペースへの直接プロビジョニングを設定する方法について説明します。
Databricks で API トークンと SCIM URL を取得する
- Databricksワークスペース管理者として、個人用アクセストークンを生成します。 「トークン管理」を参照してください。 個人用アクセストークンを安全な場所に保管してください。
この個人用アクセストークンを所有するユーザーは、Okta 内で管理してはなりません。 そうしないと、Okta からユーザーを削除すると SCIM 統合が中断されます。
-
Oktaの設定に必要な次のURLをメモしておきます。
https://<databricks-instance>/api/2.0/preview/scim/v2<databricks-instance>を Databricks デプロイのワークスペース URL に置き換えます。ワークスペース オブジェクトの識別子を取得するを参照してください。
このブラウザタブを開いたままにしてください。
Okta の Databricks SAML アプリケーションで SCIM プロビジョニングを構成する
-
[アプリケーション ] に移動し、[ Databricks ] をクリックします。
-
[プロビジョニング] をクリックします。上記のセクションで取得した次の情報を入力します。
- プロビジョニング ベース URL: プロビジョニング エンドポイント
- リモートAPIトークン: 個人用アクセストークン
-
「Test API Credentials」をクリックします 。
-
[プロビジョニング] タブを再読み込みします。API 資格情報のテストが成功すると、追加の設定が表示されます。
-
Oktaの変更をDatabricksにプッシュするときの動作を構成するには、[ To App(アプリへ )]をクリックします。
- [全般] で、[ 編集 ] をクリックします。必要な機能を有効にします。 Databricks では、少なくとも [ユーザーの作成 ] を有効にすることをお勧めします。
- [Databricks 属性マッピング] で、Databricks 属性マッピングを確認します。これらのマッピングは、上記で有効にしたオプションによって異なります。 必要に応じてマッピングを追加および編集できます。 Oktaドキュメントの 「プロビジョニング」ページで「アプリケーション属性のマッピング 」を参照してください。
-
Databricks の変更を Okta にプッシュするときの動作を構成するには、[ Okta へ ] をクリックします。 デフォルト設定は、 Databricks プロビジョニングに適しています。 デフォルト設定と属性マッピングを更新する場合は、Okta ドキュメントの 「プロビジョニングとプロビジョニング解除 」を参照してください。
統合をテストする
構成をテストするには、Okta を使用してユーザーを Databricks ワークスペースに招待します。
- Oktaで、[ アプリケーション ]に移動し、[ Databricks ]をクリックします。
- 「 割り当て 」タブをクリックし、「 ユーザーに割り当てる」 をクリックします。
- Oktaユーザーを検索し、[ Assign(割り当て)] をクリックします。
- ユーザーの詳細を確認します。 「完了」 をクリックします。
- Databricks ワークスペースの管理者設定ページで、[ ID とアクセス ] タブをクリックし、[ ユーザー ] セクションに移動して、ユーザーが追加されたことを確認します。 少なくとも、ユーザーにワークスペースのエンタイトルメントを付与します。
この簡単なテストの後、次のセクションで説明するように、一括操作を実行できます。
非アクティブ化されたユーザーをワークスペースから削除します
DatabricksOktaのワークスペースレベルの アプリケーションからユーザーを削除した場合、そのユーザーはDatabricksワークスペースで 非アクティブ化 されますが、ワークスペースからは削除されません。非アクティブ化されたユーザーには、 workspace-access または databricks-sql-access の資格がありません。 非アクティブ化されたユーザーの再アクティブ化は、Okta でユーザーを再度追加するか、Databricks SCIM API を直接使用することで元に戻すことができます。 Databricks ワークスペースからユーザーを削除することは、混乱を招き、元に戻すことはできません。
Okta SCIM プロビジョニングアプリを構成した管理者を非アクティブ化しないでください。 そうしないと、SCIM 統合は Databricks に対して認証できません。
Databricks ワークスペースからユーザーを削除するには:
- 管理者設定ページで、[ ユーザー ]タブに移動します。
- ユーザーの行の末尾にある [x ] をクリックします。
ユーザーを削除すると、次の結果が発生することに注意してください。
- ユーザーによって生成されたトークンを使うアプリケーションまたはスクリプトはDatabricks APIにアクセスできなくなります。
- ユーザーが所有するジョブは失敗します。
- ユーザーが所有するクラスターは停止します。
- そのユーザーがインストールしたライブラリは無効であるため、再インストールする必要があります。
- ユーザーによって作成された、[所有者として実行] 資格情報を使用して共有されているクエリーまたはダッシュボードは、共有が失敗しないように新しい所有者に割り当てる必要があります。
Oktaを使用して、ワークスペースの管理者、権限、IAMロールを管理する
は、OktaのワークスペースレベルのDatabricks アプリケーションからのワークスペース管理者、IAM ロール、およびワークスペースのエンタイトルメントの割り当てをサポートしています。Databricksロールとエンタイトルメントの割り当ては、Okta のアカウントレベルの Databricks アプリケーションからはサポートされていません。 Oktaから IAMロールとワークスペースのエンタイトルメントを割り当てる場合は、Oktaでそのワークスペースにワークスペースレベルの Databricks アプリケーションを作成する必要があります。
Databricks では、代わりにOktaのアカウントレベルの Databricks アプリケーションを使用して、ユーザー、サービスプリンシパル、およびグループをアカウントレベルにプロビジョニングすることをお勧めします。 ID フェデレーション を使用してユーザーとグループをワークスペースに割り当て、 内でその権限とロールIAM Databricks管理します。
同期ワークスペースの管理者
Databricks では、Okta のワークスペース レベルの Databricks アプリケーションからのワークスペース管理者ロールの割り当てがサポートされています。 ワークスペース管理者は、Databricks admins グループのメンバーです。 Databricks グループは自動的にOktaにプッシュされます。 Oktaで新しい管理者ユーザーを追加するには、そのユーザーを admins グループに追加します。
Okta SCIM プロビジョニングアプリを構成した管理者を削除したり、adminsグループから削除したりしないでください。 そうしないと、SCIM 統合は Databricks に対して認証できません。
Okta からワークスペースのエンタイトルメントを割り当てる
Databricks は、Okta のワークスペース レベルの Databricks アプリケーションからの権利の割り当てをサポートしています。 ただし、ほとんどの場合、Databricks では Databricks 内からエンタイトルメントを管理することをお勧めします。 Databricks 内では、権利を簡単に割り当てたり取り消したりできます。 Oktaでのマッピングの構成は複雑であり、エンタイトルメントごとに2つのマッピングを構成する必要があります。
このセクションでは、Oktaユーザーに databricks-sql-access 権限を付与するようにマッピングを構成する方法について説明します。
デフォルトでは、Databricks ユーザーは workspace-access と databricks-sql-access のエンタイトルメントを継承します。デフォルトでは、Databricks 管理者ユーザーは create-cluster エンタイトルメントを継承します。Oktaから継承されたこれらの権限を割り当てる必要はありません。
ユーザーから継承された権限を取り消すには、グループからユーザーを削除するか、グループから権限を削除します。 エンタイトルメントを削除するには、Databricks 管理コンソールを使用する必要があります。
databricks-sql-accessエンタイトルメントを割り当てるには:
-
Okta管理コンソールで、[ Directory (ディレクトリ)]> [Profile Editor (プロファイルエディター )]に移動します。
-
Oktaユーザープロファイルの [Profile(プロファイル )]編集ボタンをクリックします。
-
「+ 属性を追加 」ボタンをクリックして、ロールを追加します。
-
「属性を追加」ダイアログで、「 表示名 」を「
Databricks SQL」に、「 変数名 」を「databricks_sql」に設定します。
Okta変数にハイフン(-)文字を含めることはできません。
-
プロファイル エディターに戻り、Databricks プロビジョニング アプリのユーザー プロファイルの [プロファイル 編集] ボタンをクリックします。
-
「+ 属性を追加 」ボタンをクリックして、ロールを追加します。
-
「属性の追加」ダイアログで、ロール属性に次の値を指定します。
- 表示名 :
Databricks SQL - 変数名 :
databricks_sql entitlements.^[type=='$TYPE'].value形式の外部名 .$TYPEは、エンタイトルメントの API 名 で、ダッシュ (-) は除かれています。 たとえば、databricks-sql-accessの外部名はentitlements.^[type=='databrickssqlaccess'].valueです。
- 表示名 :
「外部名」形式では、アポストロフィ文字 (') を使用する必要があります。 カーリークォート文字(')を使用すると、 Request is unparseable エラーが発生します。
- 外部名前空間 :
urn:ietf:params:scim:schemas:core:2.0:User.
 8. プロファイル エディターに戻り、Databricks プロビジョニング アプリのユーザー プロファイルの [マッピング ] 編集ボタンをクリックします。
-
DatabricksをOktaに するには、Databricks列の
appuser.databricks_sqlをOkta列のdatabricks_sqlにマップします。 -
Okta から Databricks に するには、Databricks 列の
user.databricks_sqlを Okta 列のdatabricks_sqlにマップします。 -
「 マッピングの保存」 をクリックします。
-
ユーザーに権限値を追加するには、「 ディレクトリ」>「ユーザー 」に移動し、ユーザーを選択して、ユーザーページの 「プロファイル 」タブに移動します。
「編集 」ボタンをクリックします。エンタイトルメントのフィールドに、エンタイトルメントの API 参照名をダッシュなしで入力します (例:
databrickssqlaccess)。 ユーザーをアプリに割り当てると、入力した値がロールに入力されます。
この手順を繰り返して、追加の権限を割り当てます。
OktaからIAMロールを割り当てる
Okta からユーザーに IAMロールを割り当てるには、Okta ユーザー プロファイルと Okta Databricks プロビジョニング アプリ プロファイルで複数値属性を作成し、これらの属性を Databricks SCIM APIの属性にマッピングする必要があります。 たとえば、ユーザーに2つの IAMロールを割り当てる場合は、 Databricks プロビジョニングアプリで2つの属性を作成し、それぞれに1つのOktaユーザー属性をマッピングする必要があります。
Databricks では、 IAMロールの割り当てを Databricks内から管理することをお勧めします。 Databricksでは、IAMロールを簡単に割り当てたり取り消したりできます。Oktaでのマッピングの構成は複雑であり、IAMロールごとに個別のマッピングを構成する必要があります。
次の手順では、 primary_role 属性を割り当てます。
-
Okta管理コンソールで、[ Directory (ディレクトリ)]> [Profile Editor (プロファイルエディター )]に移動します。
-
Oktaユーザープロファイルの [Profile(プロファイル )]編集ボタンをクリックします。
-
「+ 属性を追加 」ボタンをクリックして、ロールを追加します。
-
属性の追加ダイアログで、 表示名 を
Primary roleに、 変数名をprimary_roleに設定します。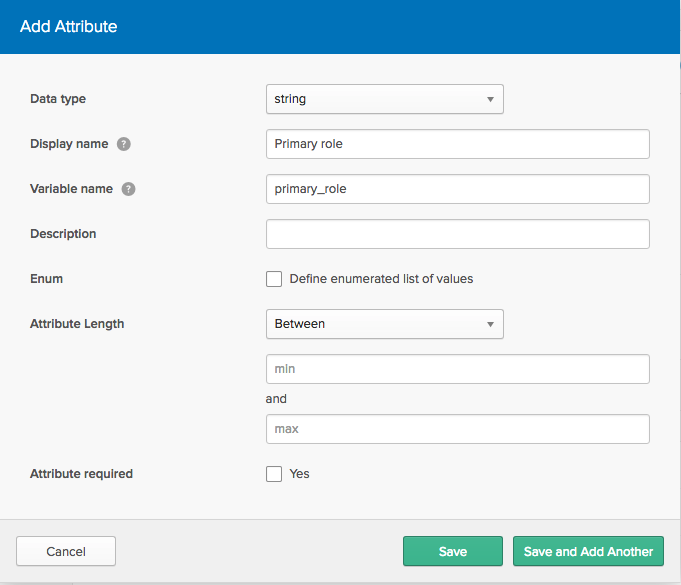
-
プロファイル エディターに戻り、Databricks プロビジョニング アプリのユーザー プロファイルの [プロファイル 編集] ボタンをクリックします。
-
「+ 属性を追加 」ボタンをクリックして、ロールを追加します。
-
「属性の追加」ダイアログで、ロール属性に次の値を指定します。
表示名 :
Primary role変数名 :
primary_roleroles.^[type=='$TYPE'].value形式の外部名 。ここで、$TYPEはロールを説明する文字列です。この場合、$TYPEprimaryされた場合、外部名はroles.^[type=='primary'].valueになります。
「外部名」形式では、アポストロフィ文字 (') を使用する必要があります。 カーリークォート文字(')を使用すると、 Request is unparseable エラーが発生します。
外部名前空間 : urn:ietf:params:scim:schemas:core:2.0:User.
8. プロファイル エディターに戻り、Databricks プロビジョニング アプリのユーザー プロファイルの [マッピング ] 編集ボタンをクリックします。
-
DatabricksをOktaに するには、Databricks列の
appuser.primary_roleをOkta列のprimary_roleにマップします。 -
Okta から Databricks に するには、Databricks 列の
user.primary_roleを Okta 列のprimary_roleにマップします。 -
「 マッピングの保存」 をクリックします。
-
ロール属性値をユーザーに追加するには、「 ディレクトリ」>「People 」に移動し、ユーザーを選択して、ユーザーページの 「プロファイル 」タブに移動します。
「編集 」ボタンをクリックして、ユーザーの「プライマリ・ロール」の値を入力します。ユーザーをアプリに割り当てると、入力した値がロールに入力されます。
この手順を繰り返して、追加のロールを割り当てます。